
Chris.ac
Moderators
-
Joined
-
Last visited
Everything posted by Chris.ac
-
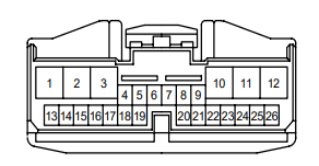
Voodoo101, on my GGH20W, so far I believe this is the wiring for the main power socket (lots of measurements and scratching about on japanese forums) PIN Colour Name 1 Yellow +B1 2 Grey ACC1 3 Red (B?) IG 4 B MACC Microphone 5 W MIN+ Microphone 6 R MIN- Microphone 7 Shield (WB) SGND Microphone 8 - TEST 9 - 10 Brown GND1 11 not used not used 12 Green illumination? 13 Red ? 14 Green ? 15 Yellow Security signal 16 Red (LG) Reverse signal 17 Blue Park Brake signal (Short to 10) 18 Black (W) Speed signal (add SW) 19 not used not used 20 Brown (W-B) SNS2 Microphone 21 Black CANH TRC VSC 22 White CANL TRC VSC 23 Green SWG Steering cont 24 Blue SW2 Steering cont 25 LightGreen SW1 Steering cont 26 not used not used
-
The 20series are all ULEZ compliant, they are also compliant in Birmingham and Bath (They are actually better than EURO IV spec)
-
All in, £100, for official Diagnostic tool software, and spare key. A specialist may be able to get you a spare key and program it, but you will be hard pressed to find for under £150
-
Techstream VCI cable and software: https://www.ebay.co.uk/itm/124808047632 Easy Virtual Machine setup of techstream if you have a semi modern laptop: https://forum.ih8mud.com/threads/how-to-techstream-in-5-minutes.1034923/
-
Blank key, ebay: https://www.ebay.co.uk/itm/255021256169
-
ANH20 series can be programmed via techstream software. You can buy a spare unprogrammed key with a blank metal key part on ebay, you could also buy techstream and the cable (connects via USB to a laptop running software) Techstream allows you to program keys, access the diagnostics and configure things like auto lights, windows via remote, the volume of buzzers etc.
-
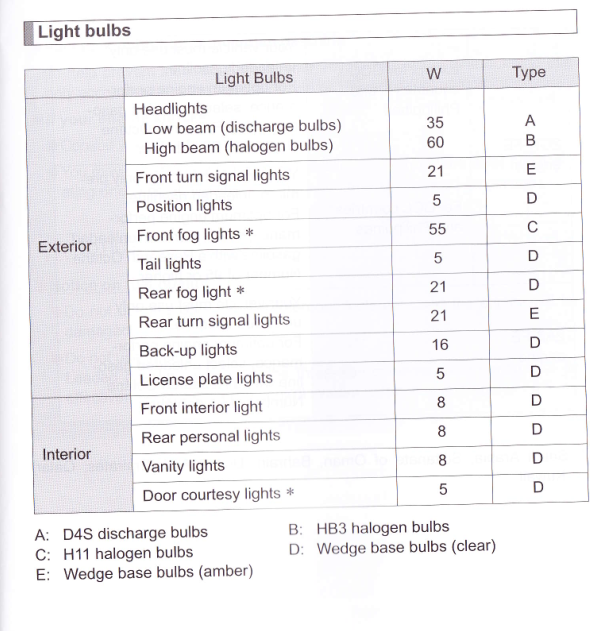
basically, all the sidelights, interior lights, number plate lights use the same capless bulbs, with the exception of the small boot illumination bulb, that looks like a fuse shaped bulb. These type https://www.amazon.co.uk/Autobulbs-Capless-Sidelight-Bulbs-Interior/dp/B009ZJUI90 I replaced all my 5W and 8W capless using LED ones, whiter light, and brighter. https://www.ebay.co.uk/itm/382904669684 Far far far cheaper than going to halfords or the like, 10 bulbs for under a tenner, I bought 20 and did all bulbs at once (including the ones above the Visors)
-
something like this? 6mm shaft, only 4cm diameter knob, so not too intrusive: https://www.amazon.co.uk/Xpork-Universal-Control-Adapter-Induction/dp/B08SJB2PMT Although something like this has a universal fit set of dowels, and may sit more flush on your stove: https://www.amazon.co.uk/SPARES2GO-Universal-Control-Switch-Cooker/dp/B00OHQ9NAQ
-
if you type dometic gas knob in to Amazon.co.uk, there are quite a few options, many have the D shaped hole for that pin.
-
There was a site I came across that will do a full health check on JDM hybrids, including disassembly of the cooling blower motors to clean out dust etc. I cannot find it at moment in my history - I did come across the attached document detailing disassembly for the 20 series hybrid: Hybrid Vehicle Dismantling Manual for ATH20 - Alphard HV.pdf What does the head unit in your car look like? some diagnostics are usually hidden in service menu (hold down top row left button and flick sidelights on and off 3 times with ignition on) techstream does have the hybrid as a selectable option, but I couldn't tell you its capability in that respect.
-
Clearly its down to individuals, because Timpson's in Exeter said they cannot cut the key unless its provided by them for 'reasons' (probably a juicy mark-up), where as my local key cutter took a look at the existing key and said sure, but I'd have to supply a blank. Timpson's In Kings Lynn, they seemed happy to do it, and were interested because they had already had a couple of people approach them to cut a key, but without blanks they had to turn them away. They said if the key didn't work, they'd refund, because it was the first one they tried of that type, and I gave them the details of where I bought my blank from. Key works fine.
-
yep
-
Toyota engine codes ending with -FE are safe to use E10. If you regularly drive the vehicle and allow the tank to get low, you should be fine. There is a minor performance hit which will reduce your MPG over E5 fuel, so the cost difference starts to become negligable. If you can afford the slightly more expensive E5, keep using that, I think the main issue is if you keep swapping back and forth, as the ECU needs to relearn trim levels and feed rates, which means each time you change fuel type you will get lower MPG for a portion of the tank while it relearns.
-
cost I think £12, at one of those booths attached to Sainsbury's. edit
-
Here's a datasheet on the anti-corrosion measures in place on 2008 onwards: m_bo_0012.pdf
-
Ahh, so this may be a minor strength of the techstream software then, as I am certain I have seen these as options.
-
Link here to a russian mirror of the electronic workshop manual: http://zatonevkredit.ru/repair_manuals/viewdoc/AWI4O_qhU9h2CeTmduUr If you funnel down through the Power Source / Network section, you can see the battery has a current sensor and temperature sensor. Attached circuit diagram, there is a lot of data here, diagnosis, circuit layouts, components, disassembly instructions etc.

-
Just for info, on a 20 series, the following data sheets show all the possible settings accessible via the canbus/obd port: m_be_0013.pdf PSD and PBD in the list stand for Power Side doors and Power back door
-
The 2nd gen do have an additional monitoring system attached to the battery terminal. I think this is in the workshop manual, too; I will try and confirm.
-
your previous 'cool' reading was probably down to the thermostat already being faulty, mine sits at just under the halfway mark, even on a several hundred mile commute.
-
look like standard cooker gas control valves, any old cooker knobs should fit, I just checked a portable 2 burner I have for camping, has the same looking pins.
-
thanks, different shape connectors, but maybe some commonality in places, will combine with what I have and do some meter reading when I get time.
-
ah, yes, now I understand.
-
I ordered this last year (price remains the same £55) https://www.ebay.co.uk/itm/255021256169 He does 3 (single sliding door!), 4 and 5 button (If you have electric opening boot) You may be able to find cheaper, but the key and at the time the VCI adaptor with techstream was under £100 Send a message to him to confirm compatibility with Alphard.
-
i was actually quite amused, when i played a DVD in the back, my children actually stopped using their mobiles for the duration! I didnt think it possible!


