


crazymac680
-
Posts
38 -
Joined
-
Last visited
-
Days Won
4
Content Type
Profiles
Forums
Store
Gallery
Events
Alphard Videos
Guides
Posts posted by crazymac680
-
-
Day 20
3 hours
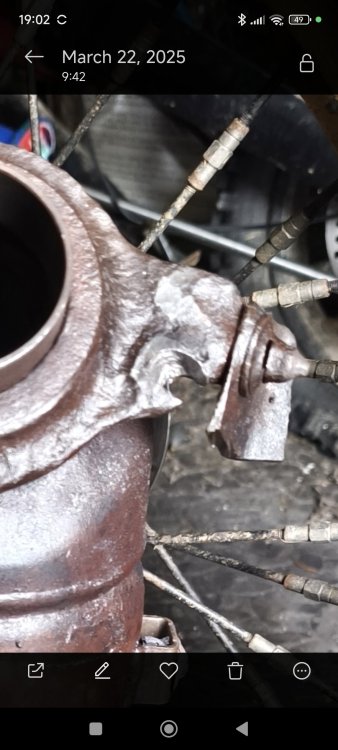
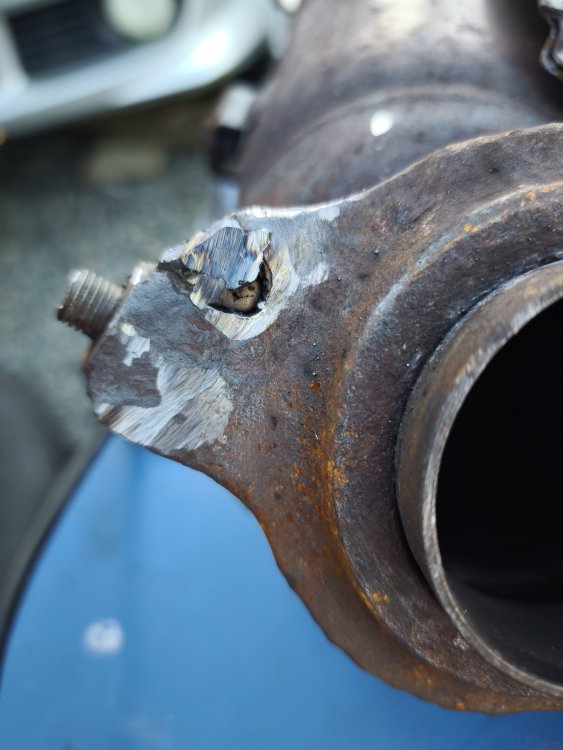
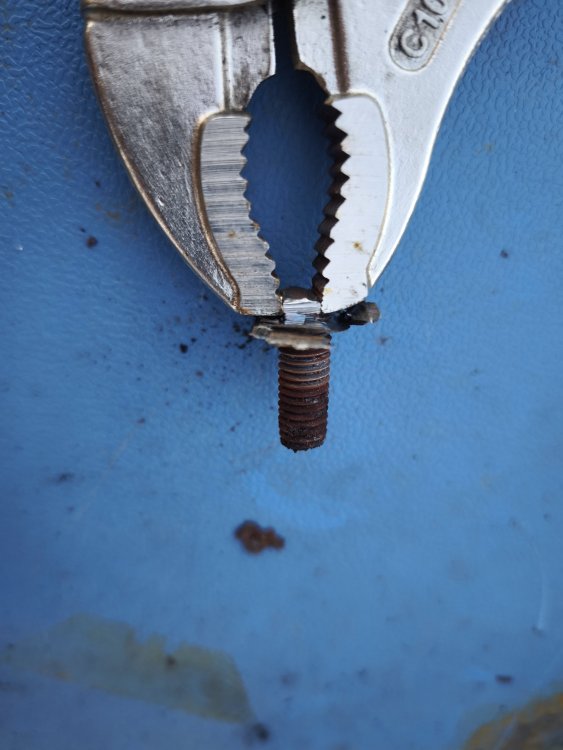
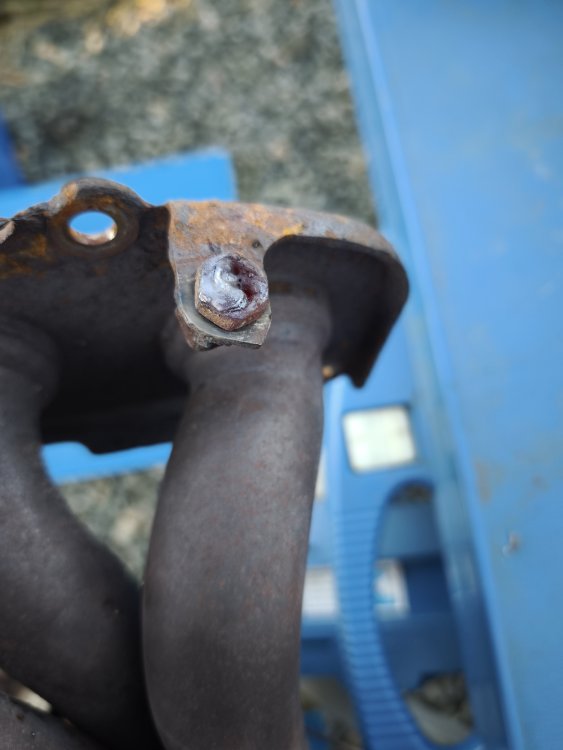
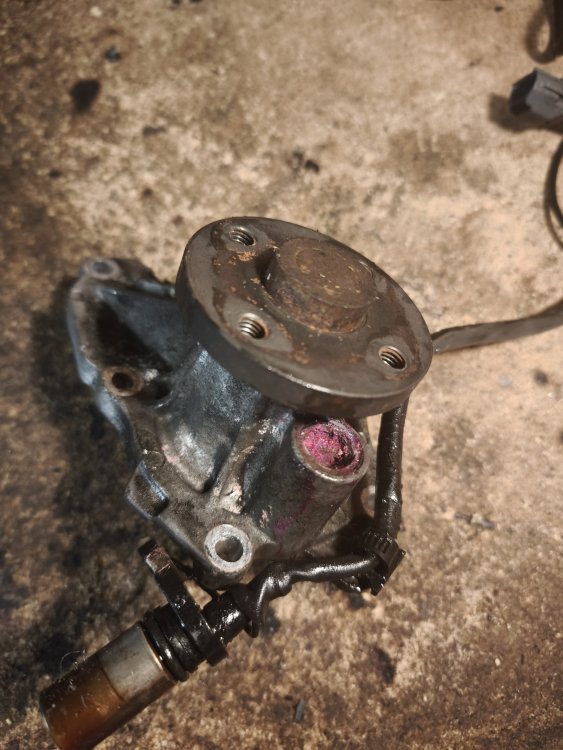
I'd decided to order a new exhaust manifold as I'd damaged a bolt hole on mine. It arrived today and it was the wrong one. It seems the 2005 2.4 is a different manifold from my 2002 2.4.
Mostly the same apart from a slightly different angle where it joins the exhaust and those two bolts are in a slightly different place.
So I was forced to repair my own.
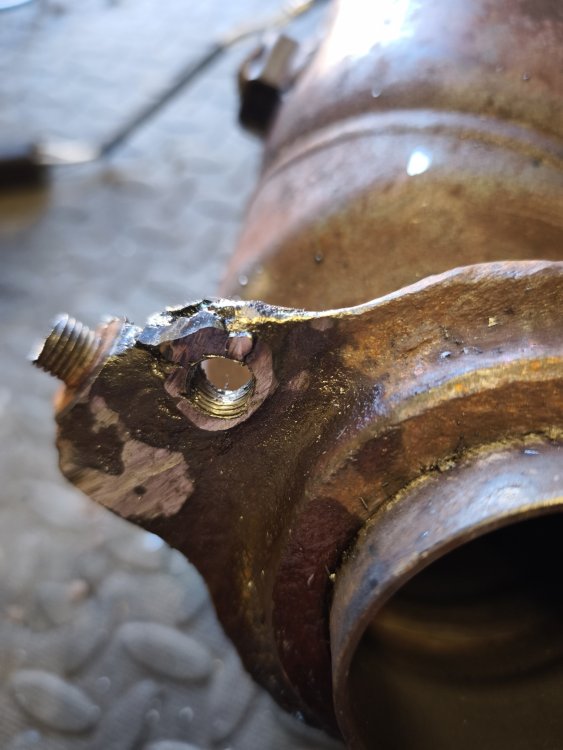
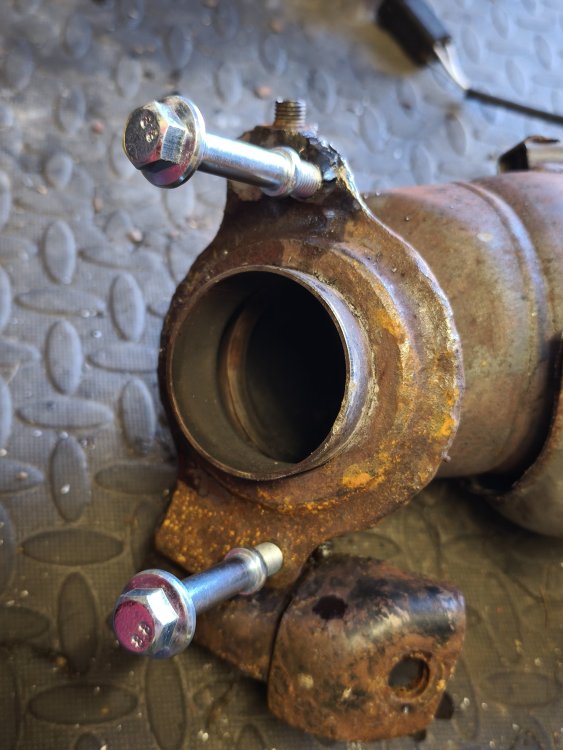
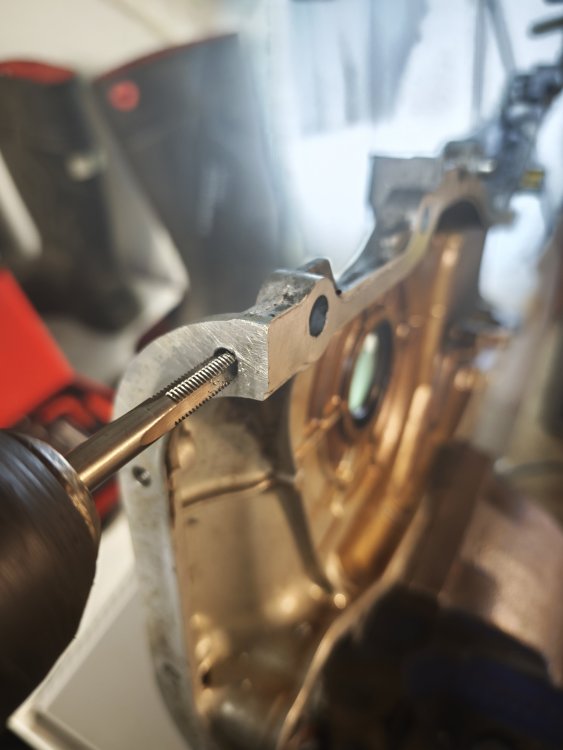
I filled the hole with weld. Then drilled and tapped a new thread. Actually went quite smoothly.
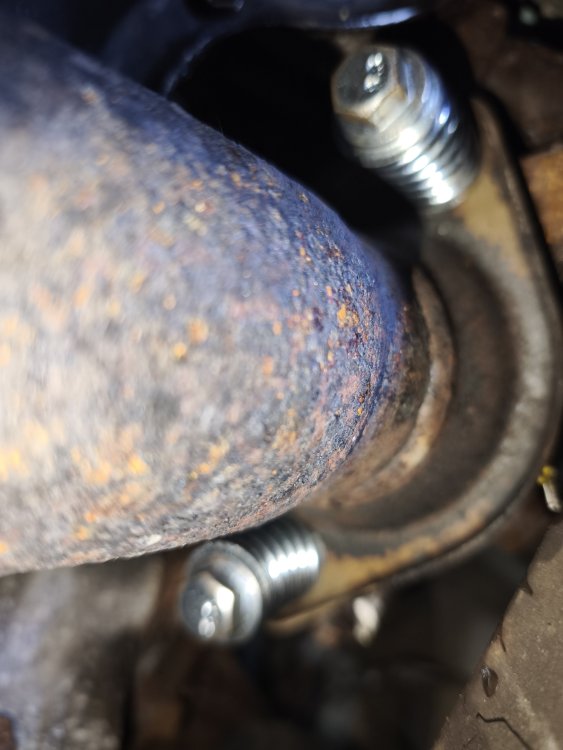
I then had to remove 3 cut off bolts from the heat shield. 2 removed and that will need to do🤣.
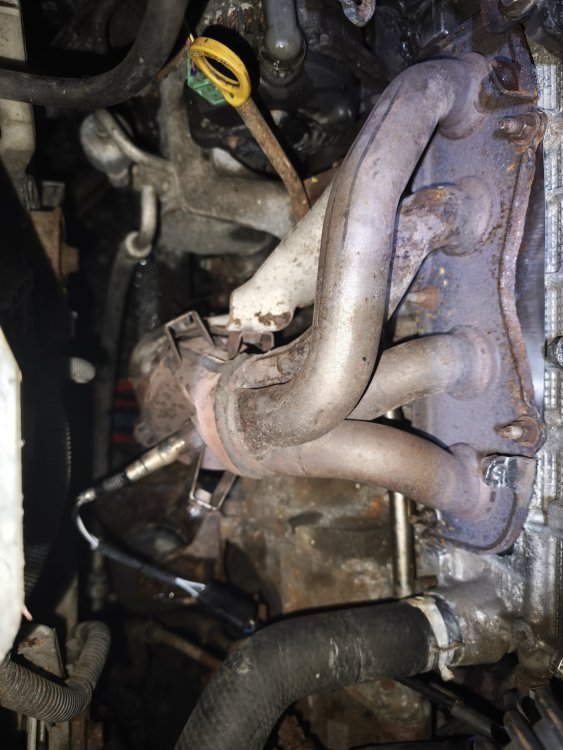
Installed the manifold
Filled with oil
Filled with water.
Installed battery.
I'd planned on turning over with the fuel pump disconnected but I was too lazy to find the fuse.
She started on 3 quick key turn. Hunted for about 5 seconds and then purred like a kitten.
Let it get to temperature and fans kick in. Kept checking the water.
Turned her off and checked all the levels half an hour later.
Took her for a spin and she is driving like she hasn't been off the road.
I'll add up the hours and my final thoughts in a couple of days🤣
-
 1
1
-
-
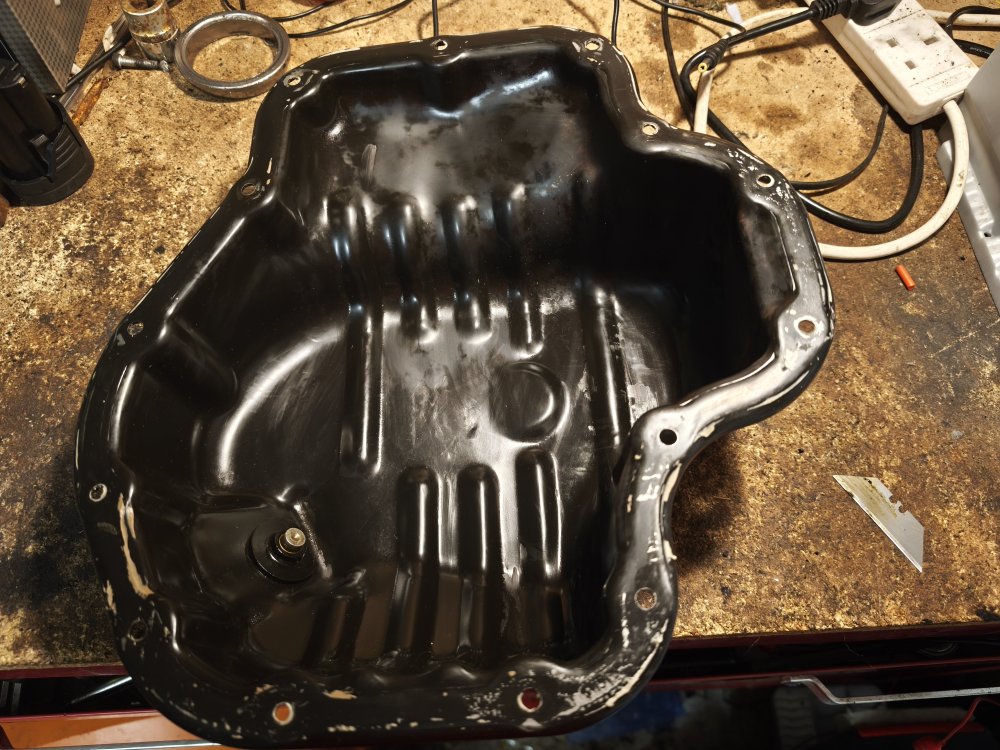
Day 19
1 hour.
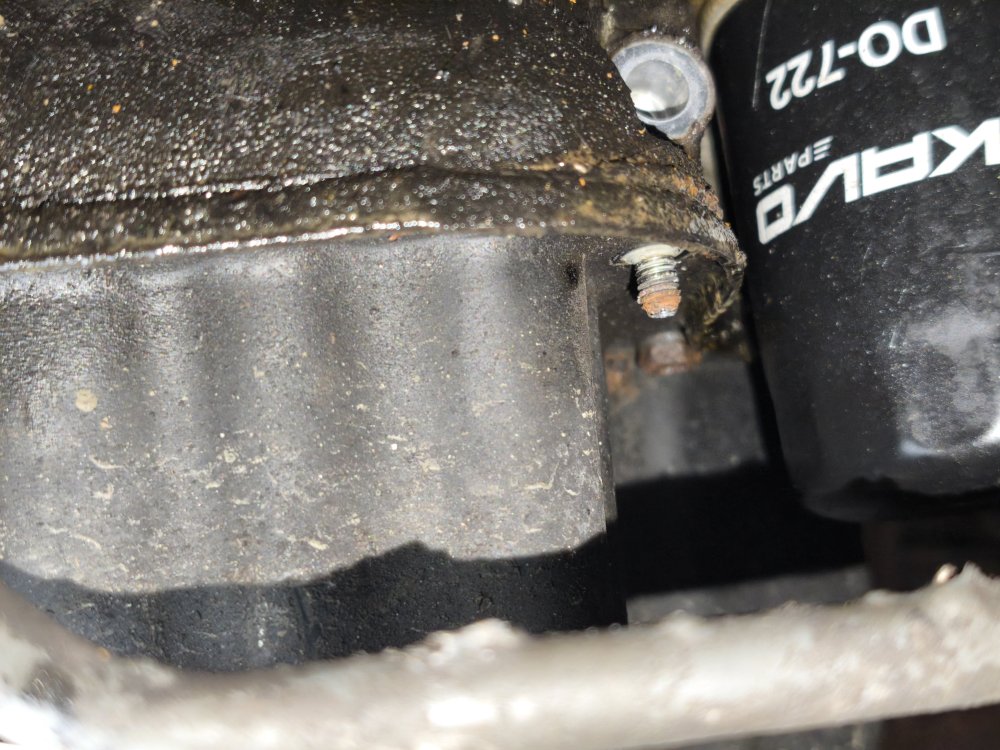
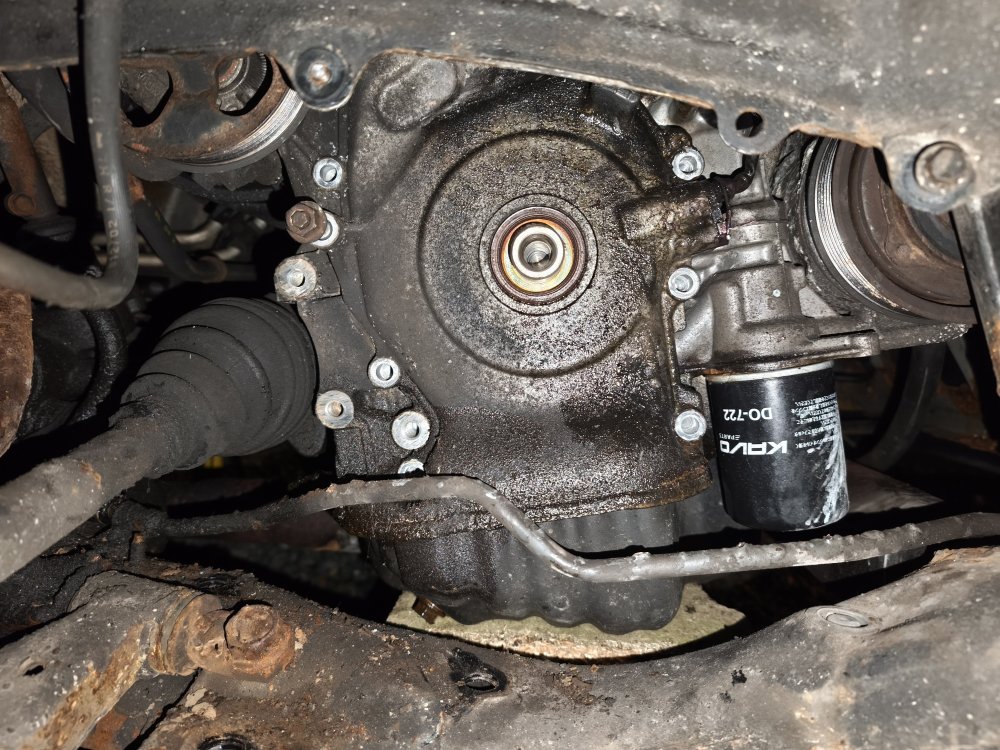
Cleaned up the sump and reinstalled.
Then installed a new oil filter.
If my new exhaust manifold comes tomorrow I might have her running.
-
1
-
-
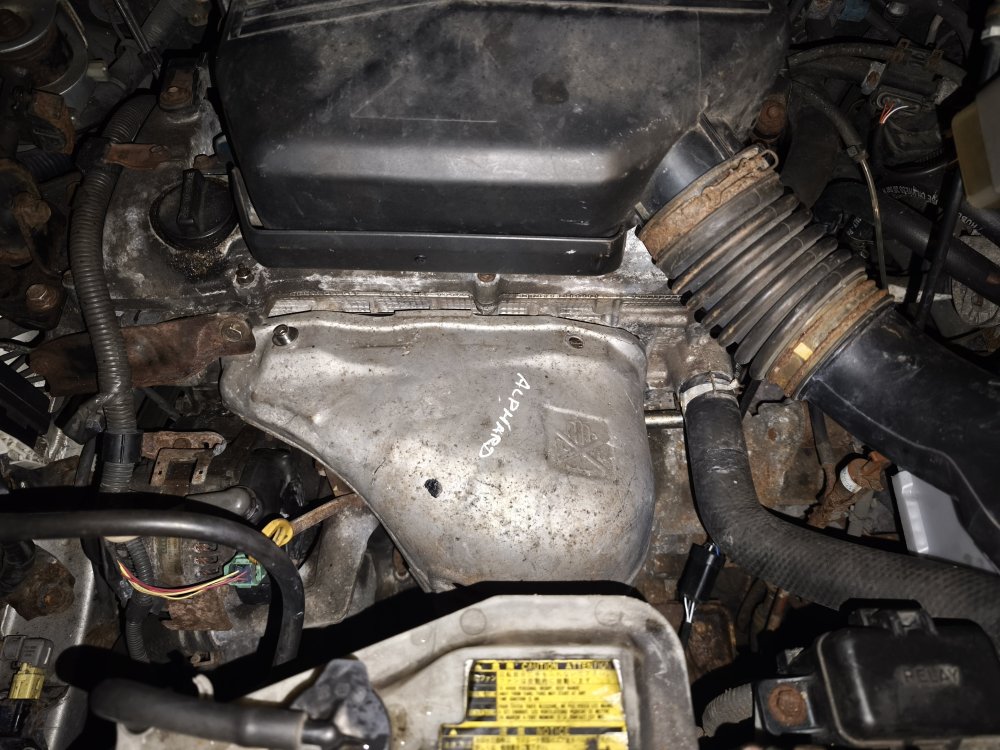
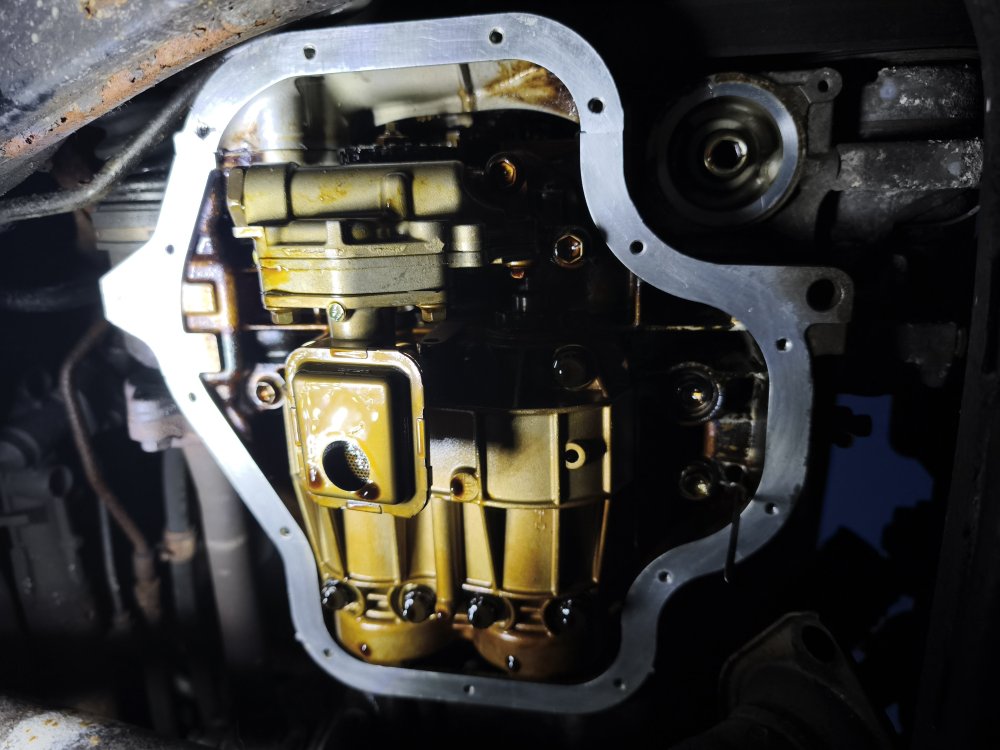
Day 18
1 more hour.
Managed to get the sump off.
Installed the air box.
Tomorrow I'll try and prepare the sump surfaces for reinstallation.
-
1 hour ago, Gamith said:
>change at 5 min or 1 month?
I am not an expert but personally I would:
1) Start by turning the engine over a few times, on a manual you could have it in gear, jack up a wheel and turn it but not sure how to approach that on an automatic.
2) As long as it turns freely start the engine and leave it to run for at least 10 mins until the oil is warm.
3) drain the oil and change the filter at that point - my guess is that whatever is likely to have been caught would have been caught by then.
4) obviously secure sump plug and refill with the proper oil
5) should be good to go - check for leaks would be the only advice, but I'm sure you would be doing that.
Yeah that sounds good to me. Get it up to temperature and then drain it.
My big worry is that timing chain cover leaking. It was so complicated reading how to apply the sealant. Taking that cover off again would probably have me calling it quits🤣
-
Day 18.
1 hour.
Just a quick bit of work today putting the drivers side engine mount and top mount on. Finally I can remove and seal my sump again. It needs sealed since I removed my timing chain cover.
Got 2 oil filters and enough oil for 2 changes. I plan to do a quick oil change to remove anything that made it's way into the engine during the work. Haven't decided how long I should leave it yet. Tell me if you have any good logical reasons to change at 5 min or 1 month?
-
2 hours ago, Monksey said:
Thank you for the reply.
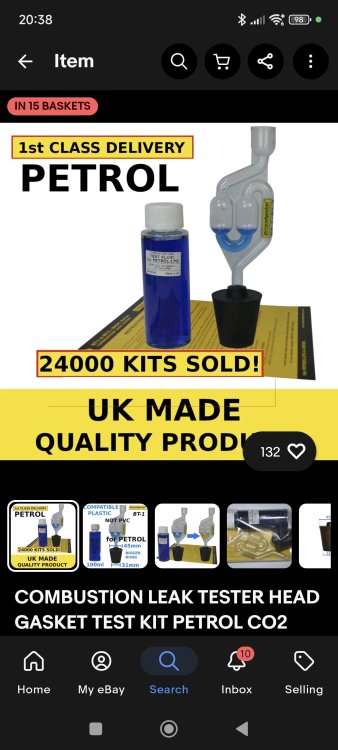
Had a look at my daughters 2.4 alphard, I think it is the head gasket blown but can't be certain, it doesn't over heat but does lose water with no obvious leaks , no frothing on oil cap but does appear to be blowing slightly white smoke out of the exhaust but no power loss .
A mechanic has told her to try some steel seal in it first , not really expecting great results but it does state guaranteed permanent repair or money back , I will let you know how it performs.
Keep up the good work you are doing brilliantly. 👍
Kind regards,
Bob.
Get a head gasket test kit from eBay. Steel seal got me about 500 miles before it started losing water again. At least it got me back home.
-
On 3/17/2025 at 12:08 AM, Monksey said:
Hi crazymac680 , brilliant job I must say unfortunately I am going to have to tackle the same job on my daughters alpha 2.4l 2006, I have worked on cars alot and feel confident on the job a bit concerned on the amount of siezed bolts you had to deal with on you job. I am just wondering if you have managed to get a workshop manual as I find it difficult to find one mainly for all the torque settings.
Kind regards,
Bob.
Morning!
Good luck with the job when you get going. I'll got a couple of workshop manuals. One is for the RAV 4 with the same engine. Thats nice and easy to read but not everything seems to be in it. I've also got a Japanese manual that has everything but is a bit harder to use.
http://fsm.japanclassic.ru/toyota/2002.5_7a037_alphard_anh1,mnh1/x339/index5.html
Open in google chrome so you can use google auto translate. You click the 2az link on the left. Then click the top link on the right in blue. Delete _base from the address and then hit enter. Google should then auto translate the whole page.
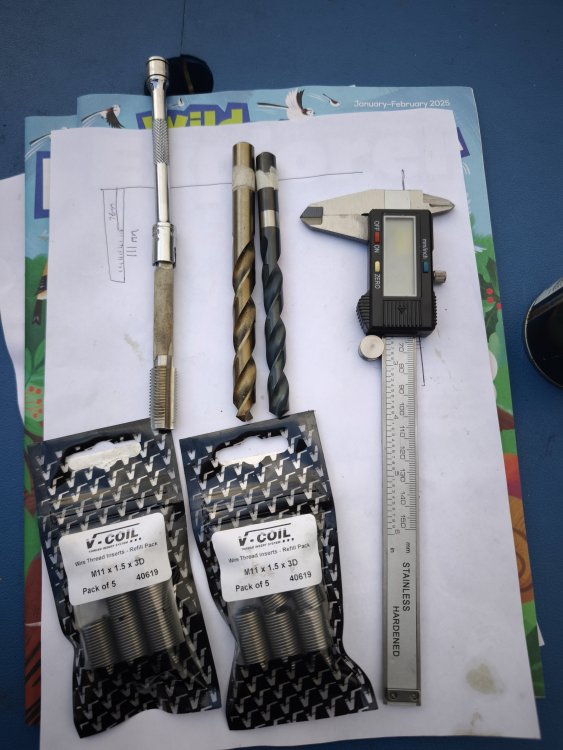
I spent quite a bit of time finding the right sized taps and drill bits. Much cheaper than buying a full kit. I'll give you a link to what I bought if you need it. Probably best to research it though as it would be easy to use the wrong size.
-
-
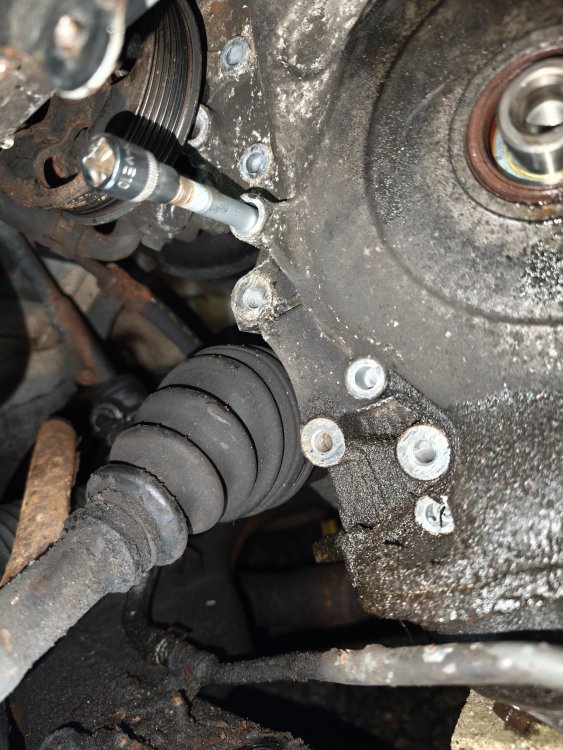
Day 18. 5 hours
This morning after 2 hours work I was in a online meeting and my boss told me I was on holiday🤣. I was delighted to get out and work on the car in daylight.
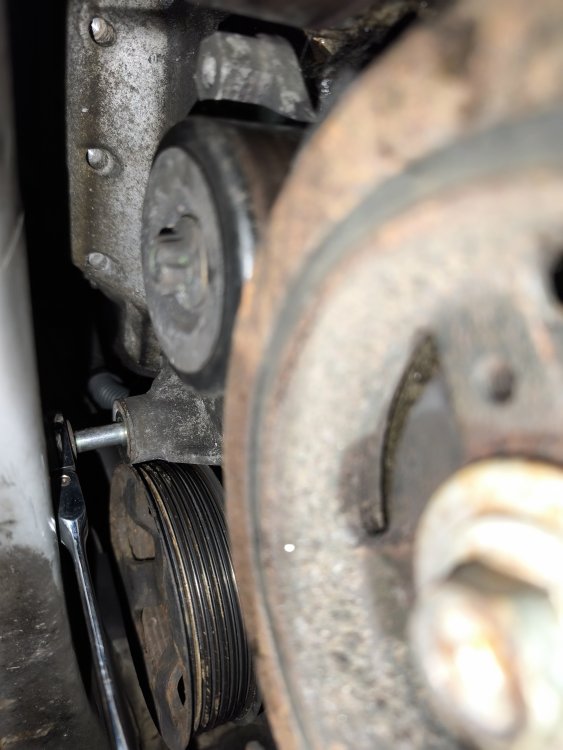
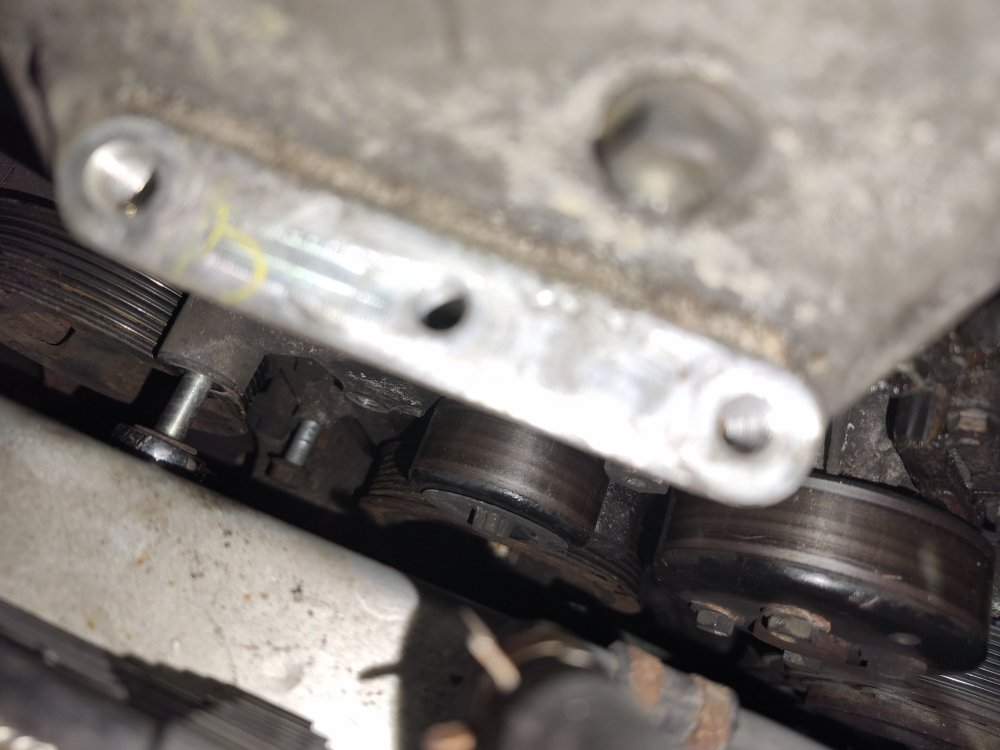
I started with the belt tensioner. It was a mix of jacking the engine up and down to get better access.
The manual tells you to put the E10 torx in first but I found it best to install the pulley then the tensioner to the pulley and finish with the E10 torx on the bottom of the pulley. I couldn't make it work following the manual.
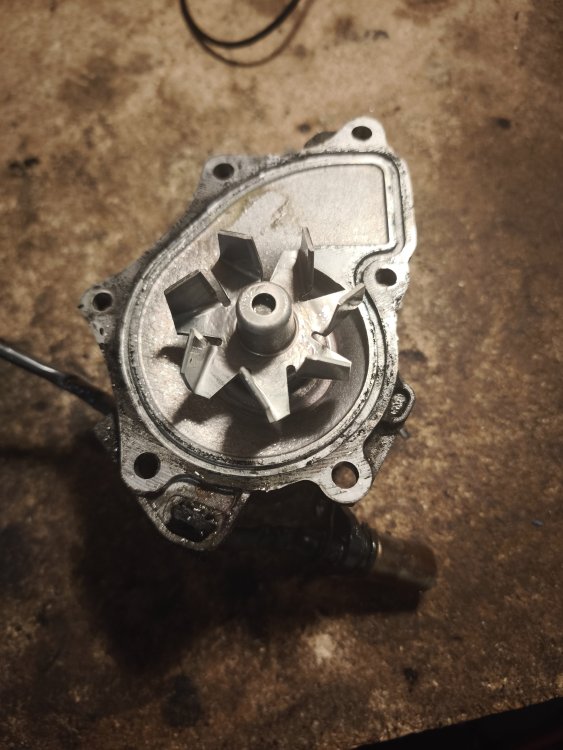
I then did the water pump which was faulty straight forward.
Alternator is a little tricky with the long bolt and hard to reach bolt underneath.
Power steering pump really stressed me out. Really tough to get it back in position it's mount was really tight. Made harder be my air box resting on it's pipes not allowing it to fully enter the mount. Eventually managed to lift my air box and get a bit more slack and got it closer to position. Then I had to squeeze the massive mounting bolts in. Top one is the worst. Even with the engine fully dropped into the subframe. The top bolt didn't clear the inside wheel arch. Had to give it a couple of love taps with the hammer. Then use a wobbly joint on the ratchet to tighten it up, through the pulley.
Fitting the was tough. I really struggled to pull the tensioner with my tool and then use my free hand to get the belt on the pulley. I ended up fitting the on all the pulleys and putting it on the alternator last as it was easiest to reach.
Air box went on ok. 5 bolts from the top. 2 from the bottom. The hard bolt is the one next to the throttle body. Mount the bolt to a long extension and socket and feed it in to the hole blind.
Rocker cover was nice and easy. Installed it with the new gasket.
New gaskets also installed on the air box and chain tensioner.
Think I forgot to talk about that.
I tried various tools to get the release switch on the tensioner but couldn't get it. Then seen a video saying it can be done by turning the engine anti clockwise. This worked.
Really tough day but finished feeling pretty good
Lpg rail and spark plugs next.
I don't see how a garage could make profit on this kind of work charging under £2000? It's a battle🤣
-
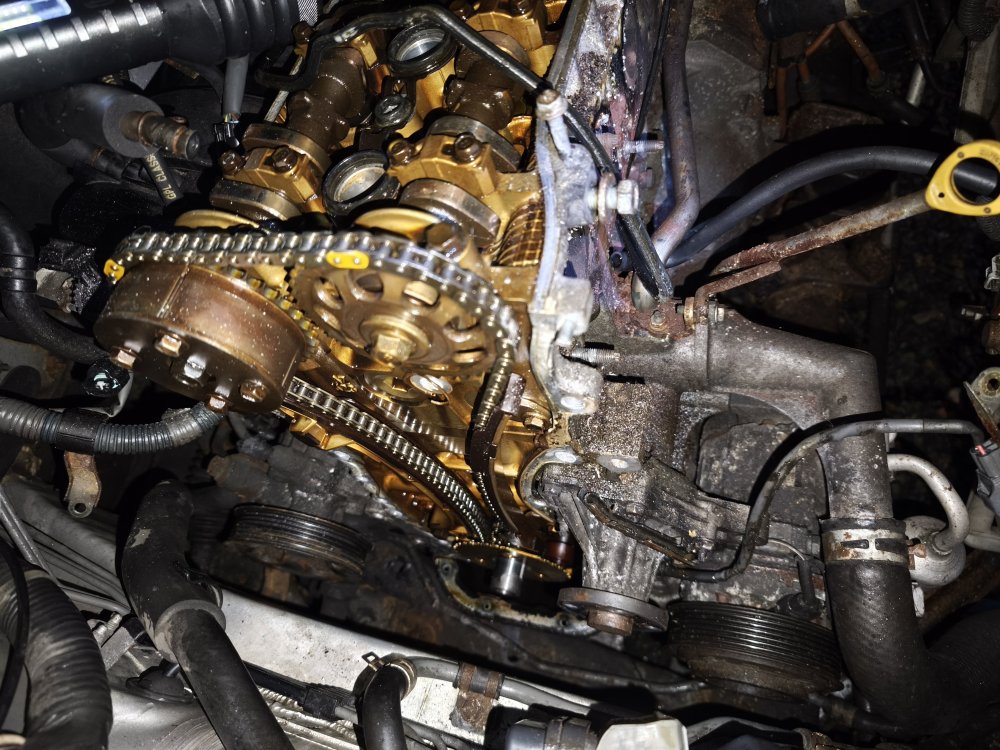
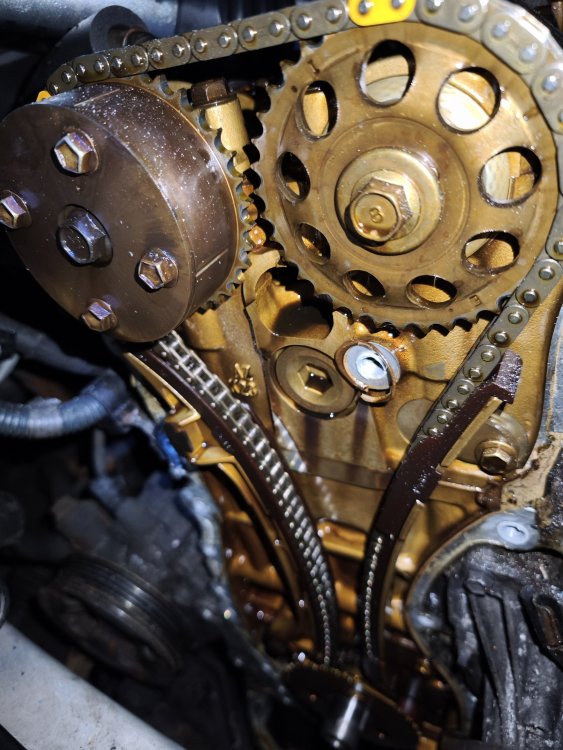
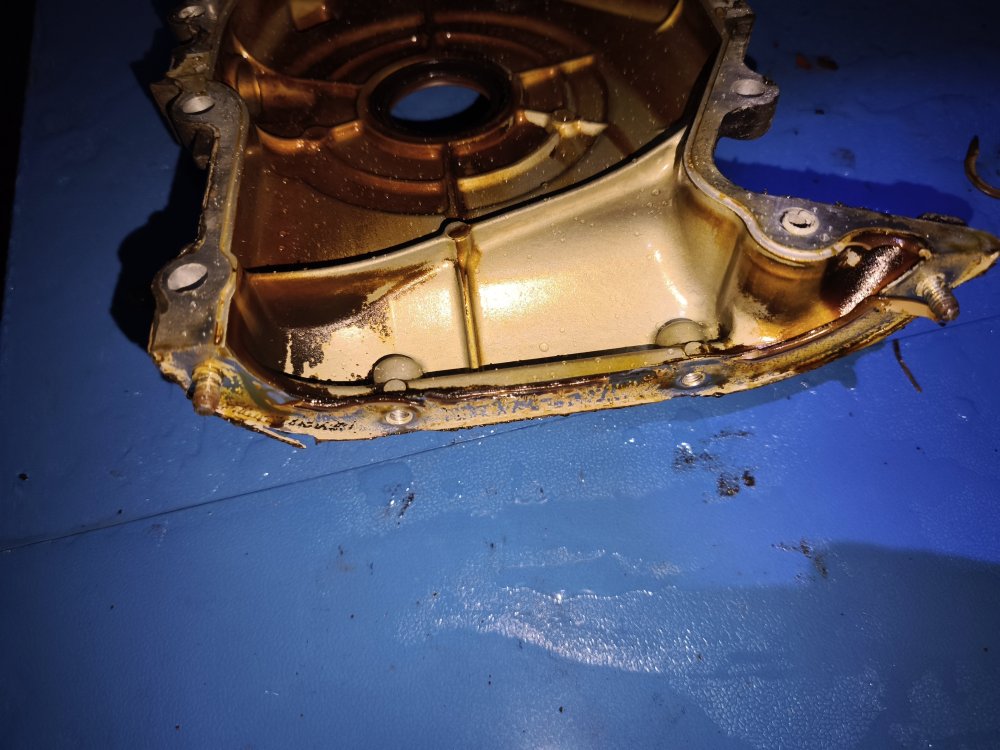
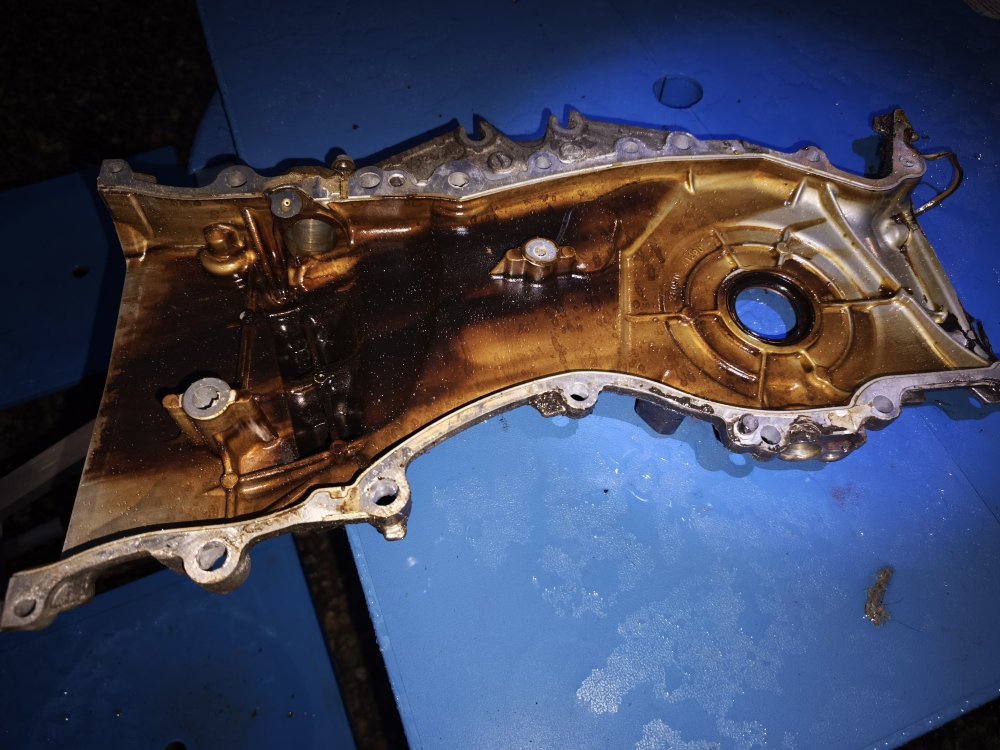
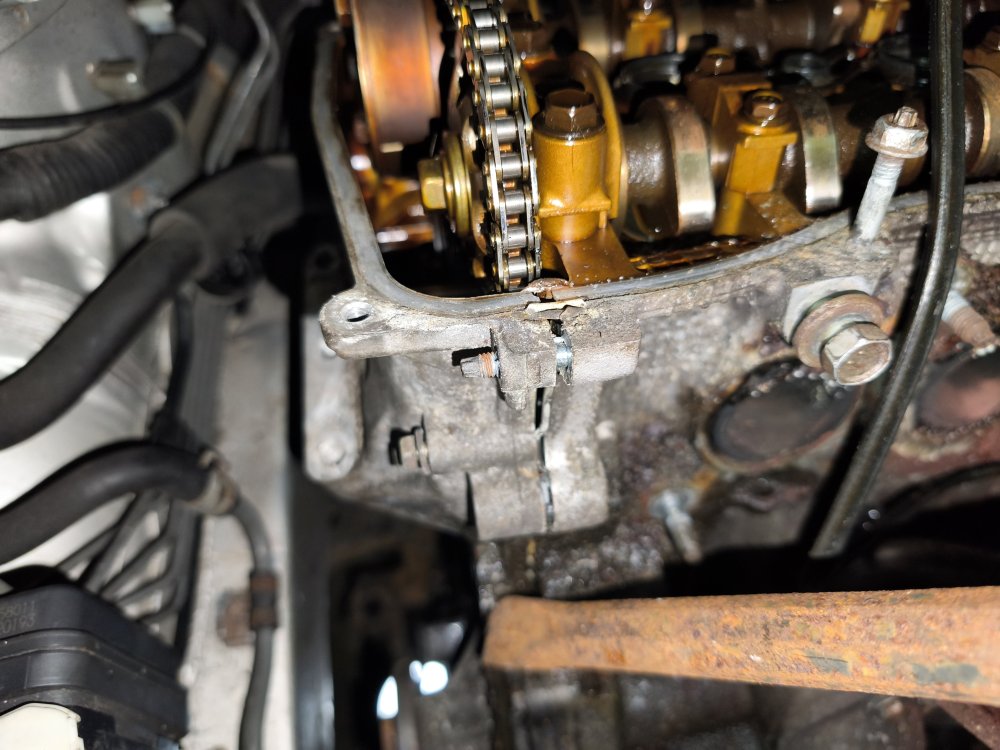
Day 17
2 Hours
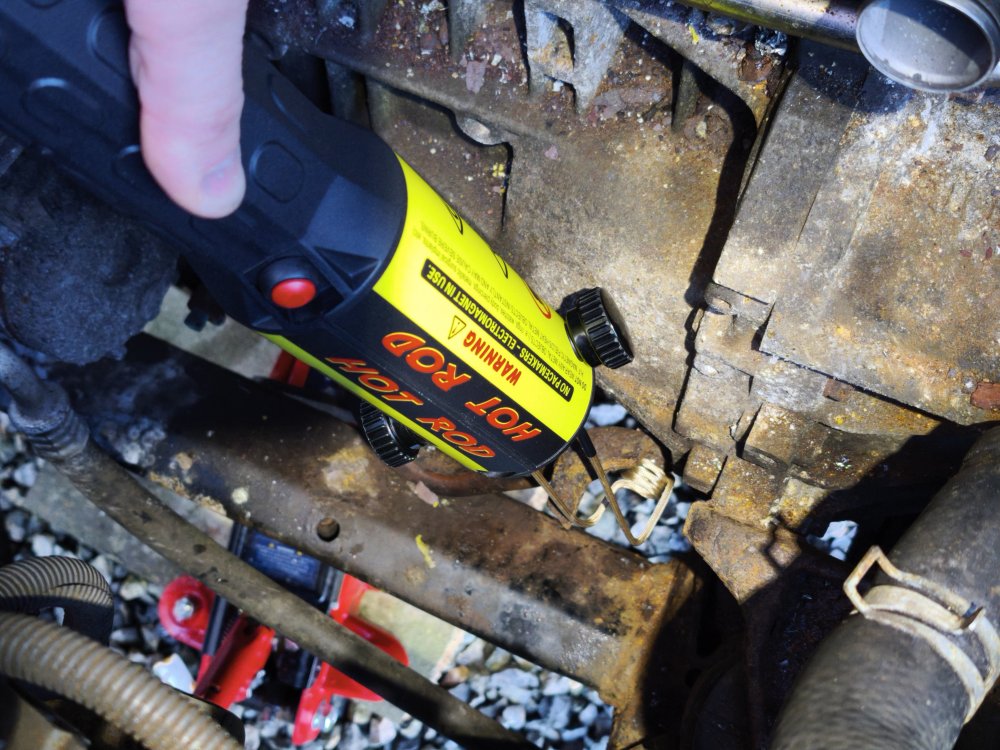
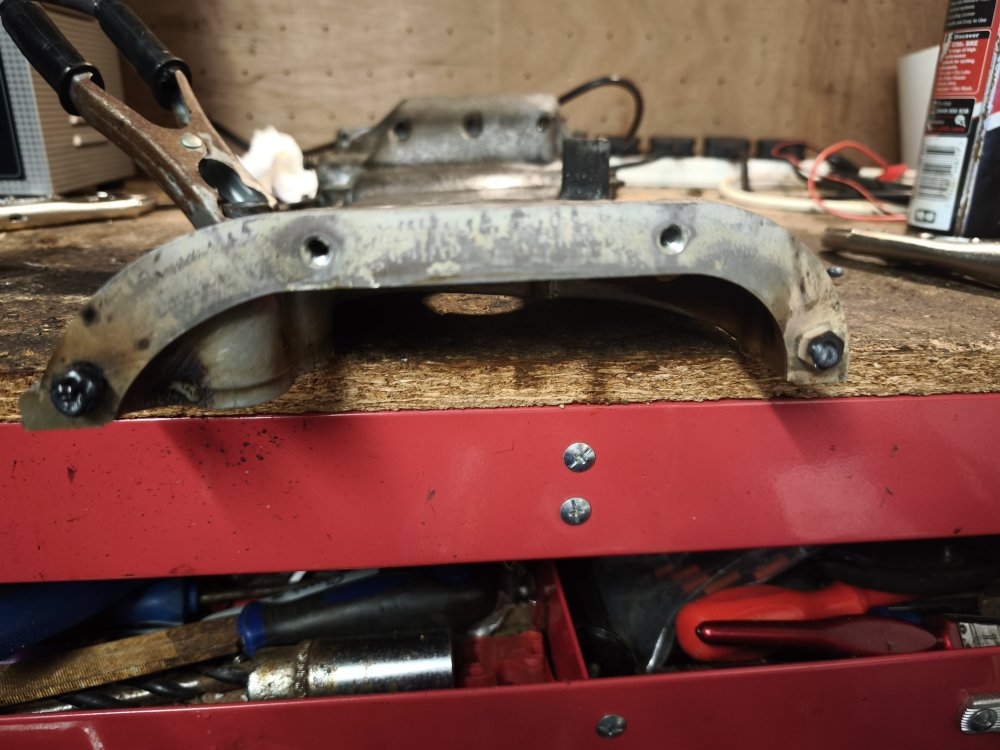
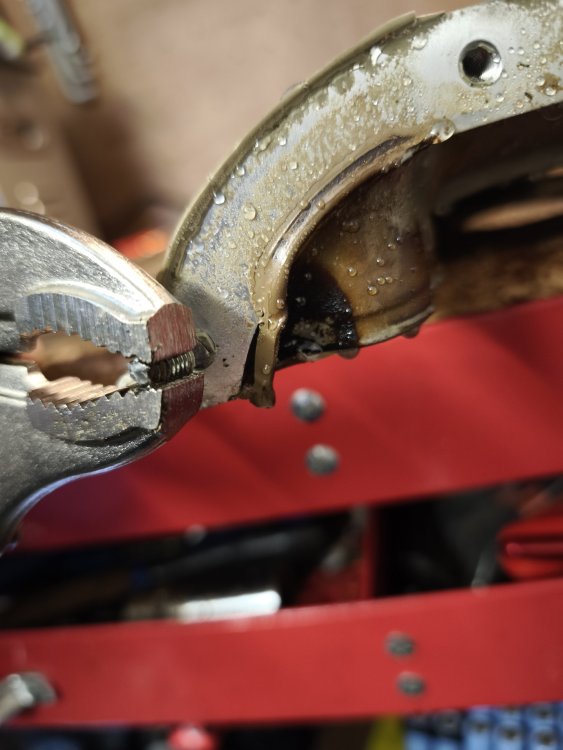
Felt like big progress today. I've been dreading using silicon gasket but think it went pretty well. Started the day with a failed attempt to remove the exhaust bracket bolt with my new induction heating tool. Looks like I'll need to weld the bracket back together.
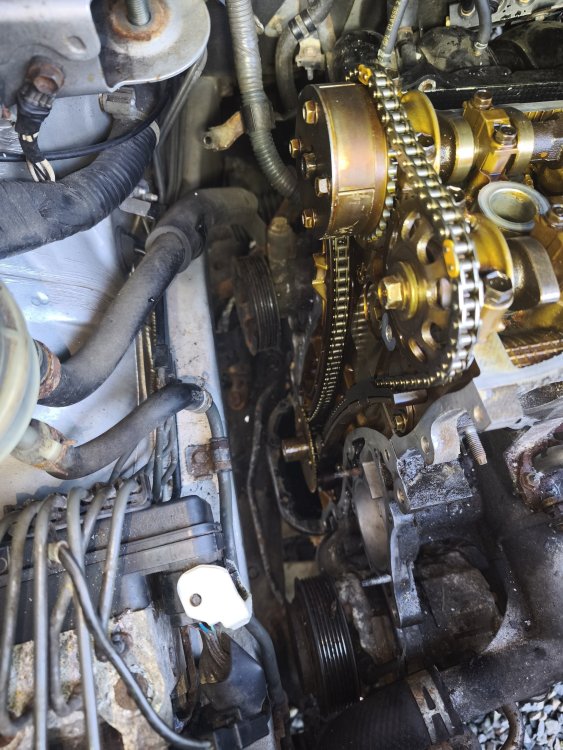
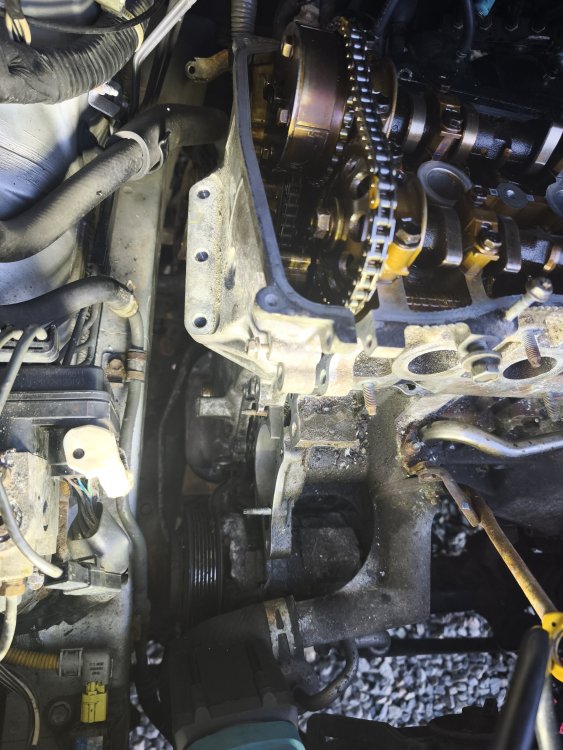
I needed to jack the engine up quite high to get the timing chain cover above the power steering pipe. I did a few test runs to make sure I could get the cover onto the engine without ruining the gasket. I installed the water pump first but then removed it as I needed the extra space.
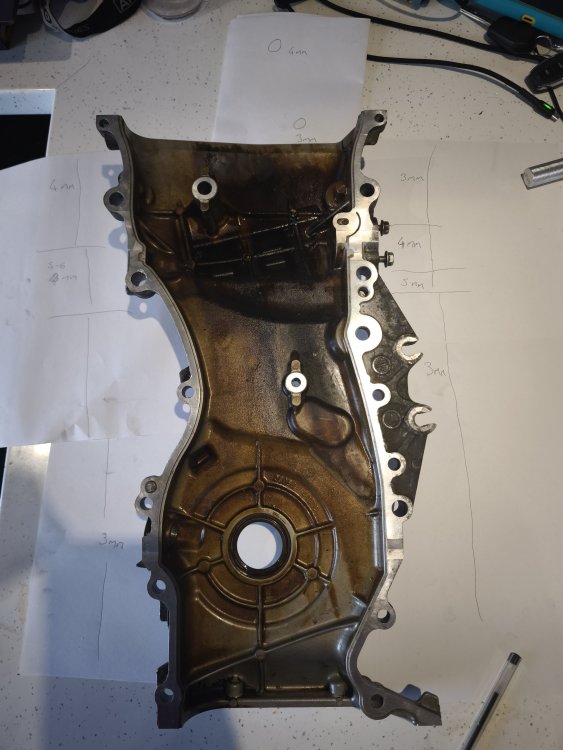
It says to install the cover 3 min after applying the sealant. It took a bit of study and preparation to get my head around all the different sealant widths.
Cover on and all bolts torqued to spec. Timing chain tensioner and water pump next I think.
.thumb.png.8236cf36ff6a1cdc8f042b175cb316bd.png)
.thumb.png.21575d8757338bd3d3ea1fc587453f15.png)
.thumb.png.1e3657dbf544a2332d1654eba2b6f12b.png)
-
1
-
 1
1
-
-
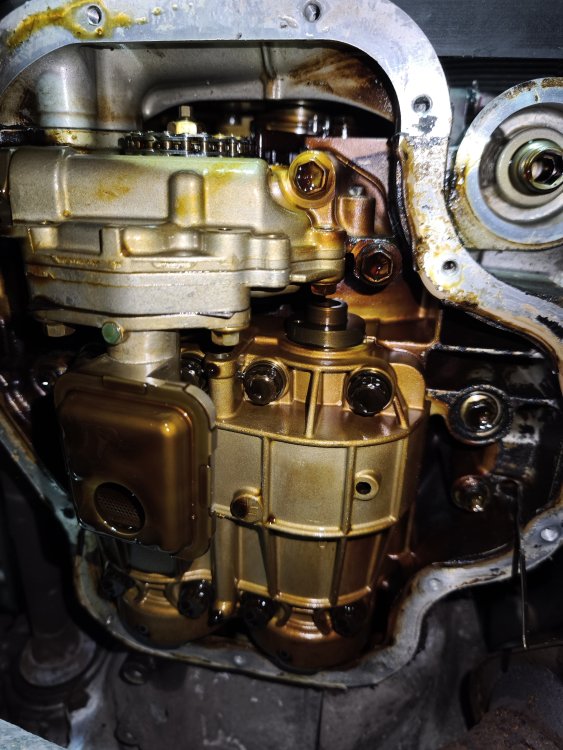
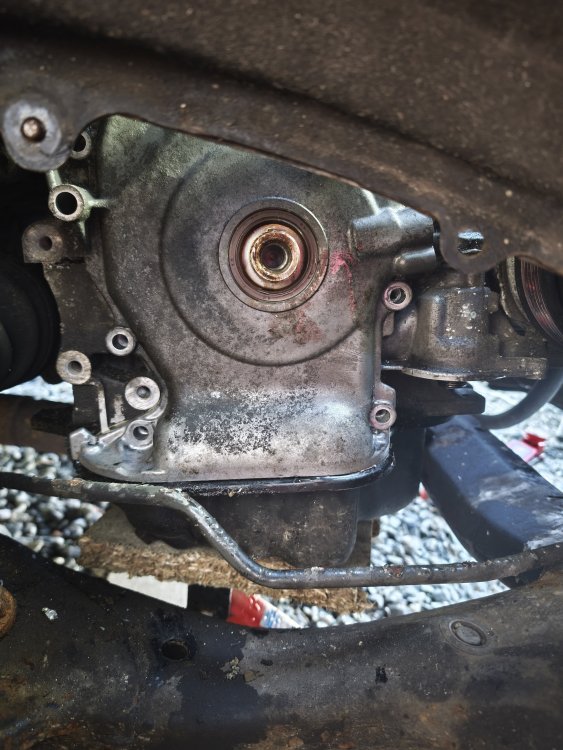
Day 16. 1 hour.
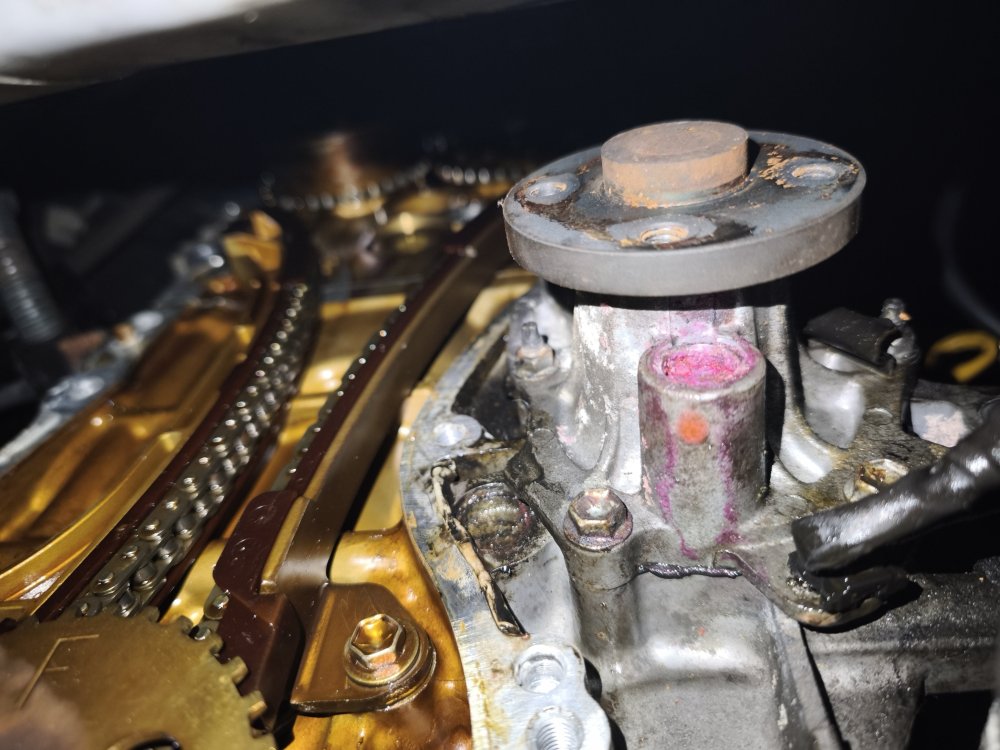
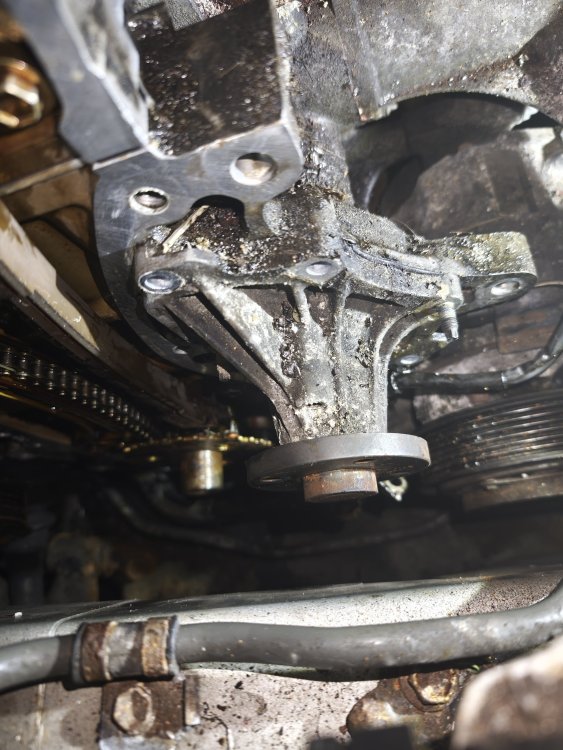
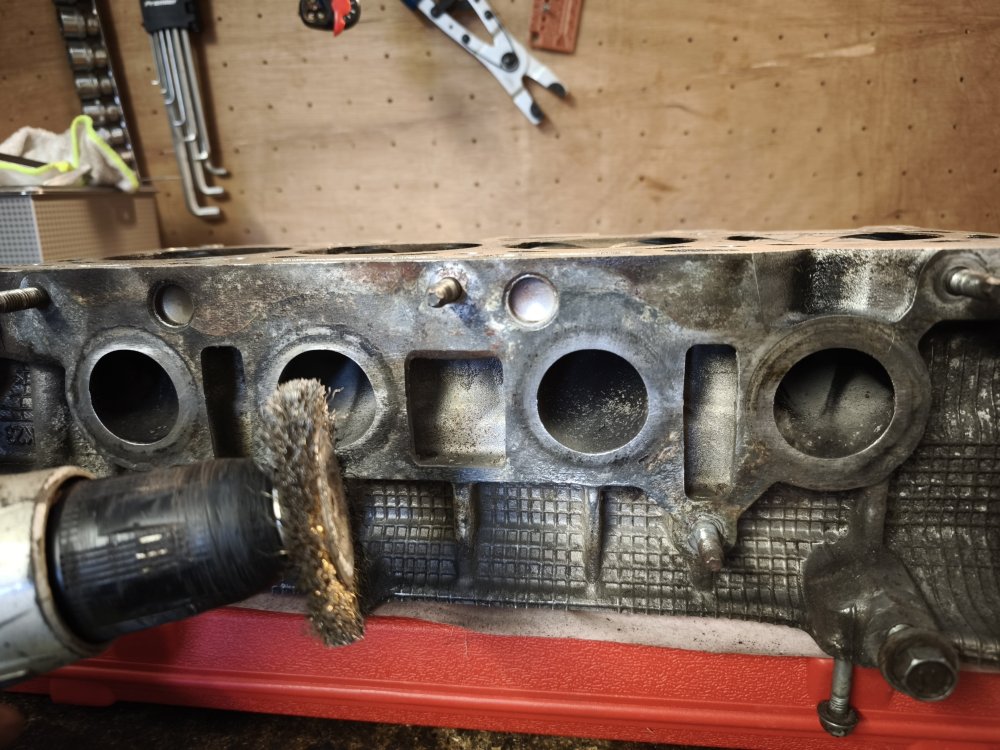
Cleaned up the block in preparation for the timing chain cover.
Noticed the pink powder around the bottom of the water pump. So decided to replace it. Very easy to remove. Just 5 10mm bolts.
-
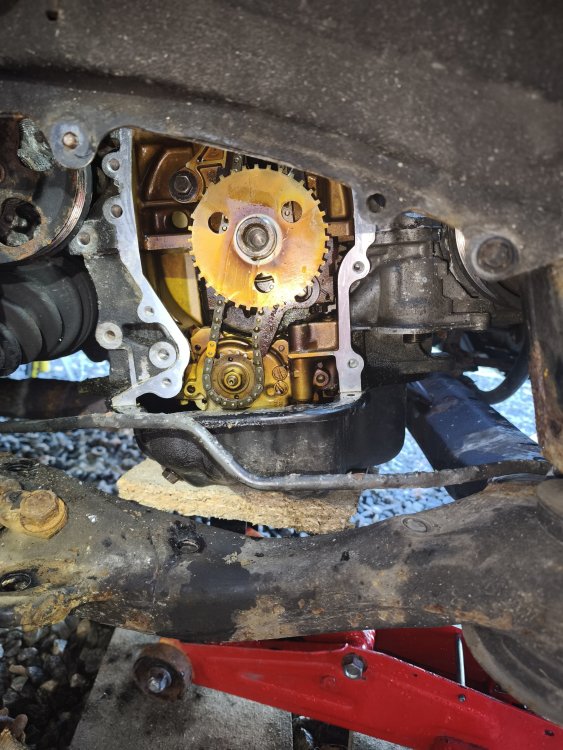
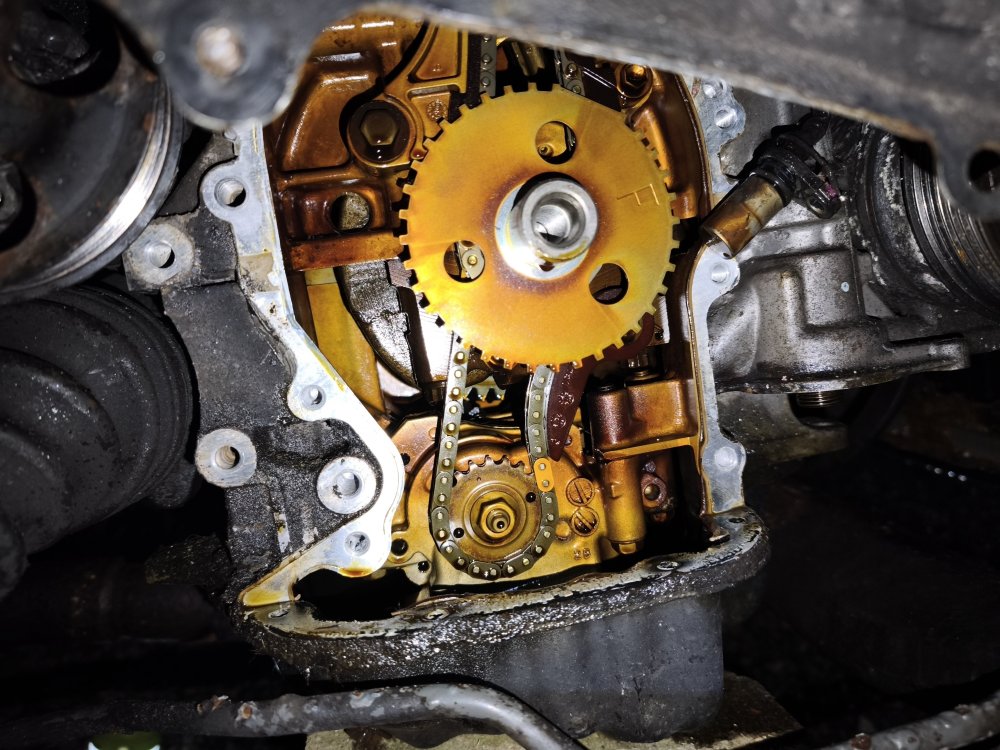
Day 15. 2 hours.
Another good night. Slow and steady progress.
Cleaned up the timing chain cover. Getting it ready for gasket sealant.
I had to drill out 2 studs from the cover. Tonight I installed 2 helicoils to keep the bolts the same size as the originals.
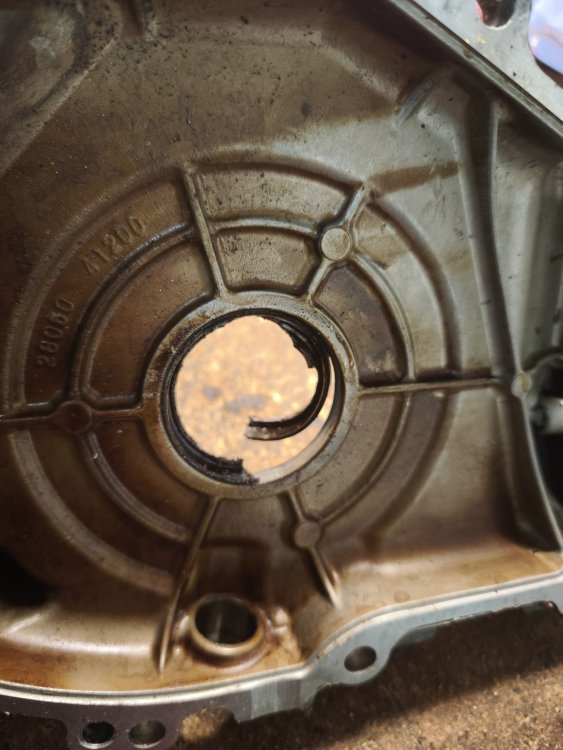
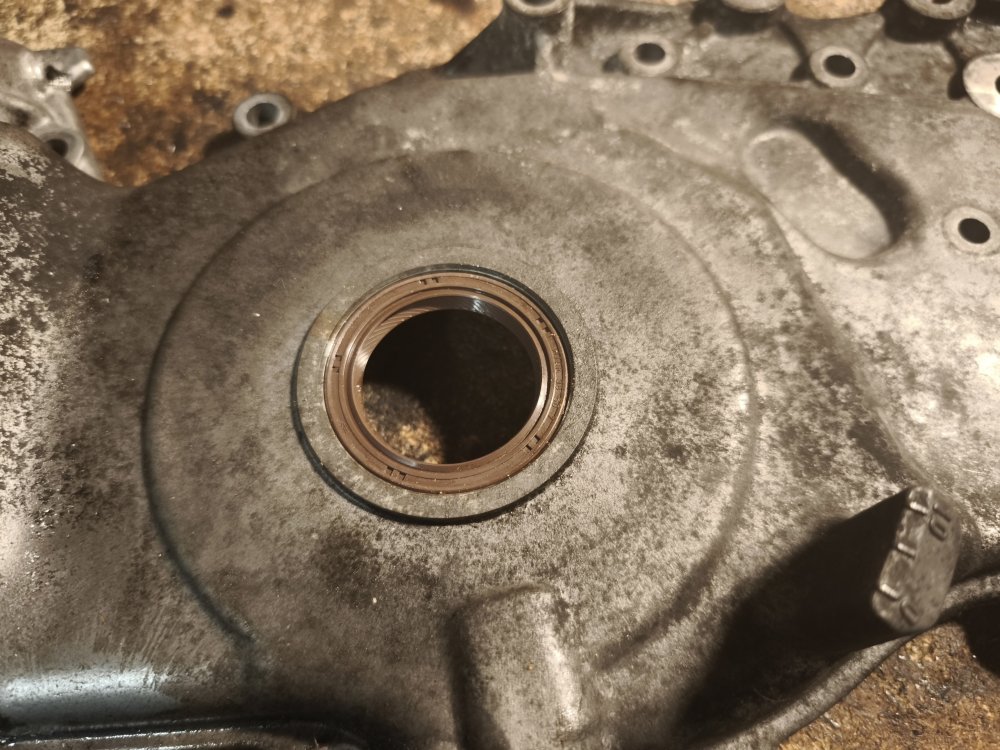
I really struggled to remove the crank oil seal. I had to very carefully cut it with the hack saw. The new one went in by hand.
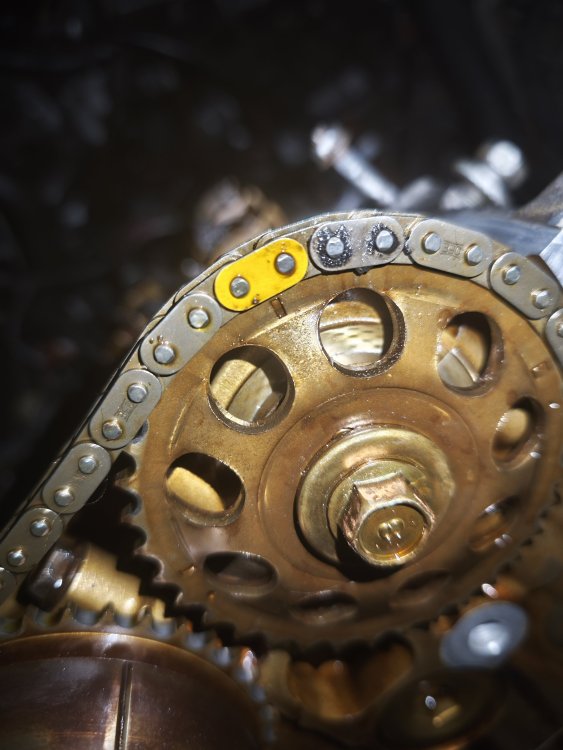
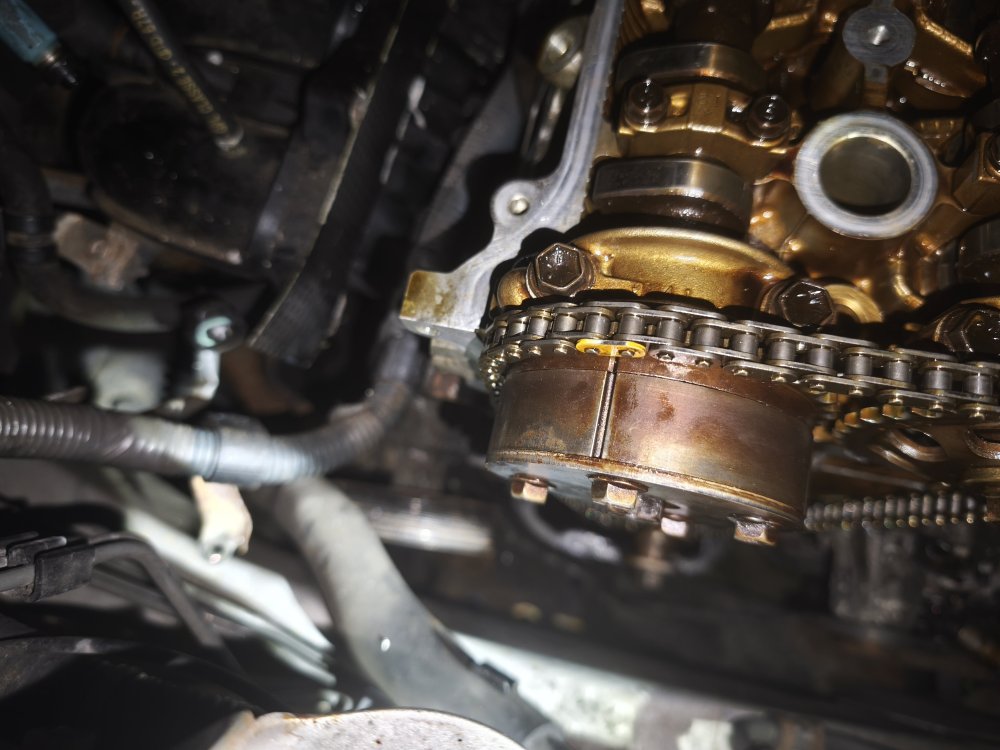
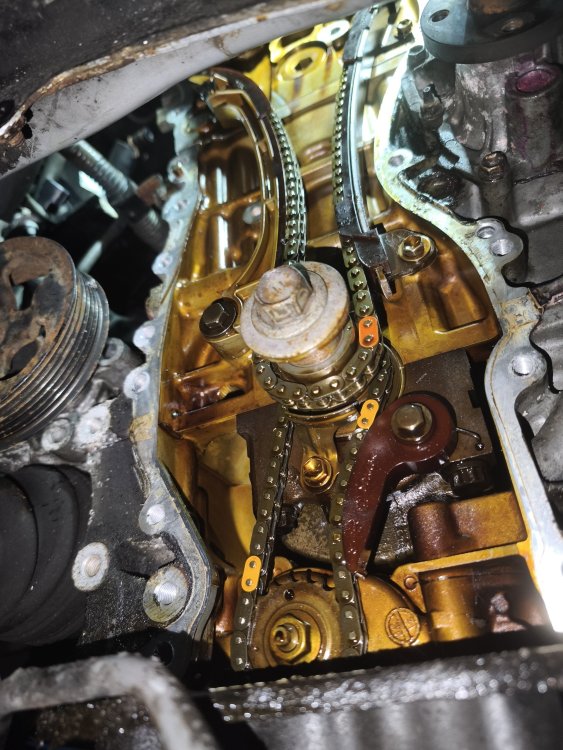
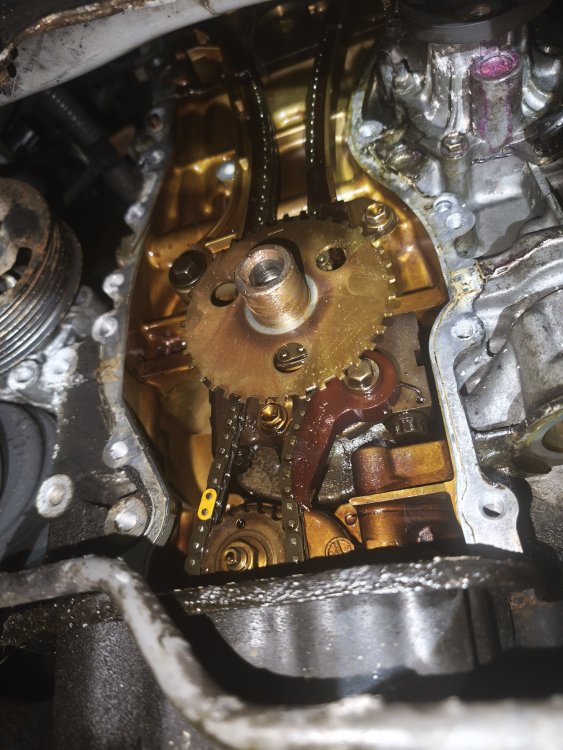
I then dialed in my timing marks and installed the chain guides.
Tomorrow I'll hopefully clean up the engine and install the timing chain cover.

-
1 hour ago, MonsterS said:
Ah i see the problem.
") it's a 2.4 not a 3L.
it's a 2.4 not a 3L.
🤣 Yeah most of the work was removing the timing chain cover
-
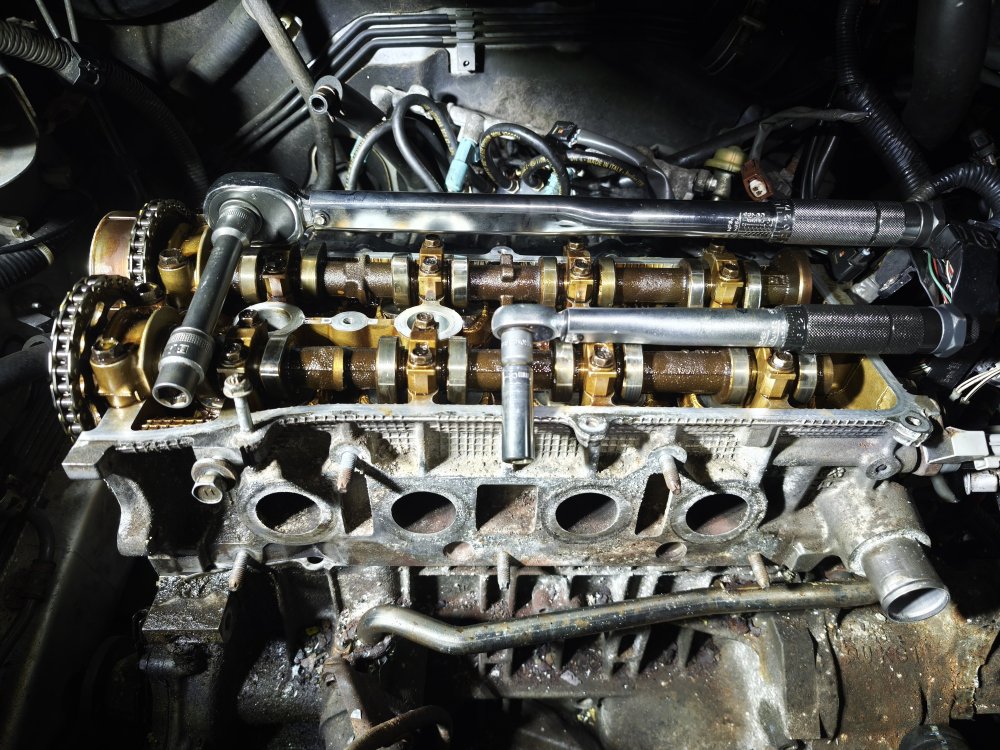
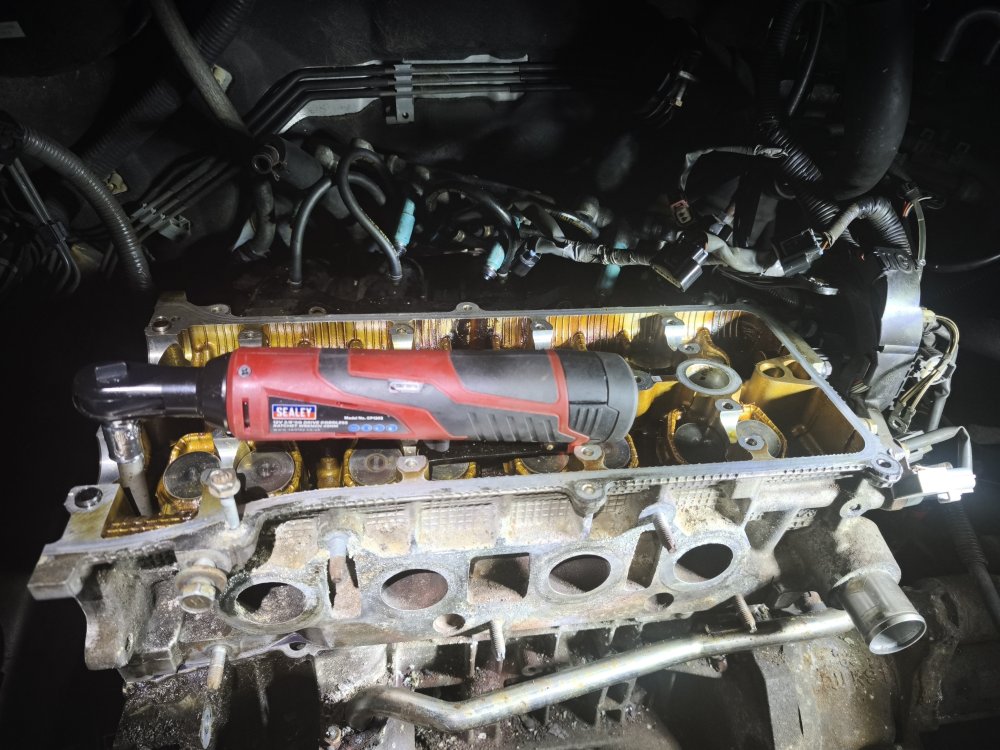
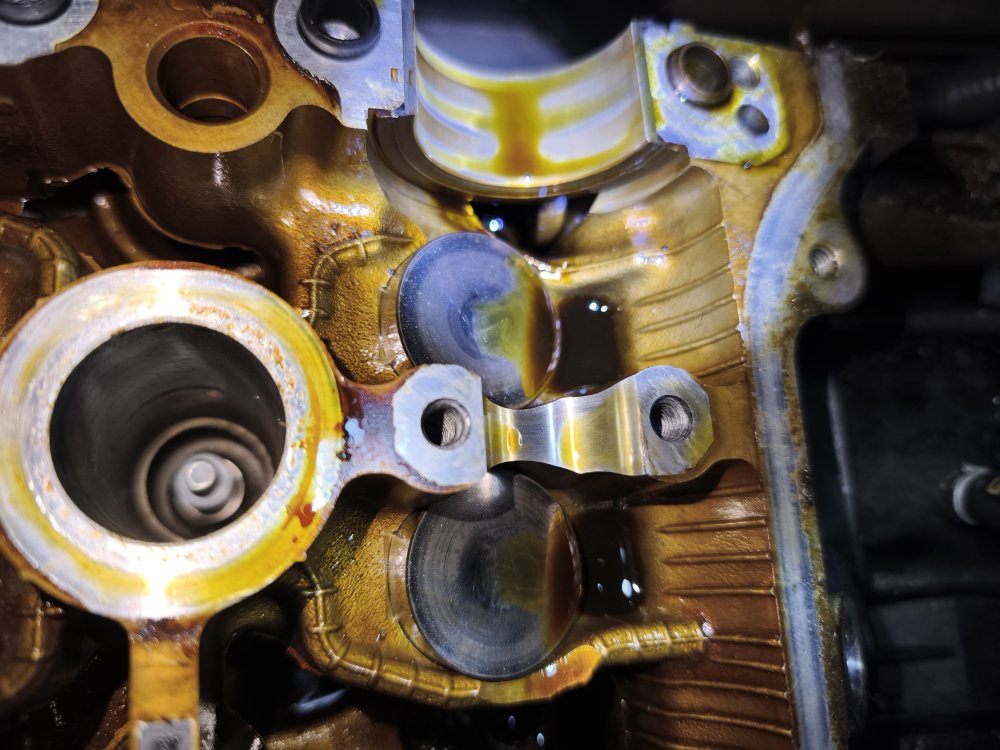
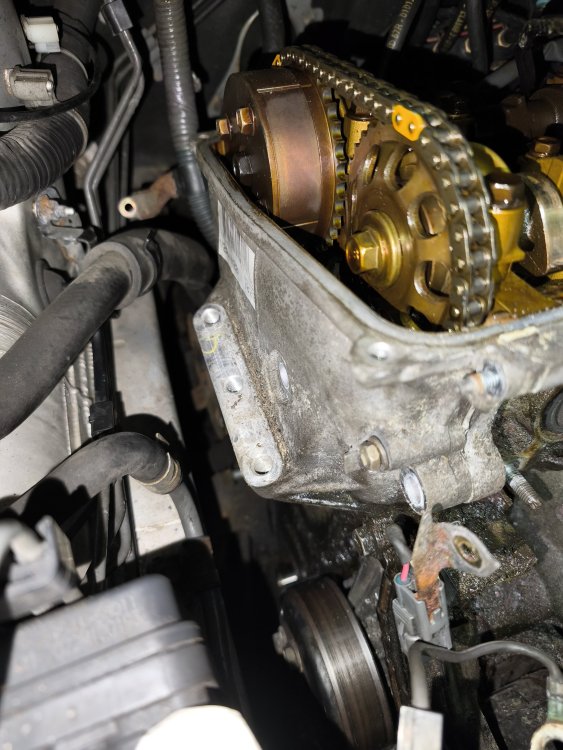
Day 14. 2 hours.
Another successful night regardless of the 40mph wind and showers. Luckily mostly sheltered by the house.
Put the block to TDC.
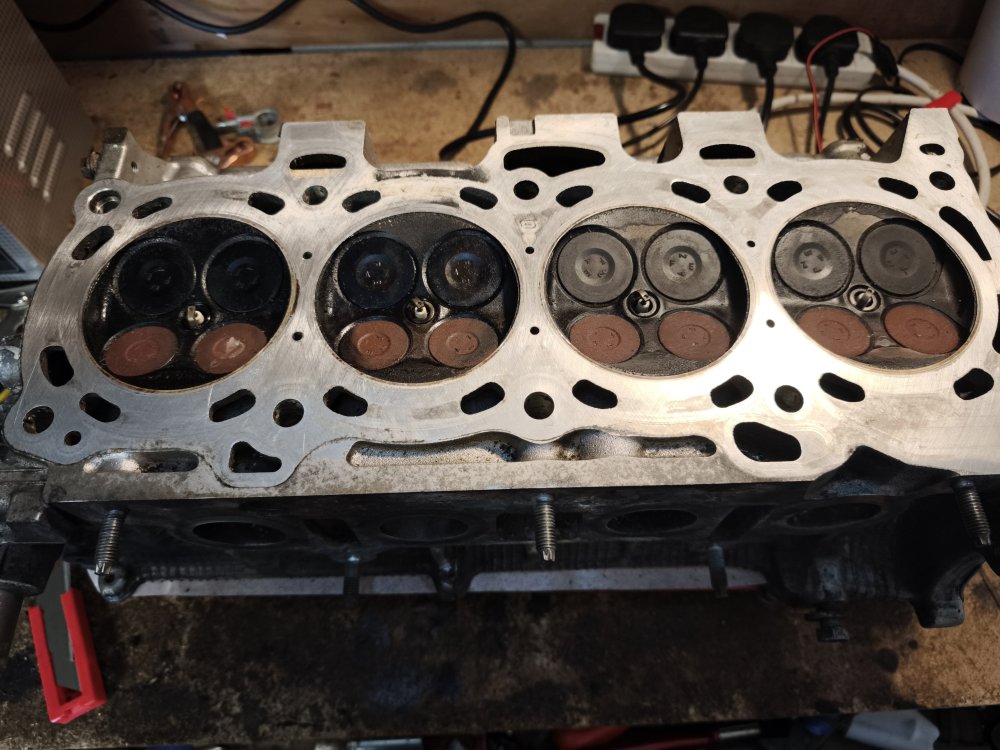
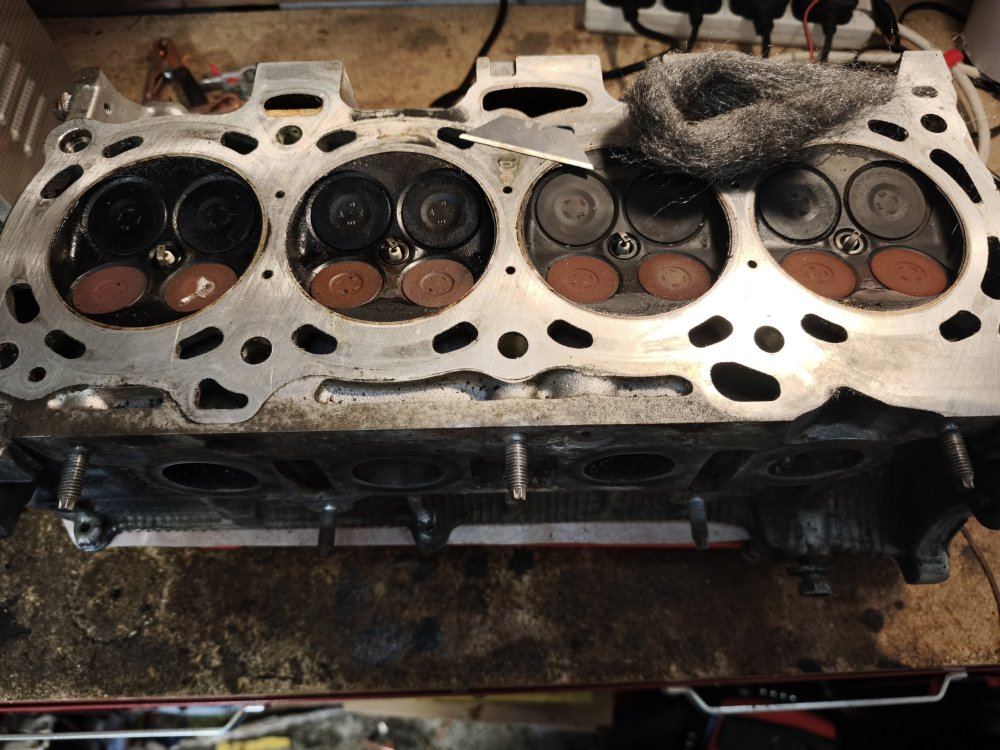
Cleaned up the camshafts as there was some rust starting to form in the followers.
Oiled all the surfaces.
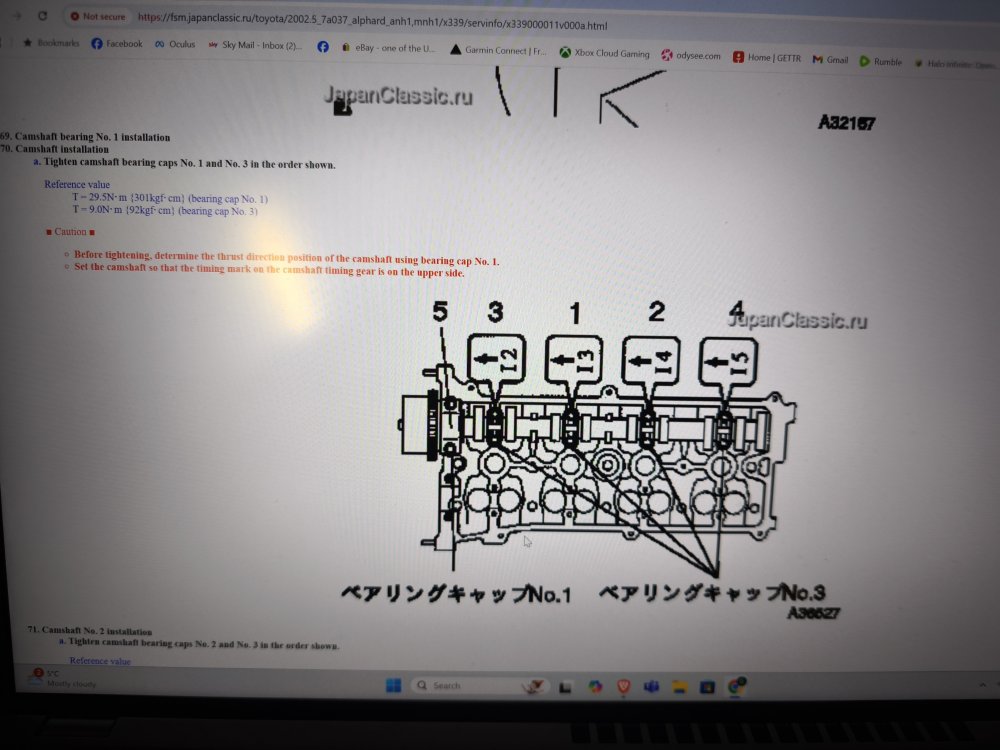
Installed the camshafts and torqued the bearing caps to 9nm for the small ones and 29 for the big one.
-
Day 13 - 2 hours
So I spent a lot of time waiting for parts. When I was ready to install the head bolts. I realised that the new ones didn't come with washers and I'd thrown away the old😂.
Didn't want to risk buying something similar and decided to ask Toyota. It was about £2.50 per washer but £28.99 delivery! I emailed asking them if they could get me a better deal on the delivery but after 3 days I had no reply. So I ordered from Amayama. It took about 3 weeks but only cost £16.90 inc delivery! Great service. I spent the first hour checking that my holes were clear or debris and oil. Then confirming that my holes were deep enough.
Gave the head and block a final clean.
Fitted the gasket and head.
Greased the washer and thread of each bolt with engine oil.
Torqued to 30 - 42- 55 - 70. In the order in the images.
Final 90 degree turn in the same order.
Feel like I'm on the home straight. Time for bed now.


-
2
-
-
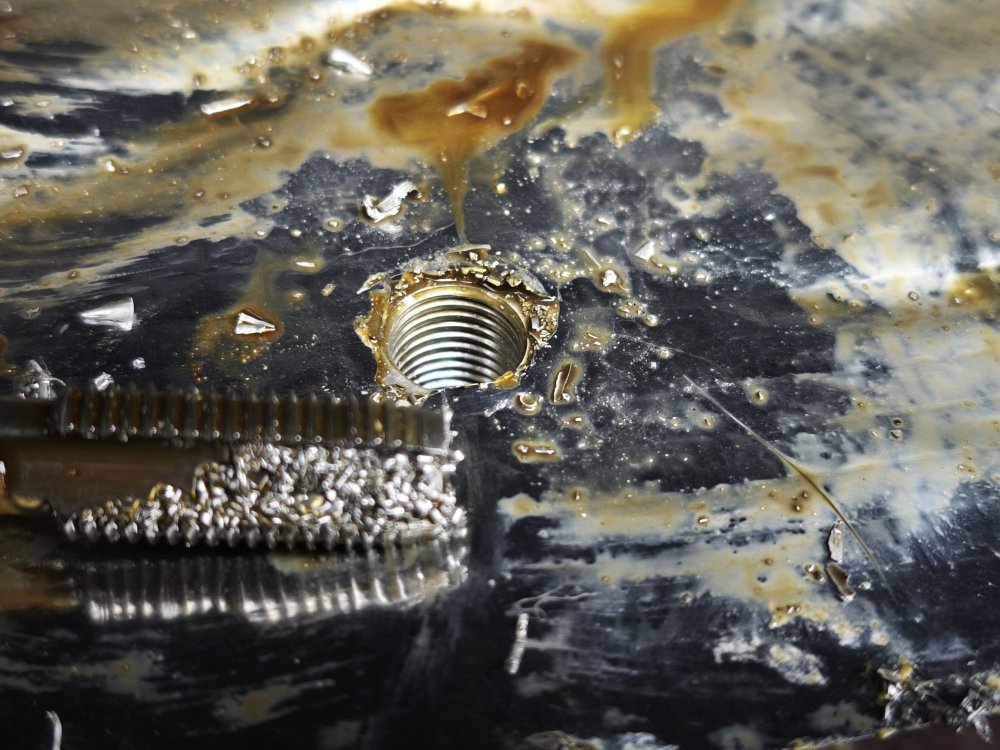
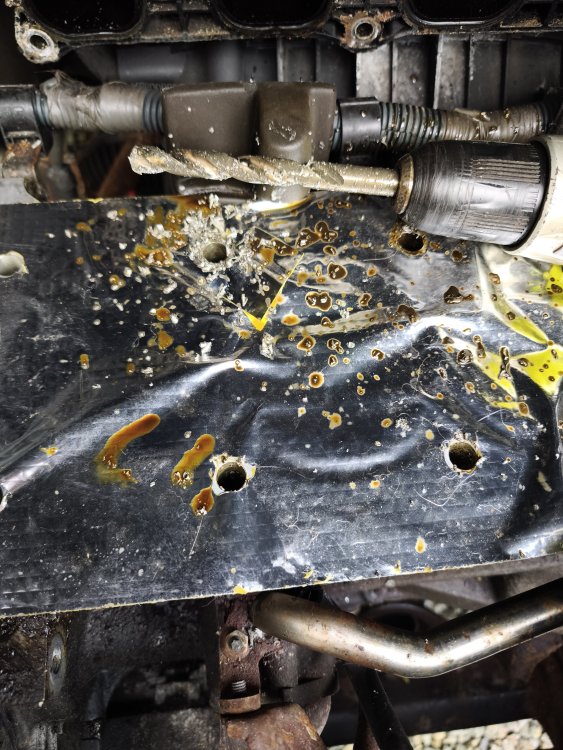
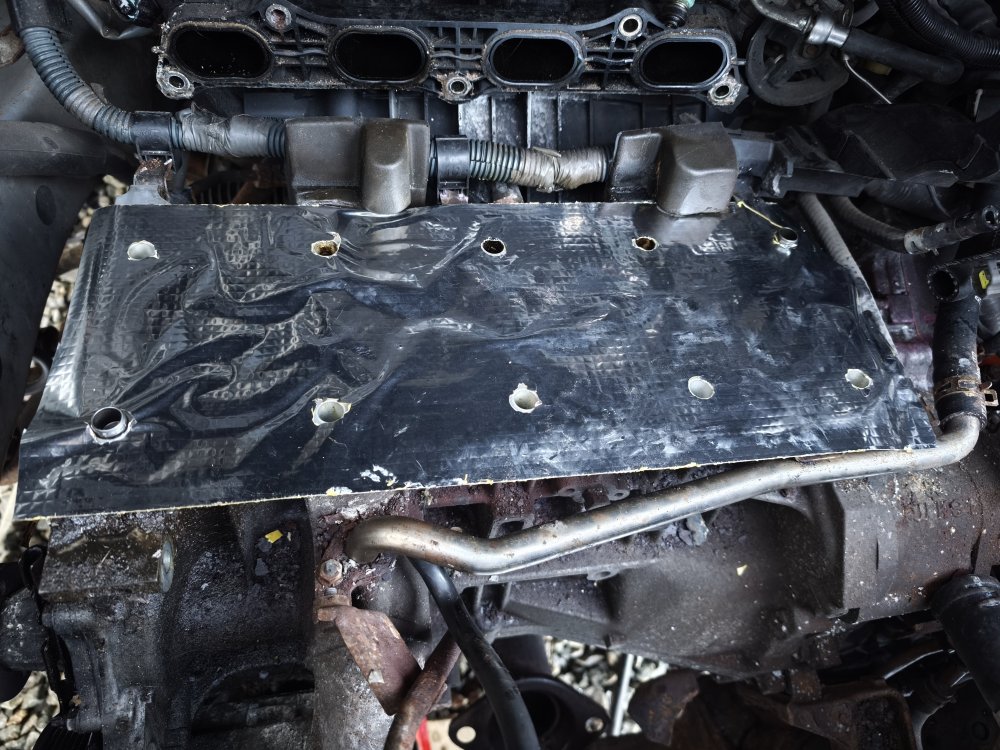
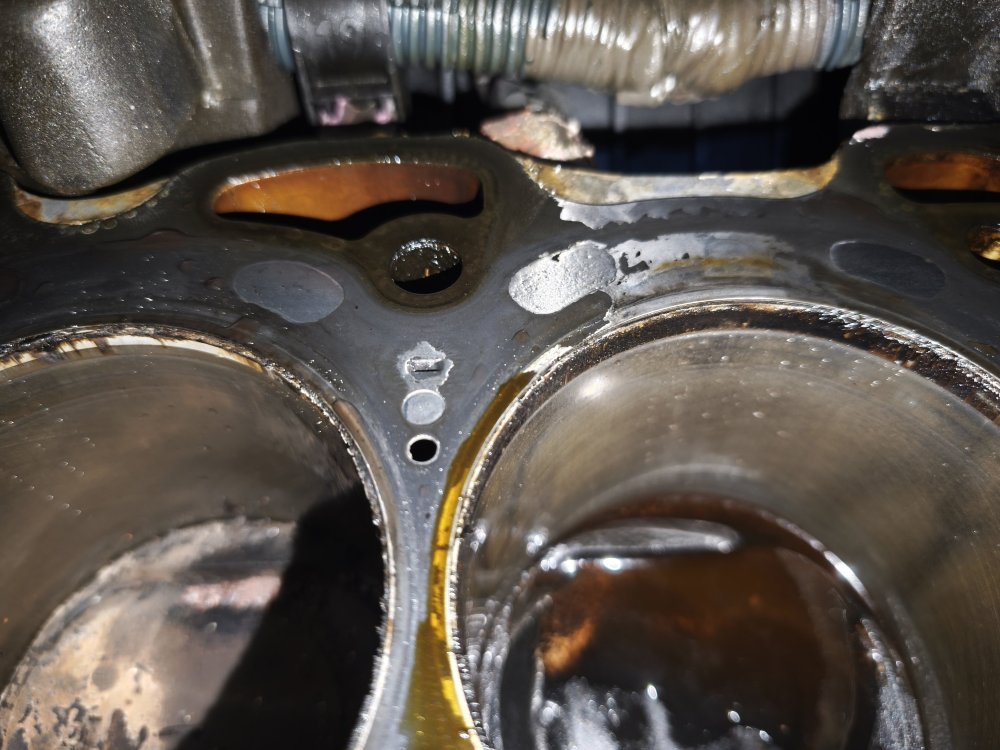
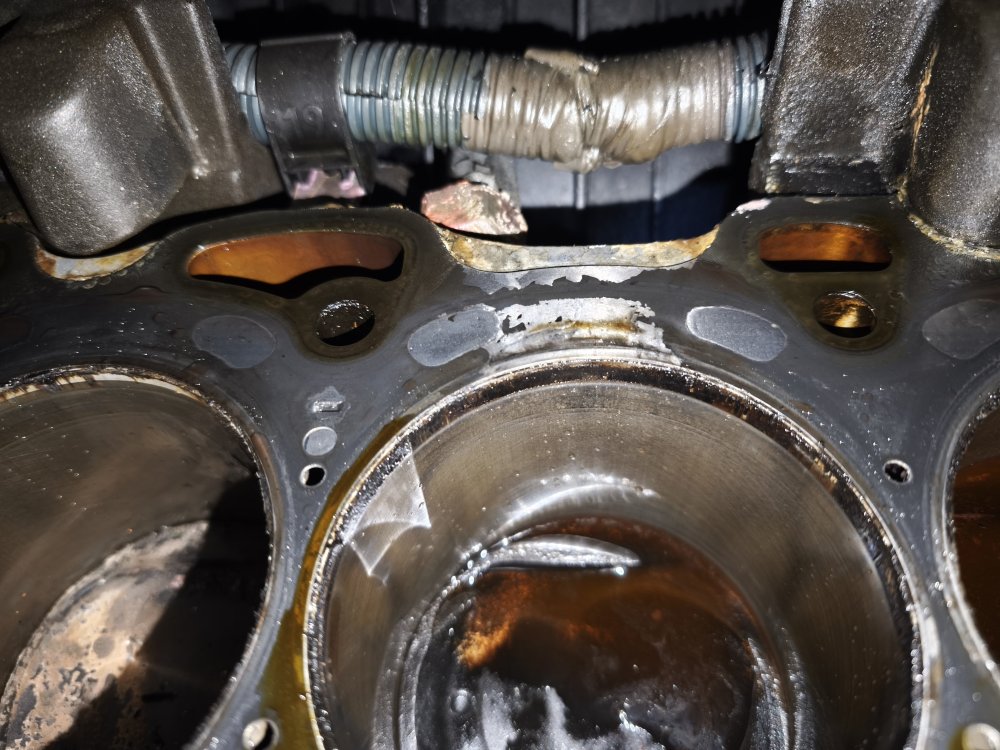
Day 11 - 3 Hours
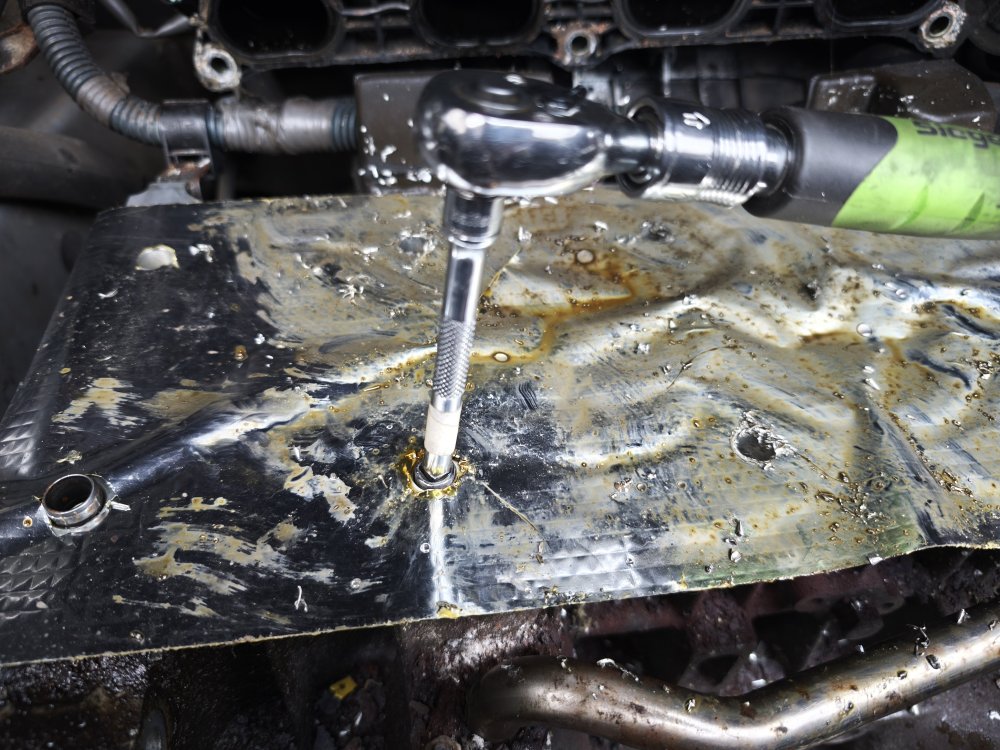
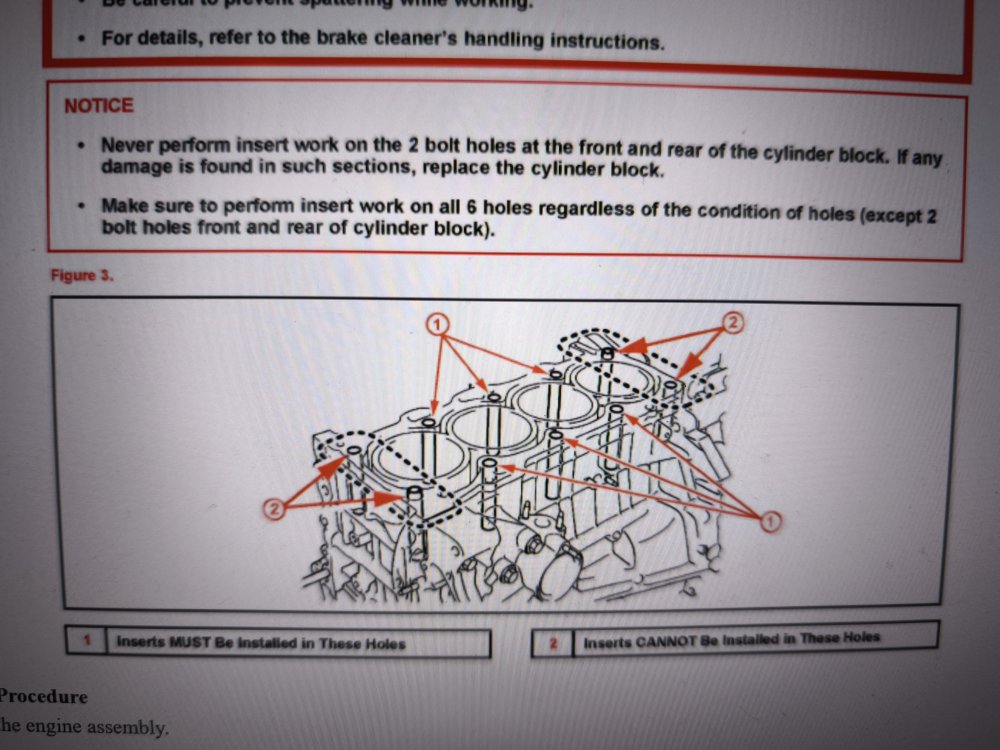
Covered Covered cylinders and waterways with sticky foil tape.
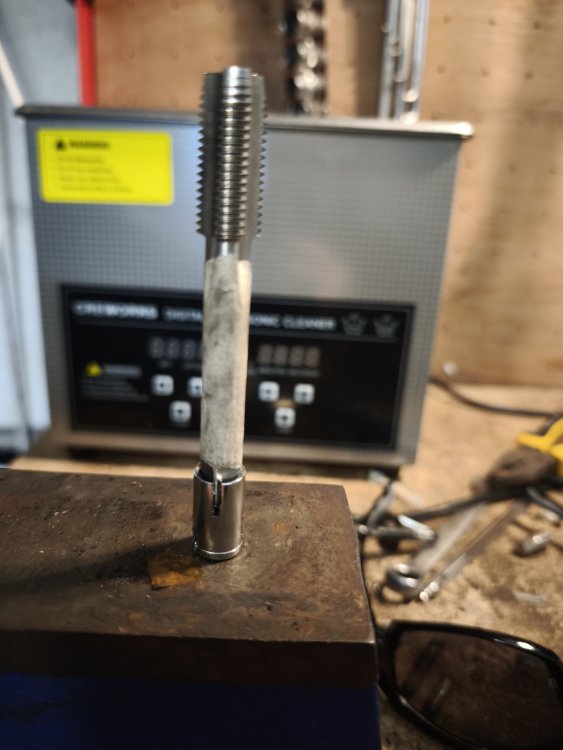
Drilled out threads with 10.3mm drill bit. Then drilled it with the 11.3mm drill bit.
Tapped hole with M11 1.5 STI tap. It was short so I cut a cheap 8mm socket so I could use a 1/4 extension to make it reach the required depth.
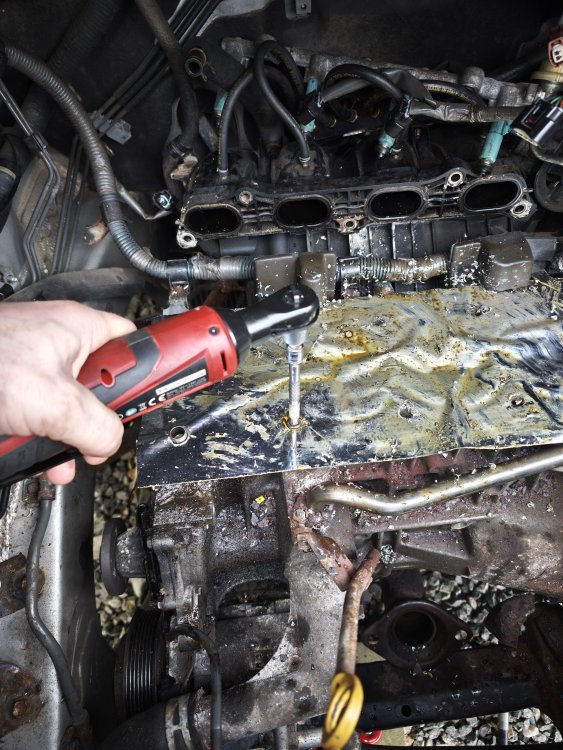
Just used the old engine oil as drilling and tapping lube. Backing out the tap about every 10mm to clear the tap of chips. I did the first one by hand but the rest, I switched to the electric ratchet to save my wrists.
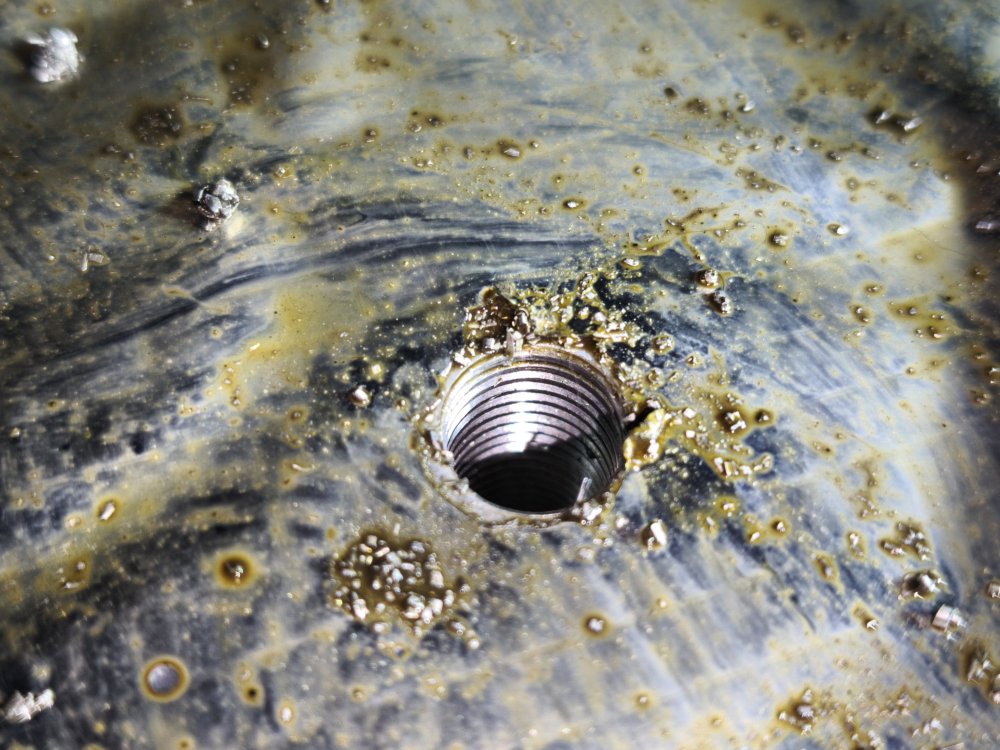
Installed the V coil M11 1.5 3D inserts to the same depth as the old threads.
Felt like a successful day.

-
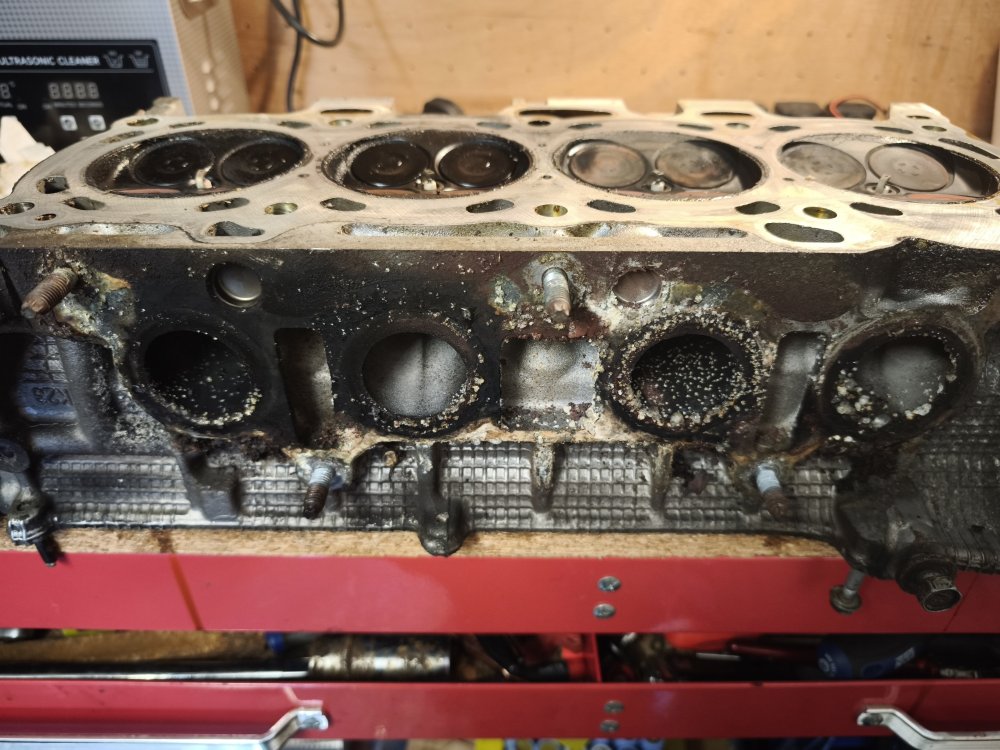
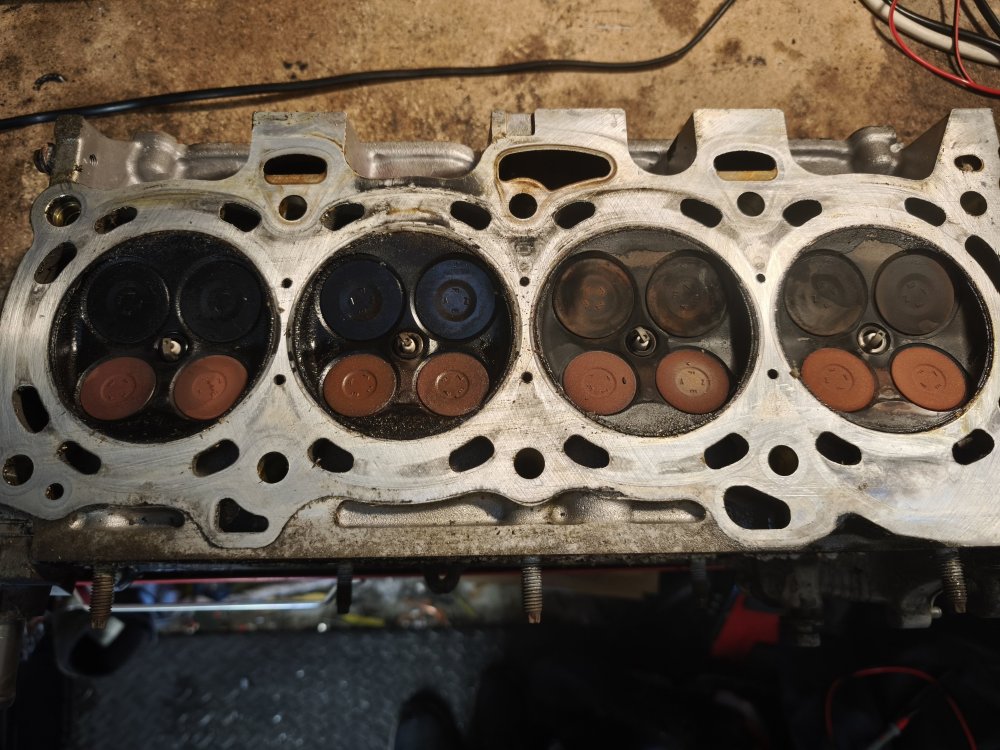
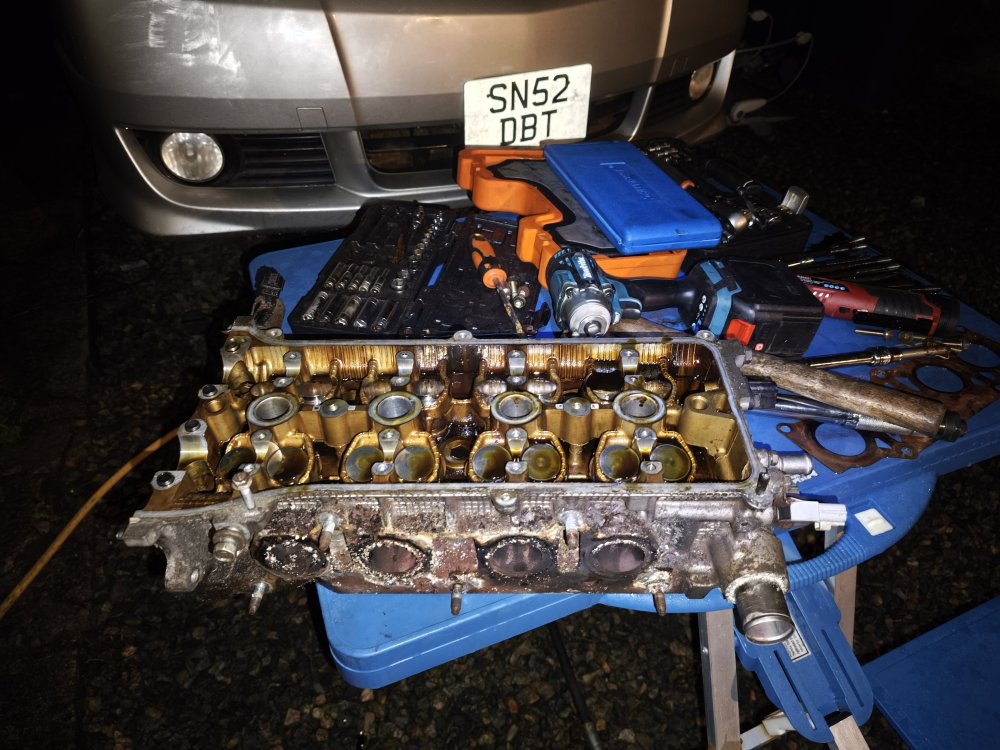
Day 10 - 4 hours.
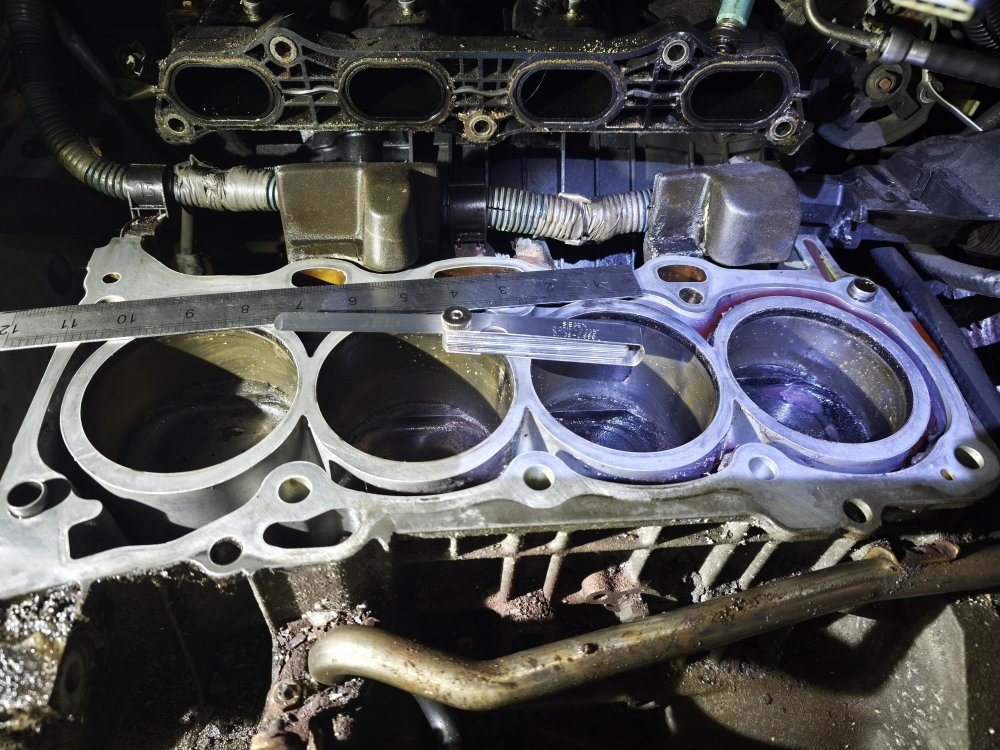
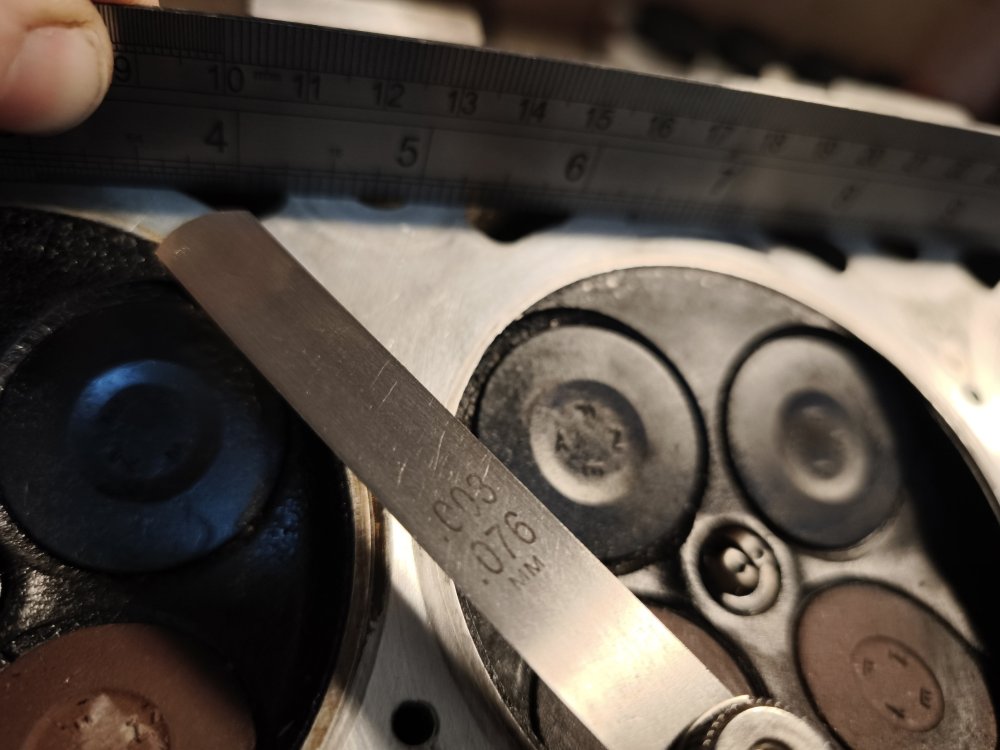
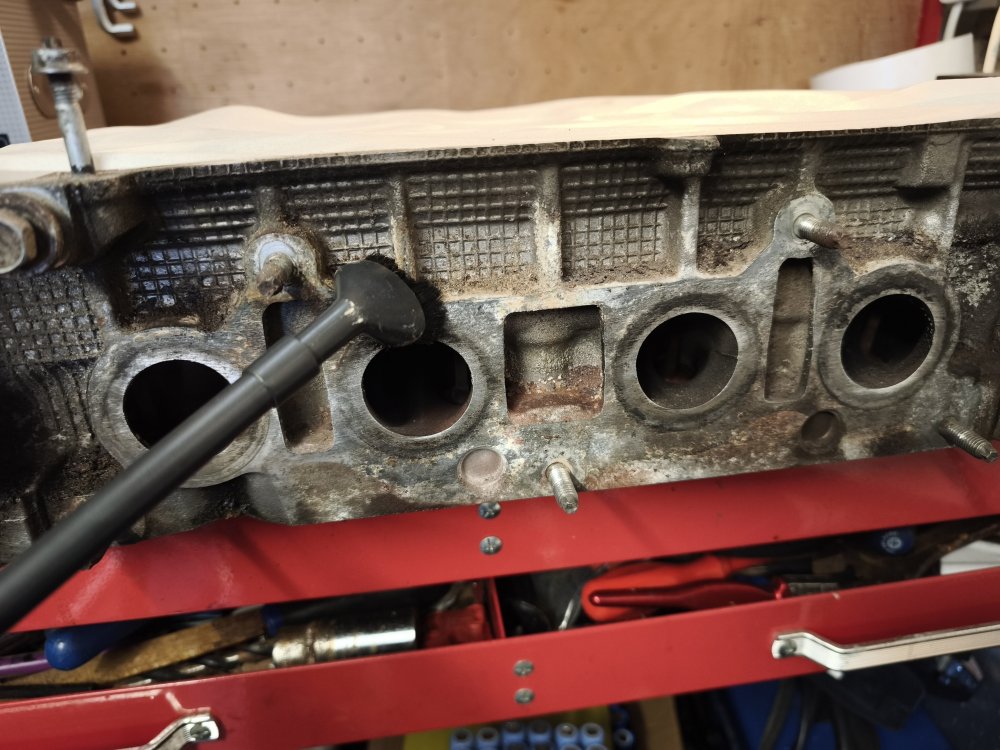
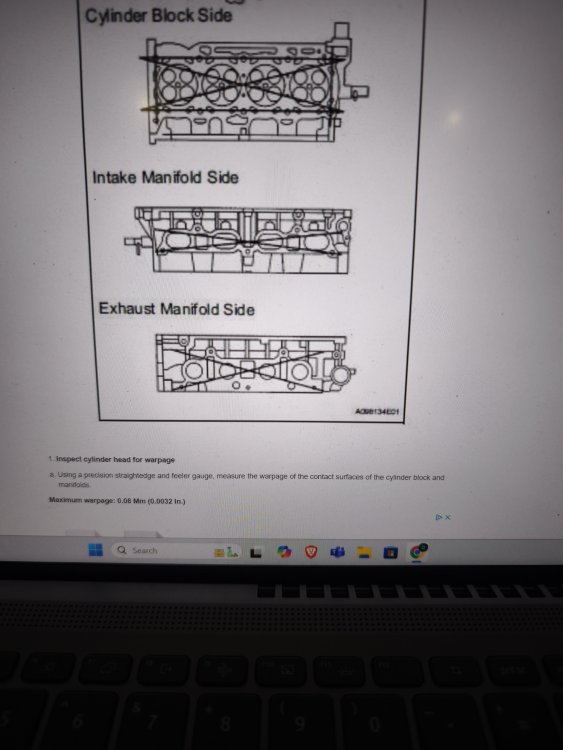
Cleaning up the head. Removing the stuck bolts. Checking head for warping.
The cleaned up easily enough. Stanley blade, Wire wool, and 1000grit sand paper on the block and rocker faces. I just used the drill and wire wheel on the intake and exhaust faces.
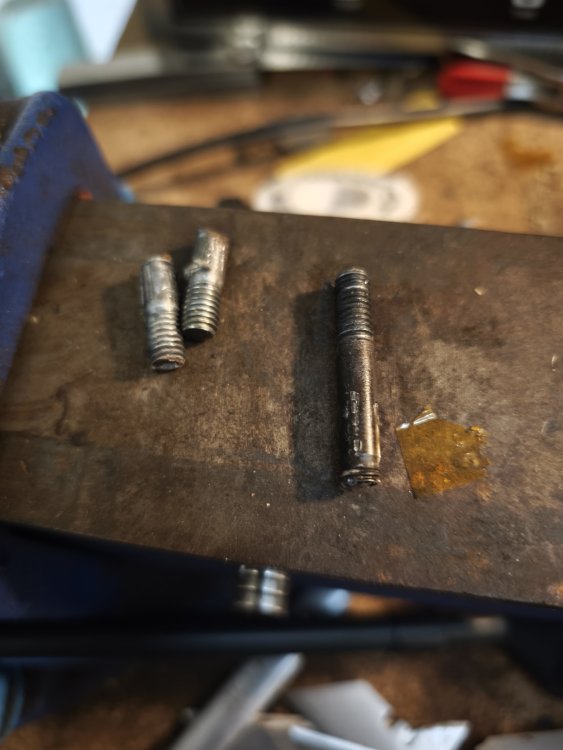
The stuck studs on the cyclinder head came out with a little heat and locking grips.
The 2 studs at the bottom of the timing chain cover were a nightmare. Snapped tight to the cover. Tried repeatedly to weld on a nut but it kept snapping. I was forced to drill and tap new threads.
I got lucky and my head isn't warped. I'm telling my friends it due to Toyota patented. "sacrificial block threads" 😂

-
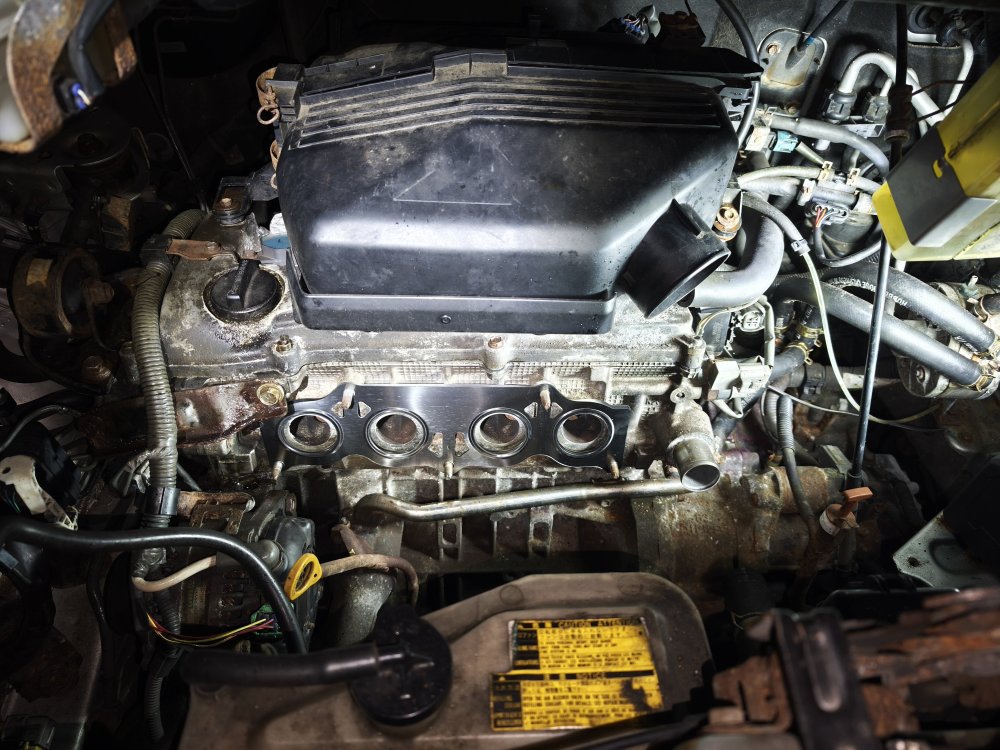
Day 9. 2 Hours.
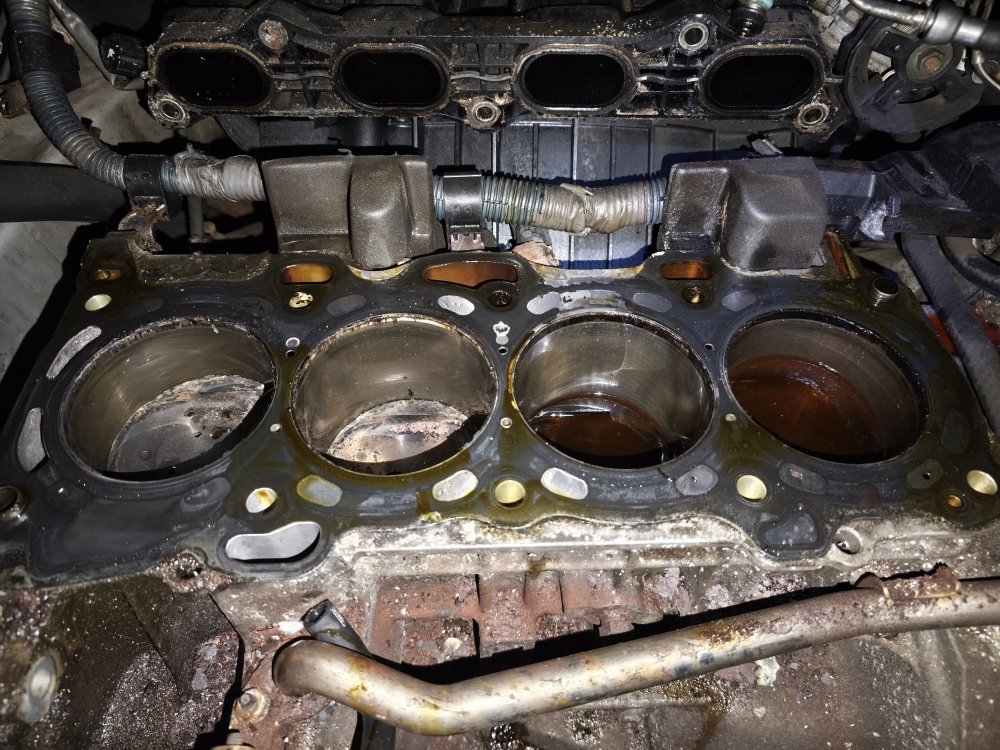
Successful night. I went out hoping to get the airbox off but pushed on with the the removal of the cams and then the head.
I first removed the 2 nuts and one nut from the top of the airbox. I hoped I could remove the head while leaving the airbox bolts underneath the airbox. Holding it to the block.
I then removed the chain guides. Then chain. Then Cams. All pretty easy.
The head bolts were incredibly tight. Apart from 2 in the middle next to the airbox. They were very loose. I'm guessing those are the 2 that pulled the threads.
I was a little confused when I could only find 9 head bolts. The last one was under the cam guide.
The head was still stuck to the airbox so I took 2 off from underneath. Then I found the last two at either side of the airbox. The one next to the throttle body was very difficult. I managed to get it with a long 1/4inch extension.
The head then lifted off. I'll inspect it for warping tomorrow.
-
1
-
-
Day 8.
30min.
Decided to cut the studs off the top of the timing chain cover. Hoping to leave plenty of meat to weld a nut on for removal later.
I thought it would allow me to pull the timing chain cover vertically. Pulling the studs out of the oil sump. No luck. Still didn't want to move.
I was just about to give up when I gave it a bit more effort with the pry tool down near the timing sensor. I heard a pop and it pulled up.
Turns out there was a dowel there. Once it popped out. The chain cover came off easily.
-
1
-
-
Day 7. 1 hour.
Not much luck today. The timing chain cover is still in place.
The large stud came out no problem. Number 10 female torx.
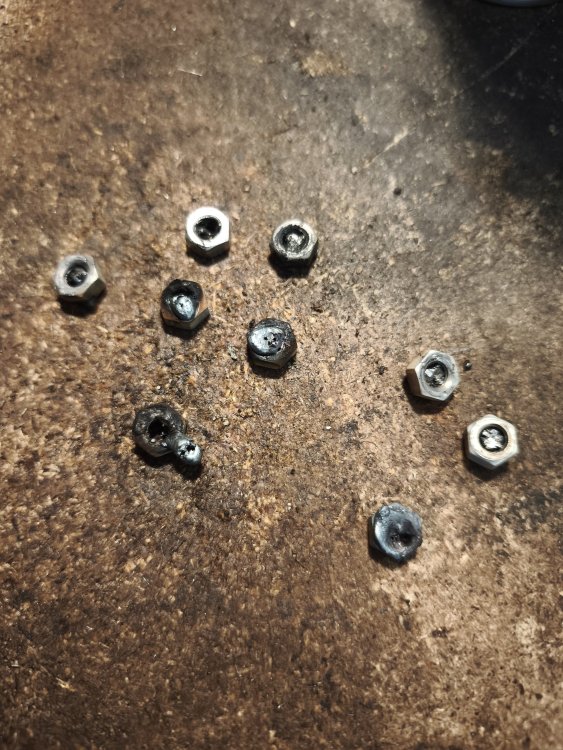
The 5mm studs on the sump just instantly broke off.
I tried to remove the 5mm studs at the top of the timing chain cover. Thinking I could pull the cover up if they were out but they just rounded too.
I then tried the two nut method on the top studs but it just pulled the threads.
Need to sleep on my next move. I'd like to remove the sump but it's supporting the engine as 2 engine mounts are removed.
-
1
-
-
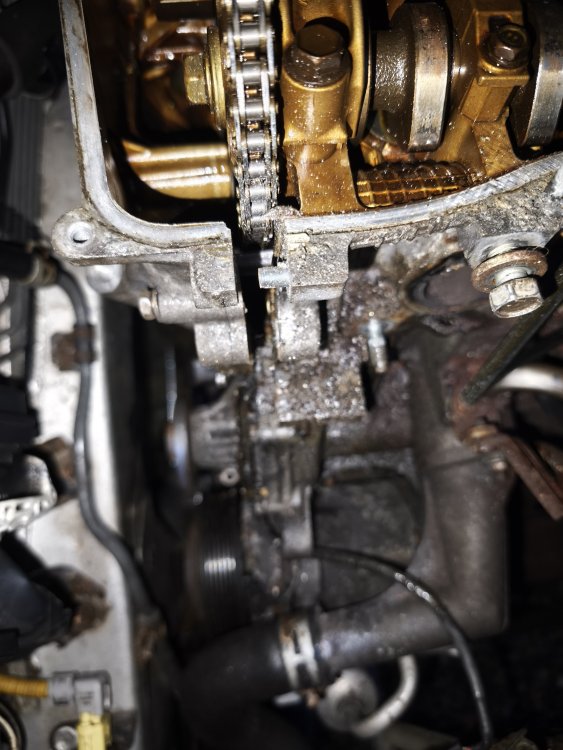
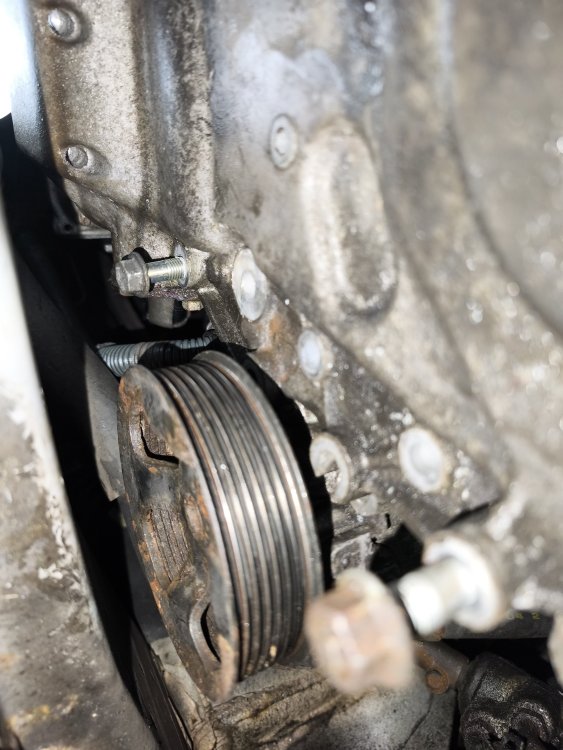
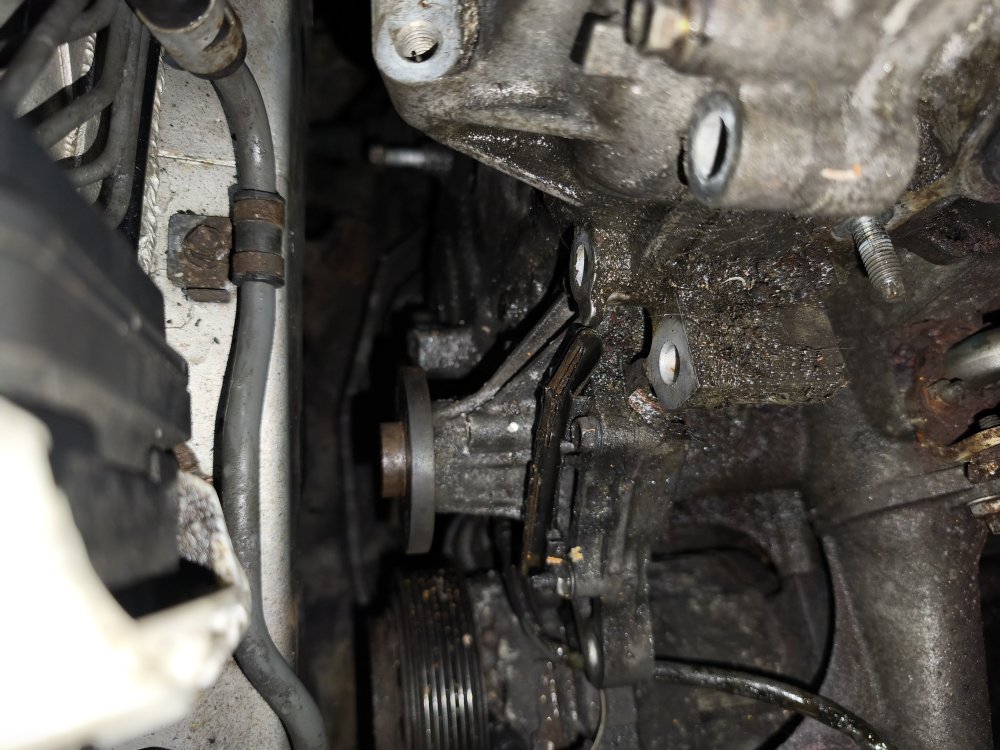
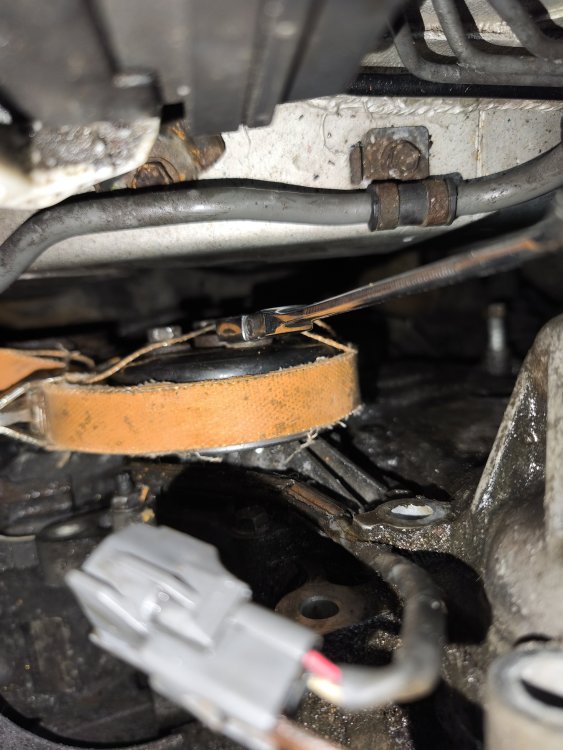
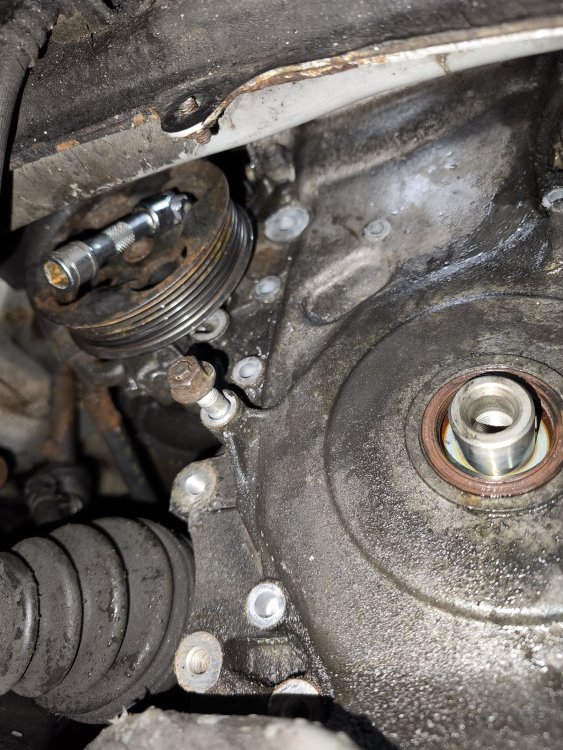
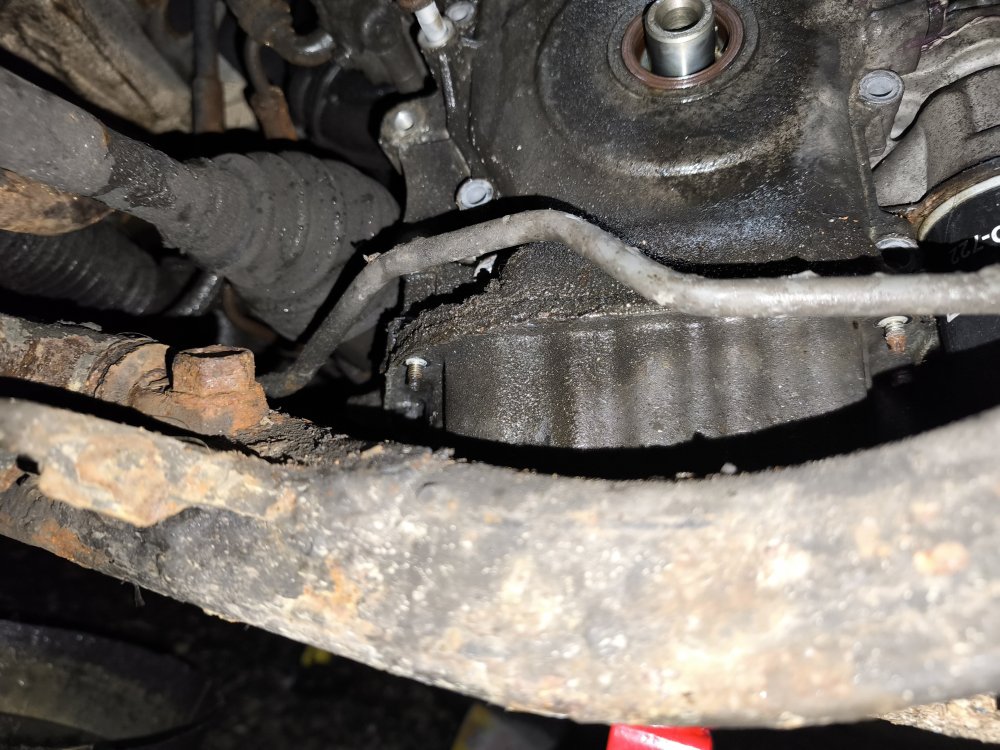
Day 6. 1.5Hours.
Removed the pulley. Not sure I needed to.
Removed the 4 sump bolts that screw into the bottom of the timing chain cover.
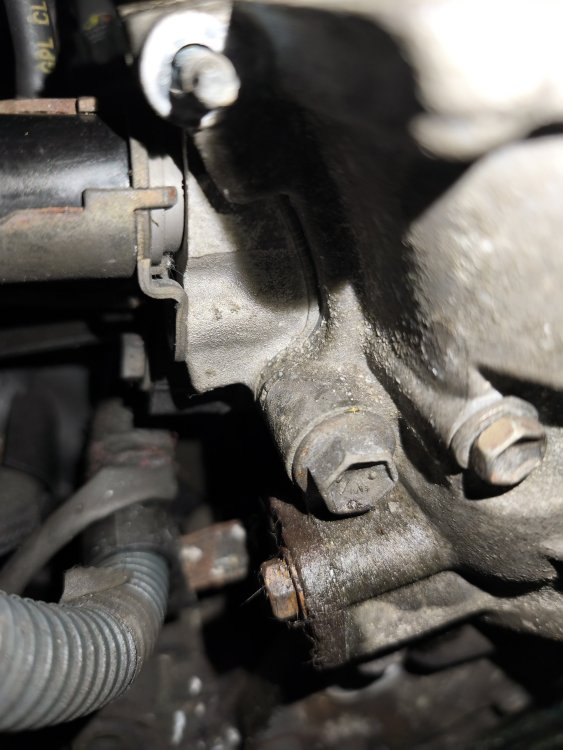
Removed the two bolts holding the power steering pump on. This gave me access to the chain cover bolt just behind.
Removed the Timing chain tensioner. Easy enough. Just two 10mm nuts. Just done by feel. Can't really see it.
I need to remove 2 studs in the in the sump and one stud in the chain cover. I don't have the tool so thats a job for Monday when the shops open.
-
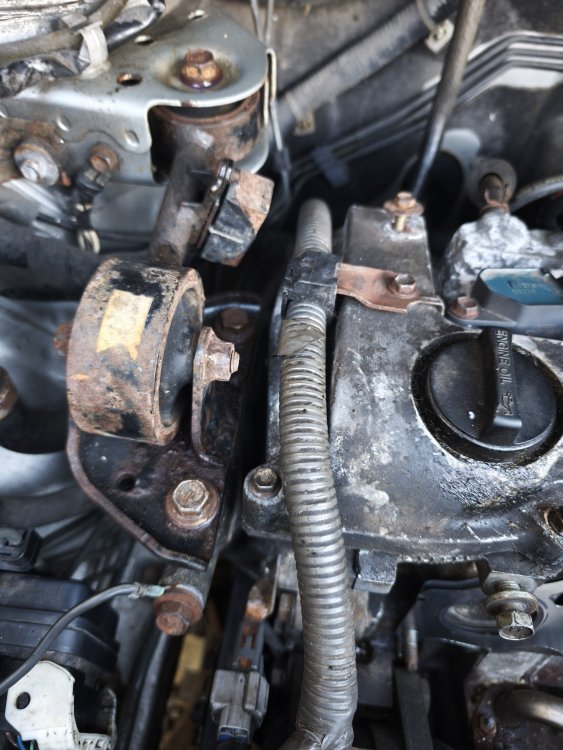
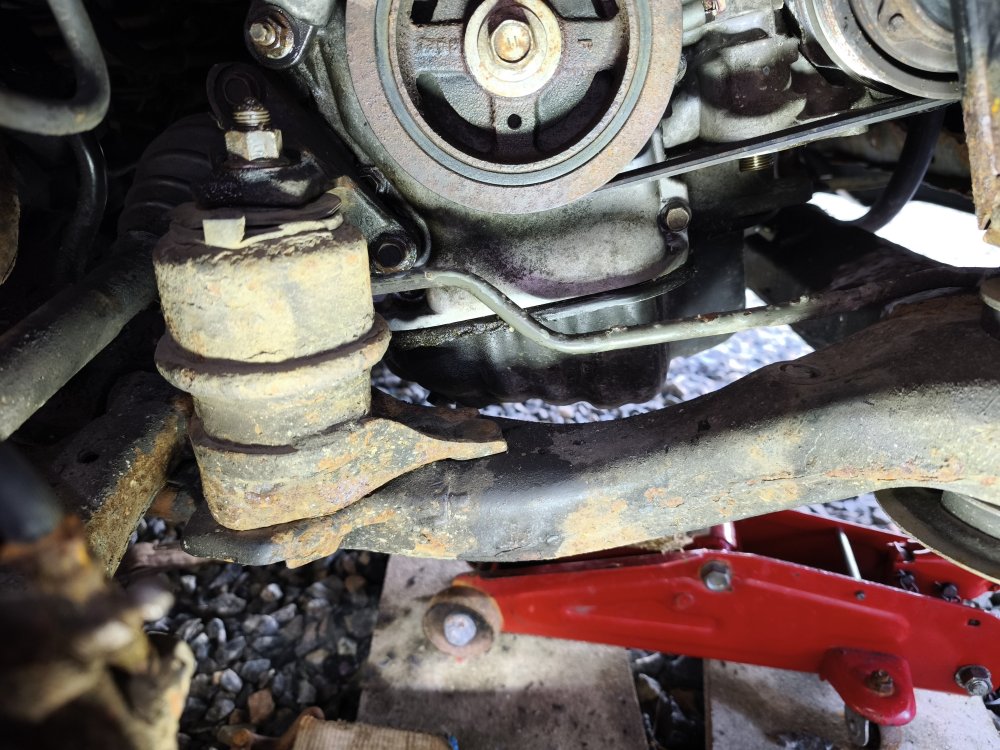
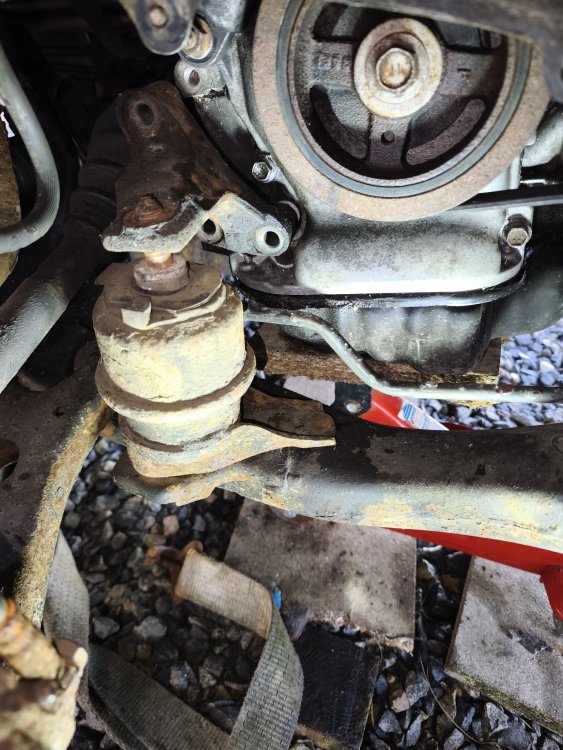
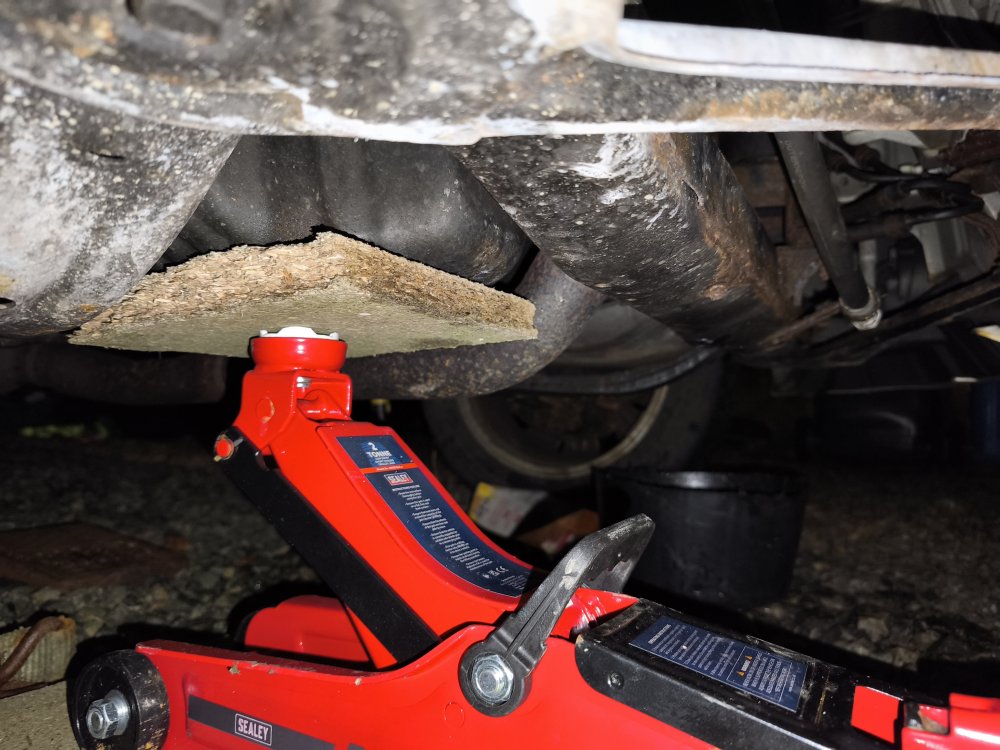
Day 5. 1.5 hours work.
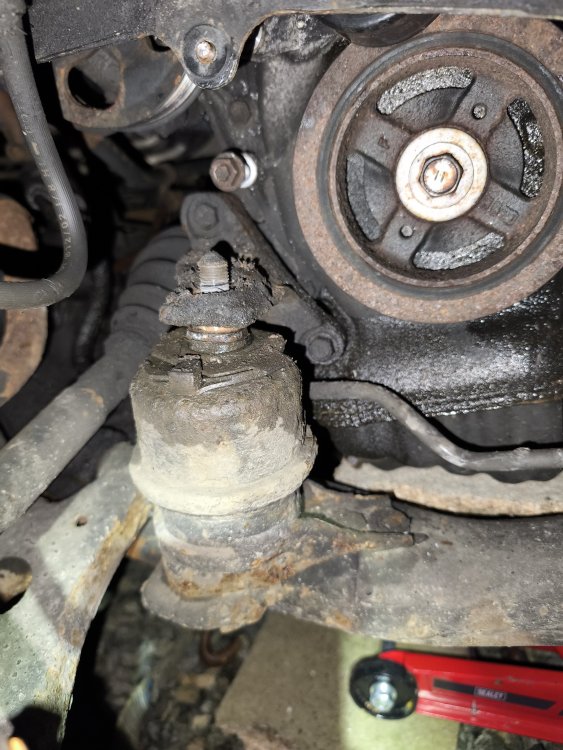
Drained the oil. Took the nut off the engine mount under the drivers side of the engine. Put a jack and piece of wood under the sump and jacked it up enough to clear the engine mount. I was then able to remove the bolt on the tensioner and remove the tensioner.
I then removed the engine mount as there are bolts behind it to remove the Chain cover. I removed several other chain cover bolts. The most awkward is inside the wheel for the power steering pulley. It's very long and the engine needs to be lowered to get it out. I jammed it on the inside of the car and bend it while lowering the engine😒. I'll order another.
Thats me done for the night. Felt like I got a lot done. Might get the cover off tomorrow.

-
20 hours ago, Michael Brown said:
You are very brave to entertain doing this job, I hope it all works out fine for you. Looking at the gravel drive might have been an idea to lay a tarp on the ground under the vehicle to retain anything falling off. Nice pictures
Yes thats a great idea. I've lost many nuts and washers in my drive😂
-
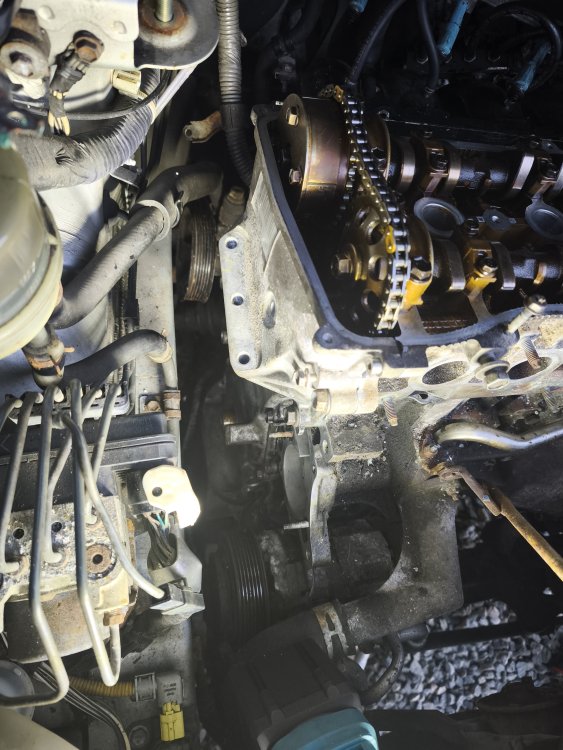
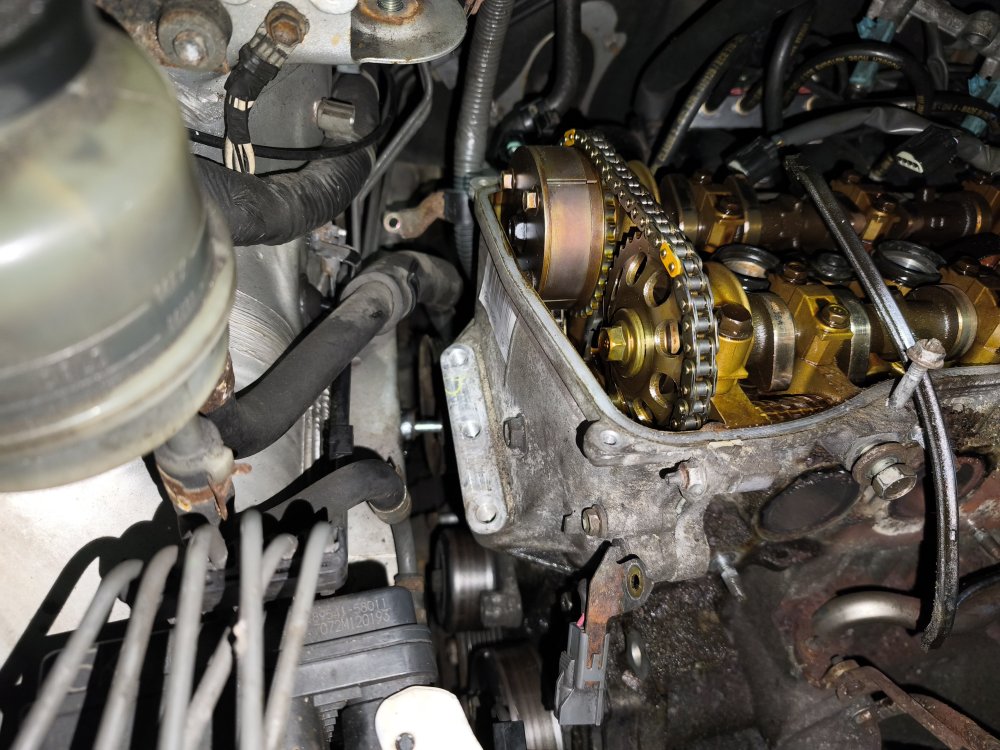
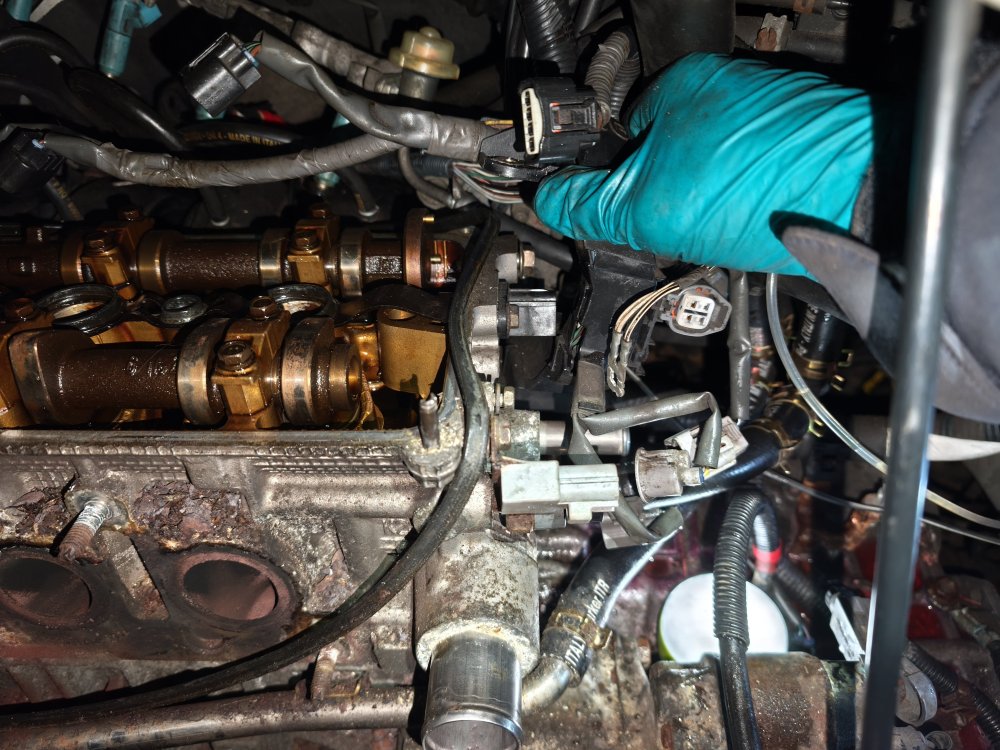
Day 4. Did about 1 hour of mostly frustrating work. Tried to remove tensioning pulley. I hoped for the best but the bolt was too long. I'm going to need to jack the engine up about 2-3inches to get the bolt to clear the chassis. To then start removing the chain cover.
Gave up on that job for the night and battled with the 3 hoses on the right side of the head. Got them off eventually. Then I removed the final 2 earth wires from the same side of the engine.


.png.ed7c55298ec7f4b924b2090a229107ce.png)
.png.bd40d26157d9891fbf096ff967e2f5dd.png)
.png.6b0ea8caa96377da3e36388fe2ed1530.png)


Stuck spark plug
in Toyota Alphard Servicing
Posted
I wouldn't panic about it. I've left spark plugs for 5 years on my early cars. As already mentioned. I'd spend the next couple of months putting penetrating oil on it. Hopefully she comes free. Snapping it would be a nightmare. Took me 42 hours to do the head gasket in my driveway🤣.