Simbad
Members
-
Joined
-
Last visited
Everything posted by Simbad
-
Chris, thanks so much for all the replies!!!!!! The door beeps is annoying to say the least so it's probably the first thing I'd love to turn off
-
Just uploaded a drive-and-talk in the 20 Series (with timestamps as the video is 54 mins long). I cover some FAQs and things like V6 fuel economy, why I went for 4WD and not FWD, why I avoided the 'low mileage' traps and so on. I also cover a couple of specific gremlins I’m struggling with, like the auto high-beam sensitivity. Would be awesome if any knowledgeable folks that can answer some of these questions. Thanks for the support
-
This restriction exists because, until recently, the maximum statutory speed limit on Japan's national motorways was strictly 100 km/h (approx. 62 mph). Consequently, Toyota hard-coded the cruise control logic in the Alphard's ECU to cap at roughly 109–115 km/h (approx. 68 mph) to ensure compliance with domestic safety regulations. Removing this is difficult because the limit is not a simple toggle in the software settings; it is embedded deep within the ECU's fuel maps and cruise logic. Bypassing it typically requires installing a specialised aftermarket "cruise control unlocker" (such as a Pivot 3-Drive unit) or a complex custom ECU re-flash, as standard diagnostic tools cannot alter this hard-coded safety parameter.
-
NANOE button turns on an air purifier for your car cabin. It releases microscopic water particles through the vents that work to: Eliminate Odors: Removes food, smoke, and sweat smells. Fight Germs: Reduces airborne bacteria, viruses, and mold. Moisturize: Helps prevent dry skin and hair caused by the air conditioning.
-
I'm too OCD to buy something that will leave a tiny mark on my windscreen. I tried replacing mine with the Bosch ones but they were too small. I am now due to get a replacement for the back so will commence my research. Will check out what bodekUK suggested.
-
You may find this video useful about my private purchase directly from Japan:
-
My first UK service was carried out by Toyota in Cambridge. Very knowledgable guys. At the time of my appointment, they had 2-3 other Vellfires/Alphards in the courtyard. I've had the full service and diff oils changed. The only thing they didn't get time to change was the gearbox oil. They turned out cheaper than my local garage!
-
Took the Alphard out today for a spirited drive through some local countryside B-roads. I normally do this as my test drive, you know, to get a proper feel for how a vehicle handles: speed, acceleration, body roll and braking. I obviously don’t plan to drive it like that regularly, and I’m sure most Alphard owners don’t either, aside from the odd 0–60 pull to show off and surprise folks at traffic lights. But I was genuinely shocked at how underwhelming the brakes were. On my first 10min run, they started fading quite dramatically. By the time I was on the return leg, I had to really lean on the pedal — and even then, the car didn’t slow down nearly as much as I expected. When I got home, all four corners were smoking, and the pads absolutely stank of burnt brake smell. For regular day-to-day driving, they seem fine-ish. Both my good old MOT station and Toyota checked them recently and they were within the norm; but give them even a slight push and it quickly feels unsafe. Which has got me seriously thinking that perhaps a brake upgrade is worth it for peace of mind. I do feel exactly the same as I did in my heavy RX hybrid where you pressed the brakes and the car felt like it was still rolling. I don’t like that feeling and I guess it’s because the car is heavy, if not heavier than the RX I owned. I’m thinking of an upgrade and probably some Brembos. Anyone have long-term feedback? Any issues with squeal, dust, or general wear?
-
Genuinely impressed with the main dealer service at Toyota Cambridge today. As someone who owned a Lexus for years, I’ve come to expect a high standard—and honestly, Toyota matched it. Not too surprising given they share the same site and team, but still, credit where it’s due. I booked it in for an interim service, but they went ahead and did the full service at no extra cost (including spark plugs). They also changed the rear diff and transaxle oils, and were upfront about not doing the gearbox oil because it’s a bigger job that needs the sump removed and filters replaced (just like someone mentioned in my earlier post); but told me to pop in during the week when they have more staff and they’d do it for £135! For some reason, my two local garages wanted approx £680 for the job, excluding the diff/axle oils. Toyota charged £430 for everything excluding gearbox oils. Their full service is normally £425, but with the rear oils and other small bits I’ve asked it should’ve been around £600 or so. All in all, very impressed with the dealer—and I’ll definitely be using them again for all my Alphard jobs. I’m more impressed at how cheap the service is in comparison to my previous Volvos and BMWs that would’ve charged me north of £700+ for a full service.
-
Couldn't be happier! Such a great company. Very smooth transaction. Thanks to this forums and its valuable members who helped me find the middle headrest! Can't believe some companies are selling g these for £150, used, on eBay. Joke! IMG_7821.HEIC
-
Thanks! I gave them a call and they’re looking into it.
-
Hey, similar issue here. Did you buy one in the end and how much did you fork out if you don't mind me asking?
-
Hello all. In this video, I share a clear, step-by-step POV guide on how I removed the instrument cluster on my 2012 Toyota Alphard (facelift) to install a plastic MPH overlay. If you're looking to convert your speedometer from km/h to mph, this walkthrough should help you get it done with confidence.
-
Hey all, here's another video to show you my experience in importing a car DIY style from Japan. I saved quite a good chunk of monies in the process!
-
-
Glad this video is proving to be helpful 🙂
-
Great news! My Alphard just passed its MOT. To celebrate, I've created a tutorial video on how to properly install the rear fog lamp using the OEM stalk and relay. This guide is specifically for second-gen Alphards, but based on feedback from first-gen owners, the process should be similar. This project took me months of research and gathering information from various sources. Since I couldn't find a single comprehensive video covering all the steps, I decided to make one myself. I hope this video is helpful to the entire Alphard community. Please like, share, and subscribe to help spread the word!
-
-
I bought it directly from Japan, the below site that people on other forums/group suggested to get OEM parts: https://www.amayama.com/en/genuine-catalogs/epc/toyota-japan/alphard/GGH25W/80091 You have to narrow your search to the exact VIN/chassis/model number of your car as I did in that link above, then you won’t have any issues.
-
Hi all, I’ve recently received my 2012 Alphard and managed to instal the OEM stalk, relay, and fog light for the MOT. I'm grateful for the help I received from the forum members—the information shared here was invaluable. I've begun documenting all the modifications I make to my Alphard, from the day I got it to this latest fog light installation. After a month of research, I'm putting together a video tutorial demonstrating the OEM fog light retrofit (though not in the factory rear location) to make the process easier for others. This video will offer a straightforward, step-by-step guide, saving others the time and effort of extensive research. Here's a short introductory video showing the car's arrival. I imported it myself, saving thousands of pounds in the process. I'll soon be posting a detailed guide outlining the import process and associated costs:
-
I recently finished installing the stalk, relay, and fog lights on my 2012 Alphard. I'm grateful for the help I received from the forum members—the information shared here was invaluable. I've begun documenting all the modifications I make to my Alphard, from the day I got it to this latest fog light installation. I'm creating a video tutorial demonstrating each step of the OEM fog light retrofit (including the stalk and lamps) to simplify the process for others. This video will provide a single, easy-to-follow guide, saving others the time and effort of extensive research. Here's the first video:
-
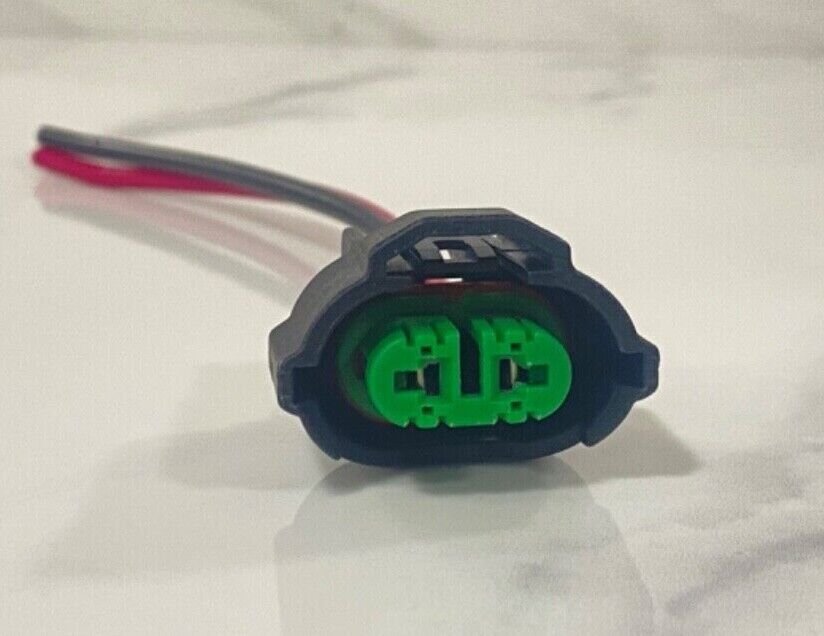
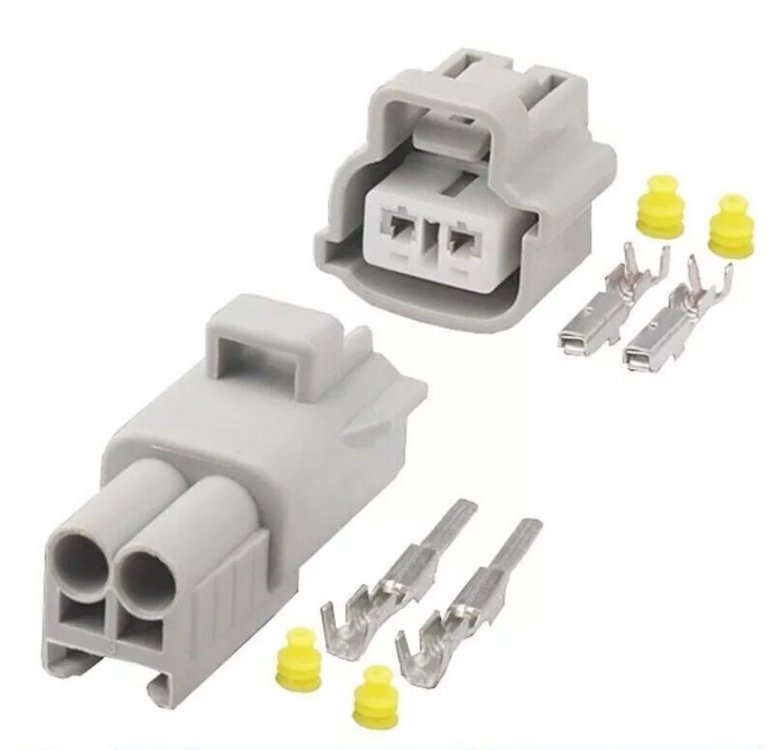
Following with interest. What year is your car? I’m sorting my stalk and fog lamp on Monday. As previously mentioned I have a relay but mine is supposed to be located underneath the passenger footwell not in the engine bay as you showed - is this even the correct place for you? I have a 2012 facelift Alphard 3.5. Based on all the info I sourced, my plan was to install the stalk, possibly add the relay (many mentioned their cars already had this present) that is located underneath the passenger side footwell and then just install the fog lamp to the blank connector that is supposed to be on the right side behind the bumper using the plug connector I bought on eBay (pic below). The reason I ask is because my method seems to be plug and play only.
-
Thanks to this group I secured insurance with Adrian Flux (van is still on the ship) via chassis number. I'll be able to drive the car myself to an MOT station and then home, as per their T&Cs. £470 for the premium itself, but then if you add all the fees and the fact I'm paying monthly, it'll be £680! Still ok for the first year I guess. I'll look around once my car is registered, etc.
-
Hey Chris, thanks for the message. This is what puzzles me (and I guess I'll find out when the car arrives) because I am hearing that on 20 series relay is already there (I bought one anyway just in case). Was relay not present on your 20 series? Also, I am installing the stalk and people advise that if you're using the stalk then relay wasn't required whereas if you're adding some button in the blank space then yes, relay may need to be installed. I am planning to use the existing socket, as seen in your picture on page 4, as it is specifically designed for OEM fog light (left blank on those vehicles that didn't opt to have it installed from factory). Do you know what connector/plug would I need to attach to this. I found the part number being 81215H and so probably this connector is right?