NorthBoy
Members
-
Joined
-
Last visited
Everything posted by NorthBoy
-
Hi, Just wanted to post and pass on a recommendation for Harmony Motors in Birmingham. They just fitted a replacement steering wheel and steering rack. Very efficient and knowledge. Ben Hau knows his stuff.
-
Try this link : - https://www.newdawnconversions.co.uk/toyotaalphardpassengerswivelseat
-
Jimmympv, We're looking at a couple of options currently. We don't want the full conversion (aka VW kitchen and rock and roll bed), as feel that takes up too much space in quite a small area tbh. We are currently looking at various options that have a full time seating bench and kitchen drawer, with the ability to expand into twin bed. Will share some pictures along the way.
-
Beats, many thanks. I’ll have another go.
-
Hi everyone, For those that have done this job, a quick question. How did you remove the white plastic air ducking some from the centre of the console? It inhibits dropping the steering wheel unless removed. Thanks in advice for any pointers.
-
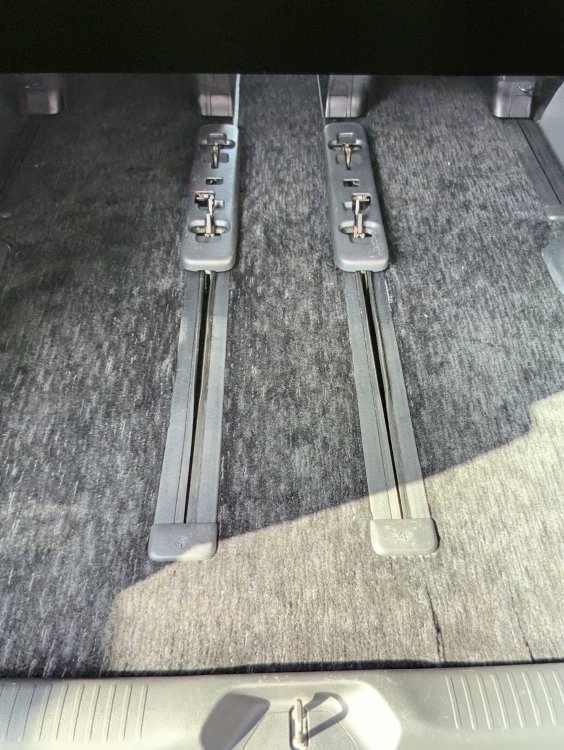
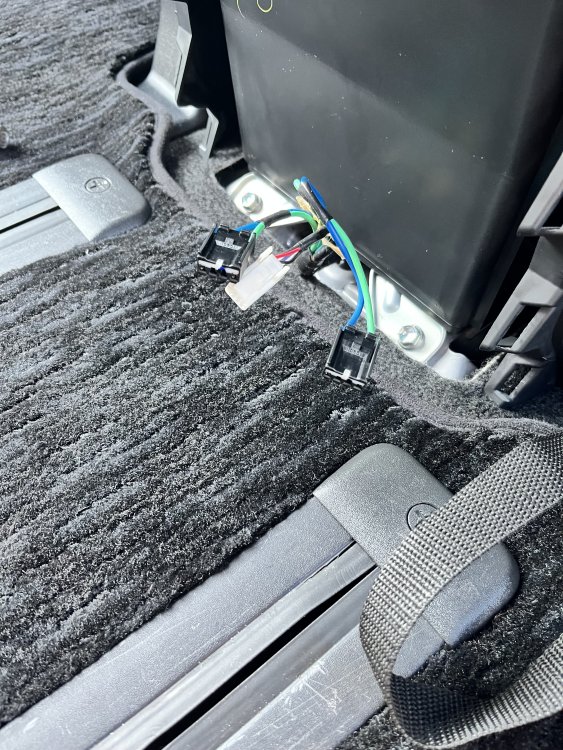
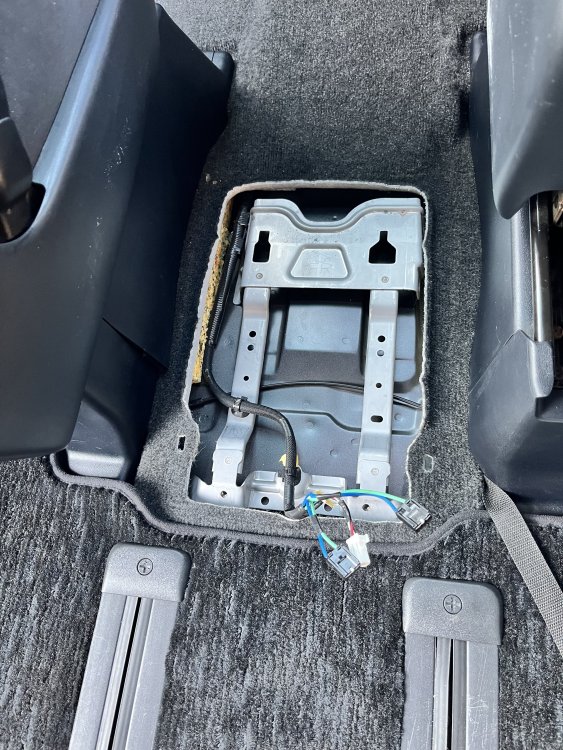
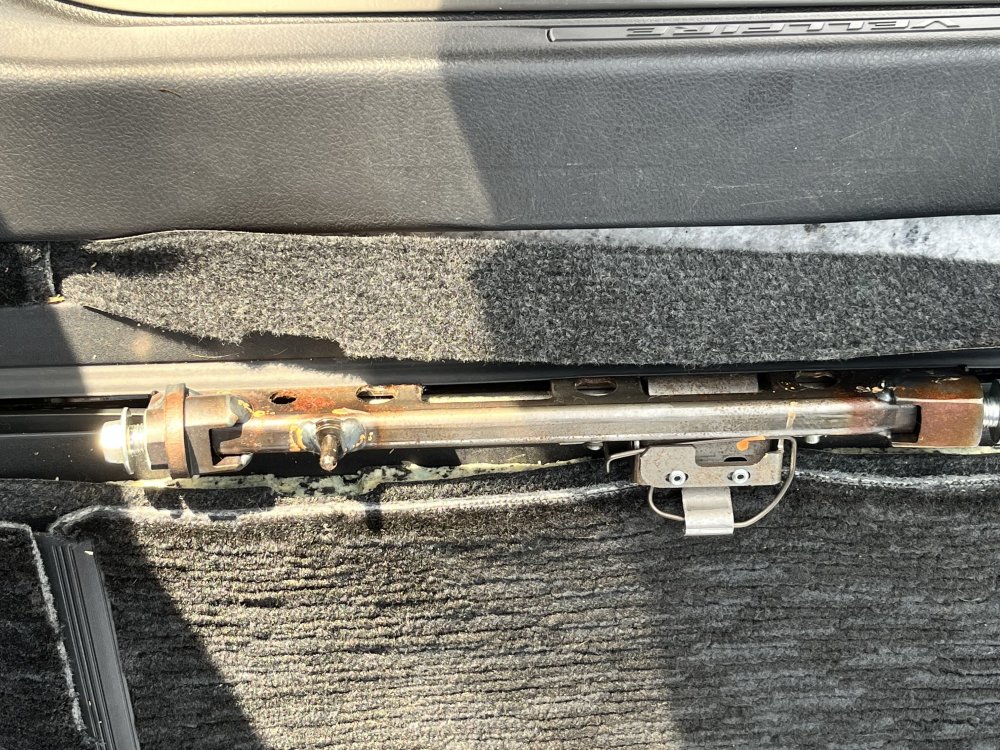
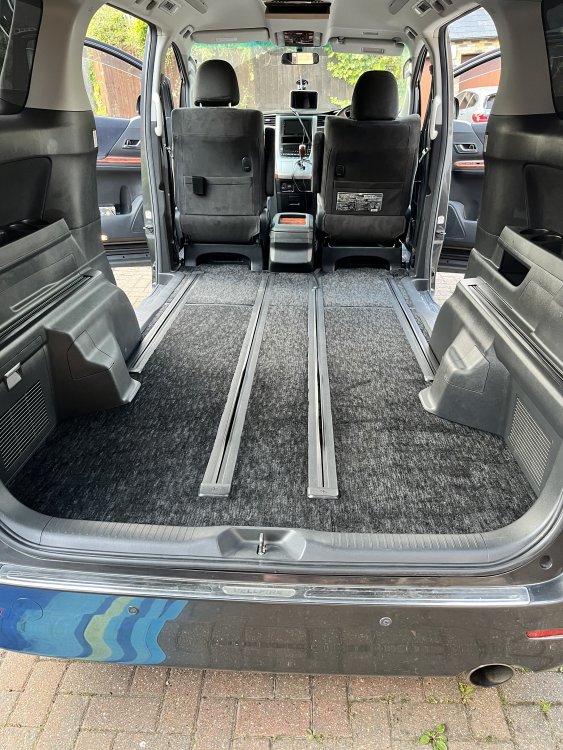
Well over the weekend I managed to finish this little project. Starting with the idea of removing the two rear seats and their sliders that sit in the rails, I eventually removed the middle seats and their sliders as well. I now have an empty back to start the next phase of remodelling. The rails are still in place but that doesn't bother me. This was done without removing the rails from the flooring, which on my Series 20 can only be done by accessing bolts underneath the vehicle. I didn't have the facility to do that. Below, for those that might be considering something similar is now I did this for a Series 20 2010 Vellfire. - I used You Tube videos as a guide for some of this - 'Anything Goes channel has some excellent guides. - The basic approach is that the sliders on the rail have to be removed by skiing them front towards the front of the vehicle. To create space to do that all seats need to removed. - Removed the rear seats and sliding rails and runners on the side of the vehicle. You'll need to physical with the plastic covers on the side of the vehicle, but it is not difficult - Removed the two middle seats. My are manual, so just four bolts and lift. They are heavy so needed a hand with that. - Removed the two front seats. Again four bolts, taking care to disconnect the electric connection underneath before lifting off. Front seats need to be removed so you create space to run the sliders off the rails. There is not enough space at the back between the end of the rails and the rear door sill. - Removed the console between the two front seat. My is a simple plastic box, no electrics. Two screws hold it down on a metal bracket. They are accessible at the rear of the box by removing the plastic cover. Remove the screws, then lift it off by tilting forward first, then up. - Remove the 'stop' brackets at the end of each of the four rails. Becareful to turn the bolt the correct way. The bolts are soft and it is easy to strip the thread. - You'll need to lift the carpet at the front to give you space for the runners as they come off the rails. Nothing is stuck down so can be lifted easily. I also found that I needed to unbolt the bracket that was holding the centre console box as the rails couldn't get past it without it being removed. Four bolts to unscrew. - There is a 'stopping bracket' in each of the two long rails that prevent the middle seats from moving too far forward. Use an Allan Key to take those out. - Carefully slide out the sliders - pressing the release clip. They have loads of crease on them, so clean your hands before touching anything else. I marked with with pen on masking tape so I know what goes where if I ever come to put them back - LHS, RHS, font and back. - That's it really. You'll need to lift the carpet in places, but nothing is glued down. It took me about three hours in total with a little help with lifting the heavy seats and holding back carpet while I unbolted things. Don't forget to put back the 'stops' on the rails so they are not lost. I found the videos on you tube and some of the mentions here on the forum a great help. A few photos attached.

-
Nigel and Gamith, I appreciate your advice. I took a look at the rails when I got home from work this evening. I managed to get the hooks lowered again. Not entirely sure what I did but moving them back and forward seemed to 'release' something and they are both low again! I even managed to remove one of the end stops (fresh eyes and Nigel's words). There is a problem with the bolt on the other rail it keeps spinning without unscrewing - I am guess it is crossed threaded or something. I'll need to work out how to get that undone. Having seen how this works now, I am going to see if the brackets can be slid off the front end of the rails (by the drivers door well - if there is enough space. All the seats will need to come out, but if possible it means I don't need to get under the vehicle. I can then remove the brackets and re-instate the brackets for the middle seats and refit the seats! Nigel - when you unbolted the rails from underneath, did you have the vehicle up on a ramp, or raised on your drive way with a jack and stays?
-
Rojie, Do you have the name of a garage in Coventry? Many thanks, Simon
-
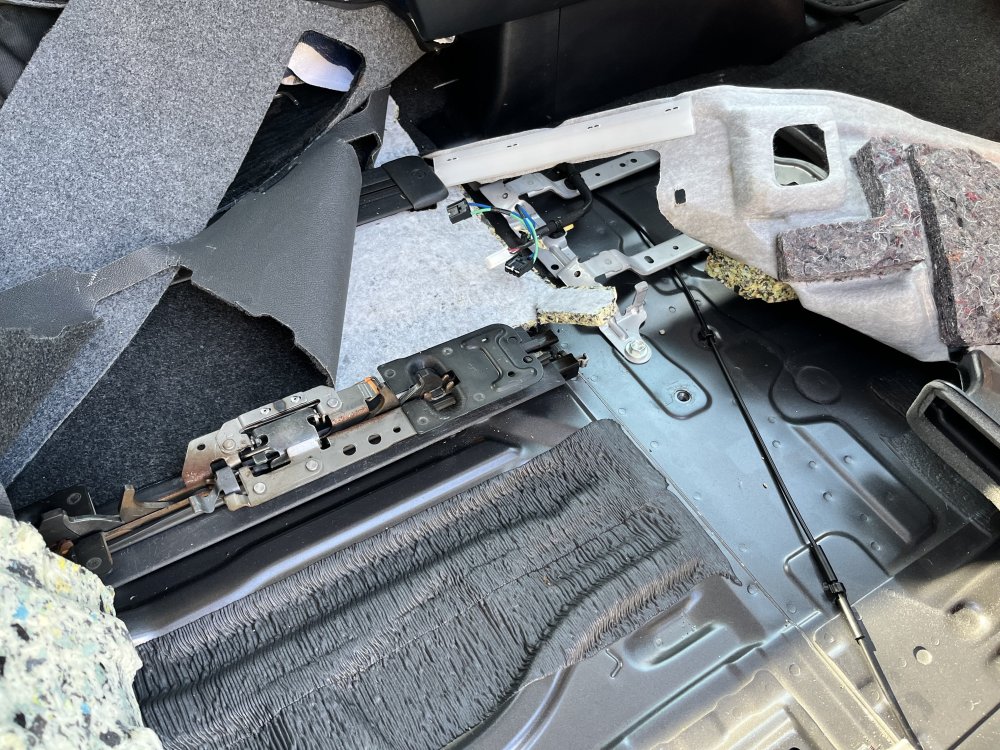
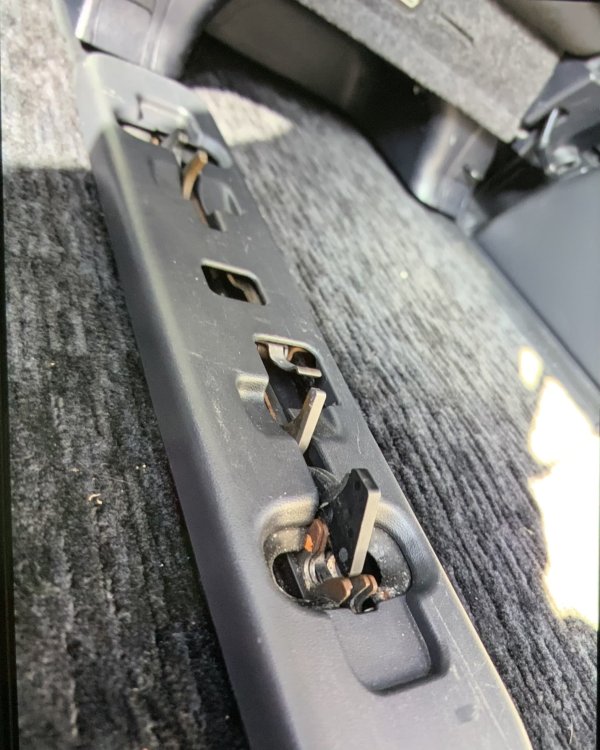
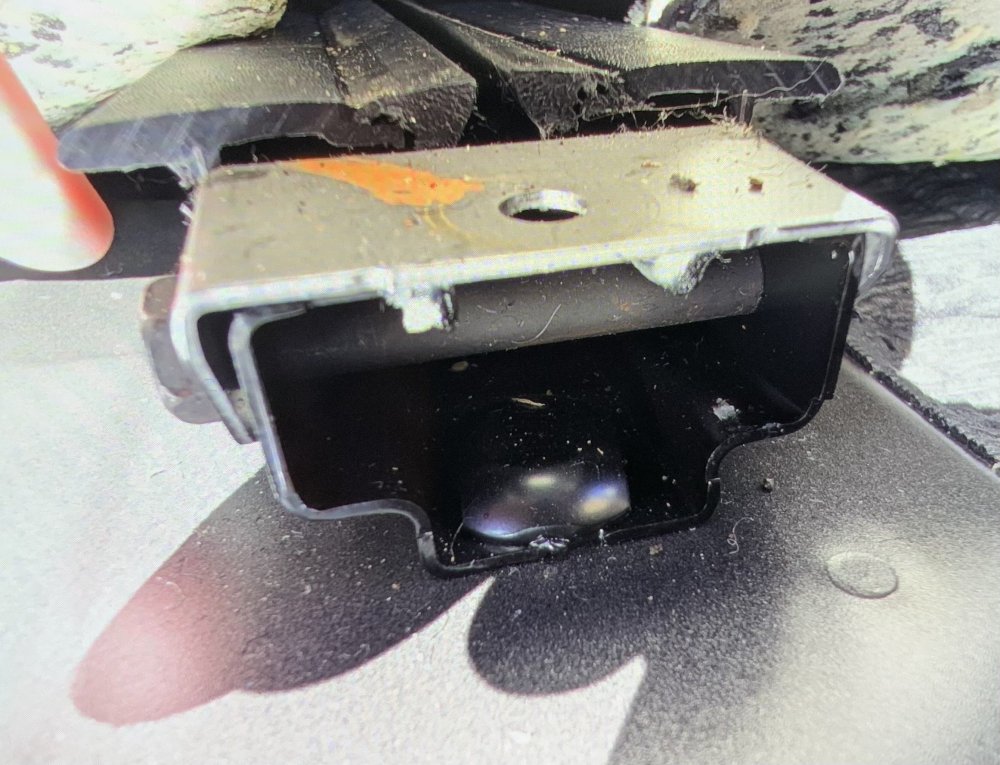
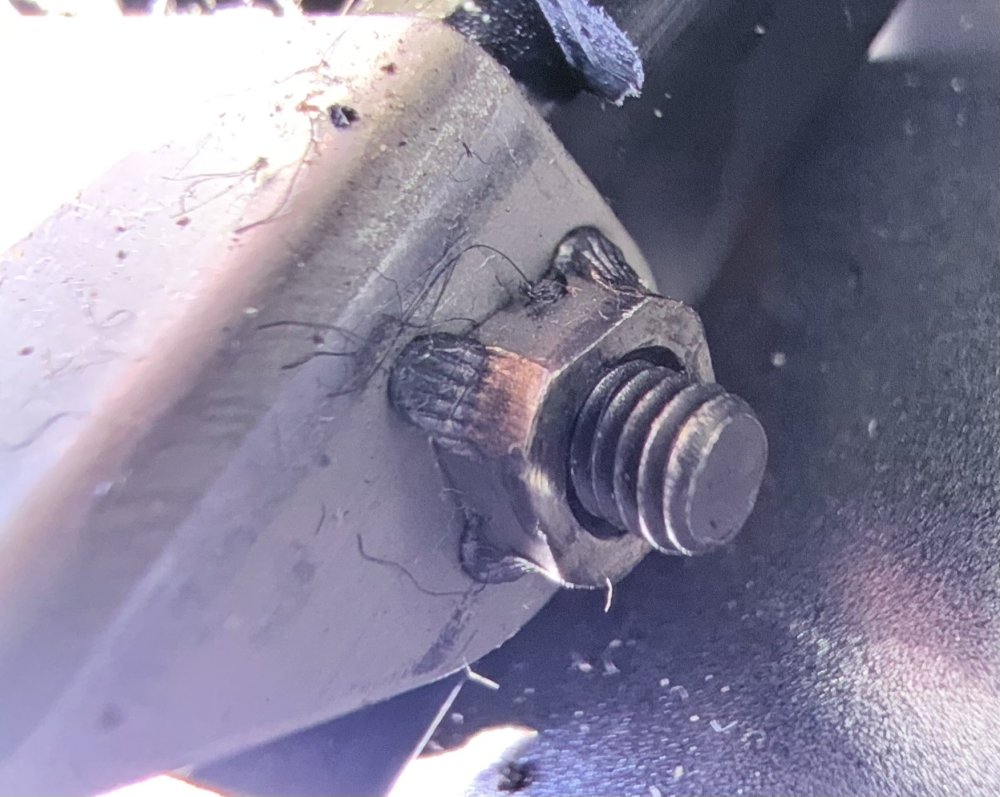
HI, I hope everyone is having a great weekend. I've been busy removing the rear two seats and the running rails that attach on the LHS and RHS side of the vehicle. I sued this Forum and the TC's Anything Goes videos on You Tube for assistance. I am now however stuck, and it is driving me nuts. 1. Firstly, as is shown in Picture 2, the metal clips in the bracket are all raised - how can I lower them? Not sure how they ended up like this, but I can't find away to release them so that lie flat within the bracket housing - Is it possible? 2. Ideally, I want to remove the two brackets that move along the runners on the floor tbh. This will create a completely flat surface for what I want to do next. However unlike series 10, I can't see blots that would allow me to unbolt the runners and slide off the brackets. I've read the other advice for Series 10 and was hoping to following that method, but my runners appear bolted to the underside of the vehicle. with no access from within the vehicle itself Also the bolt (picture 4) on the end of the runner also seems like it is fixed with tag-weld. Is it possible to remove the ends and runners, or do I need to have them unbolted from the underneath of the vehicle? If that is the case, can that be done DIY, or is it a trip to a garage. If so anyone know of a garage/fitter who can do this. I am based in the midlands. Any help on this will be hugely appreciated. Simon

-
Phillix, Did you track down the part number?
-
@big_boz you have given me the confidence to finally give it a go - cheers. I will report back
-
I had a similar problem. Took it back to where I bought it. They replaced the actuator (I think that is what is called), that moves plastic flaps that route hot and cold air to windscreen, feet, etc. The unit is up the side of the centre console, but not easy to get to There are a few you tube videos and other posts about this problem as I remember
-
Big Boz, I have this job to do, but haven’t had the time yet. I have the the same ‘sticky dash fit’ product from Oz, but have been a little apprehensive in using it yet. Your post does however fill me with hope. A couple of questions if I may: - — how did you use the cleaning spray and how did it leave the surface? I’ve previously tried to clean off the sticky stuff before I knew what I was doing with normal cleaner, and don’t want to create more mess. - when you applied the finishing coat did you paint down front of the console plastic - the area that connects with the clove box - I have fine single line cracks in some areas does the Sugru work for those, or just big holes. Any advise will be gratefully received.
-
Craig, I had the same problem. It is not a difficult job, although a little fiddly. I got the part from Jap Euro car parts. I can’t remember the part number but it looks like the attached. For fitting I found you tube Rav 5 videos good to show you what to do. The design and layout is the same. Basically - remove from RHS wheel, remove the plastic covering that separates this area from the engine area, and you’ll see the washer fluid tank with the two pumps - one for front, one for rear at the bottom. They are held in with washer so can be pulled off. To check it is the pump and not the fuse. Swap the rear (working) pump and plug it into the front socket. If it works the pump is the problem. If it doesn’t, then you’ll need to look at the electrics. Hope that helps

-
Hi everyone. I want to refurbish my steering (2010 Vellfire) as the gloss finish on the ‘wood’ areas has started to delaminate. Before I start this project I wanted to know if anyone else has done this, by removing the steering wheel and rubbing the gloss down. I’ve seen a few video on utube and it doesn’t look too difficult. First question I have though, is the ‘wood’ actually wood or a hard plastic? Cheers in advance for any pointers.
-
Thanks for this. Nice looking console, no wood effects Toyota plastic like mine!
-
I’ve order the QC3 unit. I’ll confirm how I get in. Many thanks for the advise and links, very helpful.
-
Hi all, I'm new to my Vellfire 2010 and wiring electric sockets. I am looking for a twin USB socket to install next to the 12v cigarette socket in the central unit below the gear stick. I have seen an old YouTube video from Malaysia with the exact unit with a patch cable to take power from the 12v cigarette socket. However, I can't for the life of me find where this, or something similar can be found. Any kind soul who has done this job, wants to point me in the right direction? All the best for a great weekend.
-
Yup, I failed to find a reference to the area
-
Hi, can anyone recommend a garage in the Northamptonship area that is capable and reliable for general work (service) and repairs on series 20 vellfire/alphard. Thanks in advance.
-
Thanks for the detailed explanation. I will how, likely go down this path and adopt the same solution. The temporary magnetic sleeve hasn’t really worked.
-
@smurfVery useful post. I was looking for a solution that didn’t involve me attaching the rail to side of the vehicle, and yours might be the way to go. Couple of questions:-— - did the existing rubber length pull out easily? - what adhesive did you use? - did you need to drill a hole at the top end for the self tapping screw, or was there something me already there?
-
🤣
-
Have you used the product yet. If so, did it work?