
Chris.ac
Moderators
-
Joined
-
Last visited
Everything posted by Chris.ac
-
Sorry, just to be clear - what BT part? I have jotted out all the wire colours on paper, and am trying to cross check against various wiring schematics to slowly tick them off. Identified the Blue GVIF plug is for front and side cameras. Brown GVIF is Digital TV, so effectively a free high res video input that can be used to feed a 360camera system or a UK spec TV decoder (Research will follow). The Brown GVIF has to be connected along with the 12 pin grey plug (Video signal to the rear dropdown monitor) The black 8pin connector is the AUX AV (which I am using to feed android auto/carplay) The other large connector is 22 pins+a removable 8pin connector - the 8pin part is what connects to the external 18speaker amplifier - what the other 22 pins do I have not figured yet) The main power connector is parking brake, reverse sense, speed sense, steering controls, ACC, IG, Battery, Ground, rear camera, (Maybe microphone too) The white connector of 6pins+a digital coax, no idea yet. FM/AM antenna is the two round pins in a socket, GPS is the small grey socket, the other two antenna sockets must be for ETC, DTV, the 'G' connect and cellular systems. ETC video feed, and sonar connects to some of the pins (Sonar will display on the screen if you remove the camera feeds) Wish there was a wiring schematic for this headunit! but I am getting there
-
2010 an additional air cool radiator was added passenger side cavity in front of wheel/behind bumper for the U660E transmission. m_01_0035.pdf unfortunately, I believe the 2.4lt engine uses a U241E transmission (4speed auto) or the CVT transaxle - I am missing that page detailing this model revision!
-
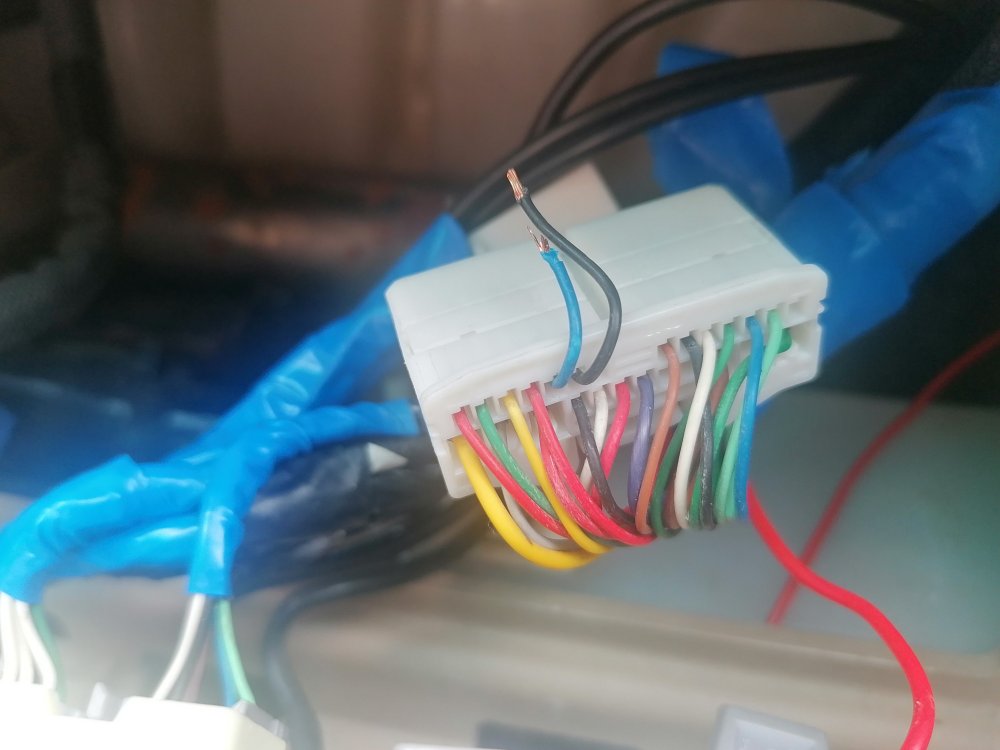
blue and black wires, speed sense (prevents fiddling with satnav/GPS whist moving, pointless to us as its Japan specific) and parking brake. I taped up loom side. connect the socket side wires to earth. I plan on wiring to a switch at some point, do I can revert to standard operation.
-
blue and black wires, speed sense (prevents fiddling with satnav/GPS whist moving, pointless to us as its Japan specific) and parking brake. I taped up loom side. connect the socket side wires to earth.
-
will do in the morning
-
yeah, some android headunits (like the tesla style ones) have a canbus connection, and let you adjust the settings like in carscanner, too.
-
As far as I can see, carscanner accesses the same ECUs as techstream. I bought techstream just to program my own spare key, as the cost of the cable/software and unprogrammed key was less than a key to be supplied and programmed for me by a specialist! If you can get a decent BT OBD2 dongle, carscanner is perfectly adequate Edit: I leave the BT dongle connected permantly, so I can fire up carscanner whenever I want to do checks, or have additional gauges on display, one of the gauges I found useful was the one showing what gear you were currently in, as when in 'D' it will actually show the gear changes numerically
-
If you want a simple setup of the software and drivers, you can install a virtual machine of windows xp with techstream preinstalled - over on this forum. https://forum.ih8mud.com/threads/how-to-techstream-in-5-minutes.1034923/
-
I have a similar USB socket as Steve linked, except mine is 'reversible port' so you can connect the usb cable either way around, good when fumbling with eyes on the road.
-
anyone with the headunit posted by 'steve in chester', above, I can tell you the 2 pins at the rear of unit to bypass the handbrake/speed restriction detect. This lets you adjust BT settings whilst on the move, (Now my wife can swap over the phone source without me having to 'park' to do so!)
-
yep, this is good, you can use the fact that the calling and media are separate BT connections in order to use BT media storage/players, or a second phone just for things like music, streaming radio etc.
-
Same with techsteam, no alarm option. But.. this may be because the fuse is not fitted, so a 12v signal is not applied to the correct pin of the certification ECU. Will try tomorrow by fitting the fuse and relay, see if it energises the circuit, techsteam will ignore ECUs that it can not communicate with due to powered down.
-
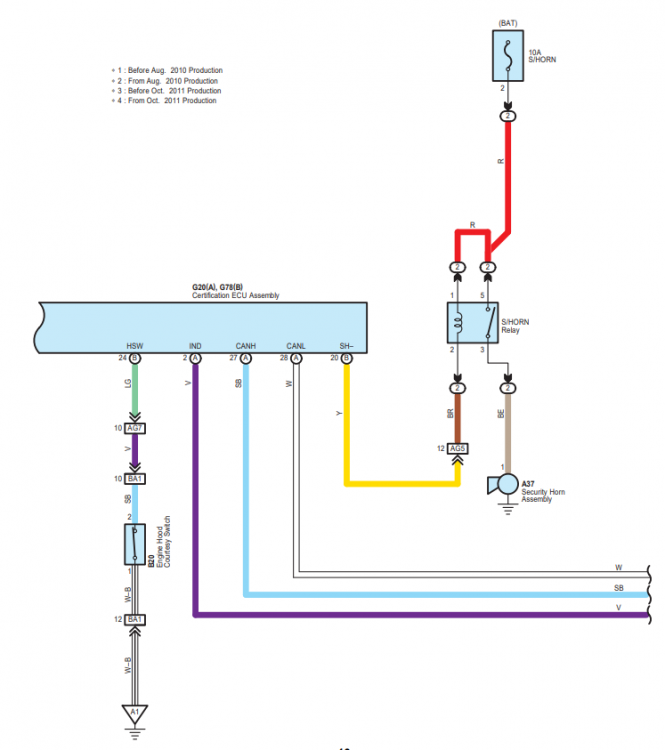
I would suggest, that the manuals reference to the 'hood' being opened is related to this switch: Edit: found wiring diagram containing both S/horn and Hood switch:
-
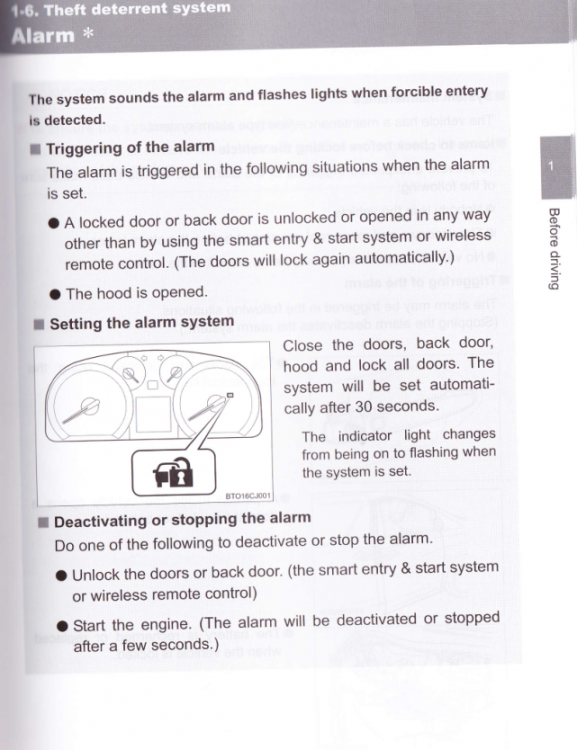
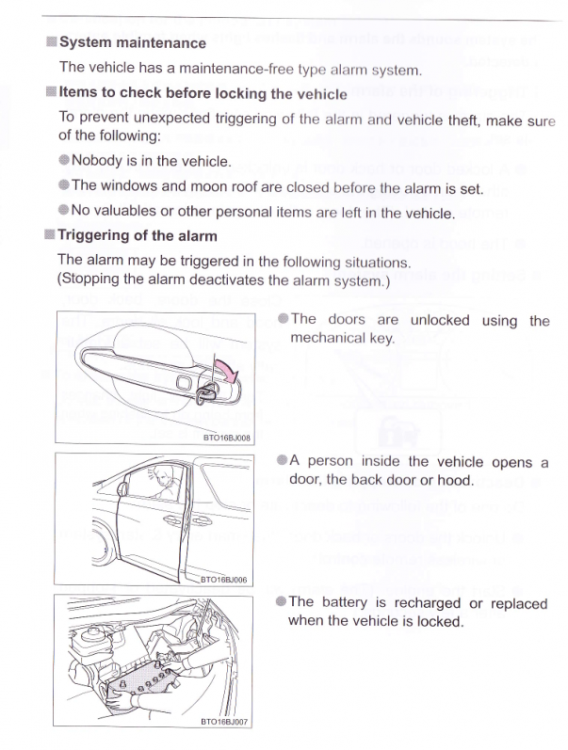
English manual pages:
-
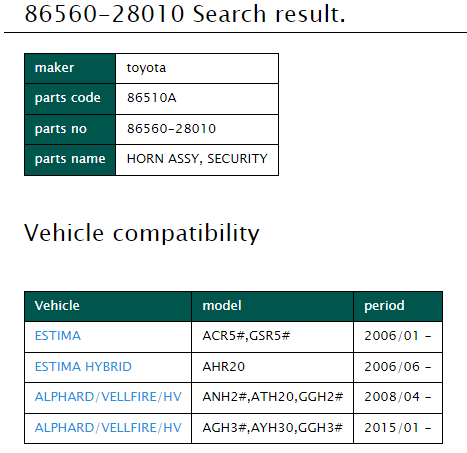
or... just buy the security horn.. https://www.amayama.com/en/part/toyota/8656028010 I always overcomplicate stuff, lol. im sure the part number is common to toyotas, so may be cheaper than the £30ish to buy/import one
-
If we take the pin 3 o/p from the relay, this will be 12v when relay is active (alarm state) > we feed this to the coil on another relay, with the other side grounded, then the switched part of the new relay will connect earth to the pin 2 of the normal horn relay. This will cause the normal 2 tone horns to sound in an alarm state.

-
Edit: Added post further down thread containing Wiring diagram for security horn related circuit
-
Fuse is located in the right hand side relay box in engine bay, too.
-
an easy way to check if you have a factory alarm, is to check for presence of the S/Horn relay (security horn). it's located next to the regular Horn relay position in the left fuse/ relay box in engine bay
-
Yes, and when you reset it it transfers that value to the headunit, took me a while to figure out how to populate the consumption chart
-
What head unit do you have, and what type of dash display do you have? several types of layout. On mine the button on steering wheel cycles between instantaneous fuel consumption, trip avg, and overall average. Long press on the trip average resets it, and copies the last value over to the headunit, where you can see a graph plot over trips.
-
Not sure if same as 20 series, but, on my older Regius, you could undo the single bolt on the door plunger switch which turned on the courtesy lights (and the door open chimes) the bolt is what made the ground connection, so the door is not detected as open
-
This version: https://www.aliexpress.com/item/1005001505549002.html Appears to have the same coloured icons as the ones ben installs, and uses the physical scroll knob/buttons, so you dont need to fiddle with the screen dismantling. Same company, so I will ask their customer service team for a firmware update With this version, you would only need to feed the box with power, as the video will connect straight to the phono connectors and you have a physical jog dial
-
A whole new unit would give a cleaner system, with higher resolution, and better connectivity. Just for info, the system I bought is linked below, it was a private purchase, and my motivation was wanting something like what Ben installs, but with the option of being able to install to my standard, and save cash: https://www.aliexpress.com/item/1005004065427172.html Who is to say if it is a cheaper clone version, and if it will break down in a couple of months, however, as someone from an electronics background, and understanding IPCC standards, I opened up this box, and the standard of soldering seems perfectly good - the board itself seems to be a generic input/output board with a mounted logic daughter board - I would guess the only difference between this and Bens version is firmware, as the icons, switchgear and connectivity instructions appear identical
-
Also, if your battery on fob dies, the fob is able to still work if you touch it to the start button, like wireless charging


