Leaderboard


Popular Content
Showing content with the highest reputation since 01/20/2025 in all areas
-
7 pointsI'm a new owner of an 2013 Hybrid and i'm just searching relevant inf and documentation ref my model, so far i have the attached, if anyone else have any other, please share you never know when you need it maintenance-schedule.pdf auto-service-repair-manuals-and-wiring-diagrams-pr.pdf toyota-alphard-vellfire-em2441e-overall-electrical-wiring-diagram.pdf Toyota-ALPHARD-VELLFIRE-EM2441E-Relay-Locations-pdf.pdf Alphard-2-Vellfire-20-2008-2015-fuse-and-relay.pdf CAMSHAFT-VALVE-TOYOTA-ALPHARD-VELLFIRE-HV.pdf ALPHARD-VELLFIRE-Service-sheet.pdf hybrid-vehicle-dismantling-manual-for-ath20.pdf Alphard-20-Manual-pdf.pdf7 points
-
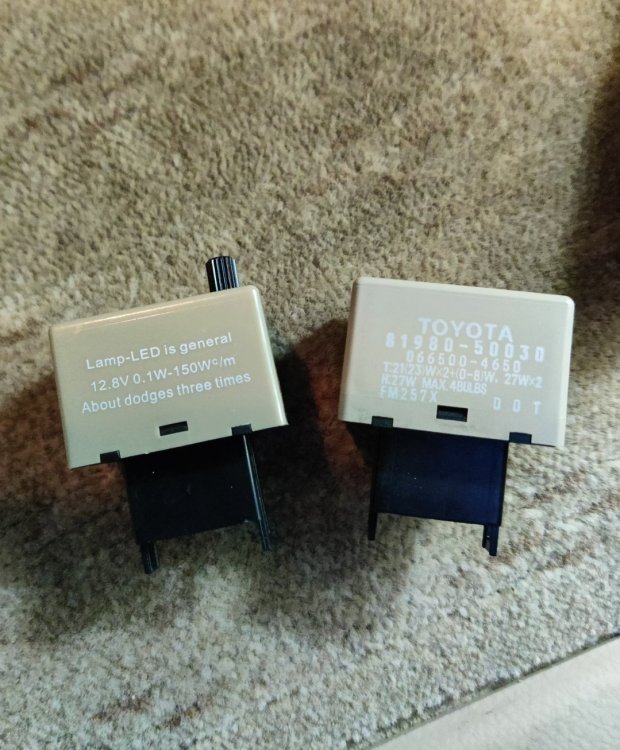
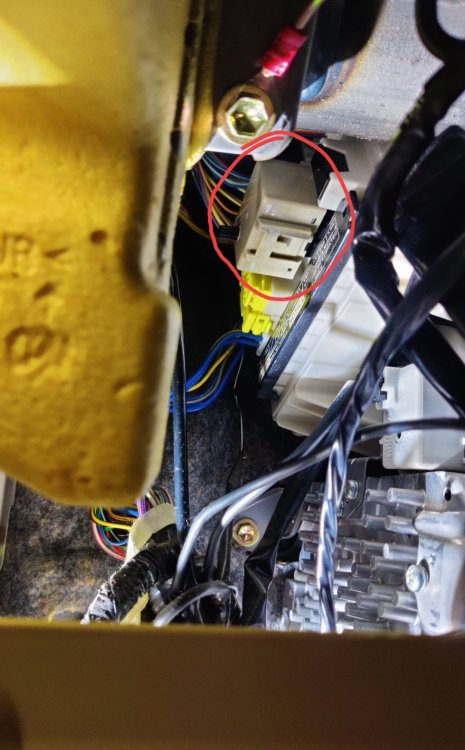
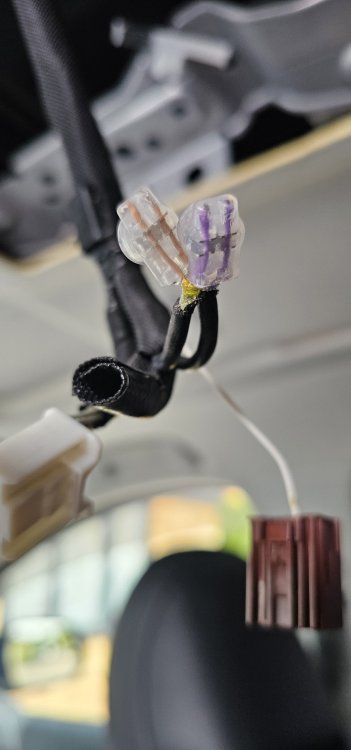
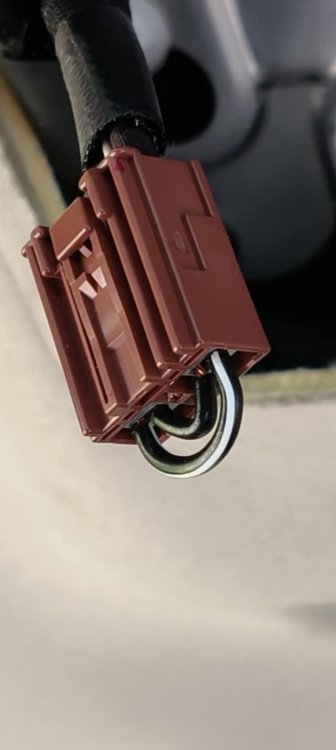
One thing I missed when driving my gen 1 Alphard is the indicator lane change 3 flash that is in many newer vehicles these days, and I got so used to using it that when driving my Alphard I often forget and just flick the indicator to change lane and, of course, I get one flash. I'd seen someone was selling an alternative direct replacement flasher relay for upwards of £50 that was modified to give the 3 flash, but that price was too much for me to just avoid holding the indicator down a bit longer. A bit of research turned up a potential alternative for less than £10 on eBay. It didn't specifically mention the lane change function as it seemed to be more aimed at people retro-fitting LED indicator bulbs and messing up the flashing rate, but I had a suspicion so I took a punt and bought it. The original Toyota item and the replacement are shown below. Notice the knob for adjusting the flash rate, and poorly translated "about dodges three times" on the replacement relay. Fitting it was easy enough. Simply pull out the coin drawer thingy just above the bonnet and fuel flap release levers on the driver side of the dash and look in. The relay is fairly obvious. The relay put up a fight and was reluctant to release, but a bit of jiggling and a little bit of leverage from a screwdriver got it out. This photo shows the new one fitted. I turned the hazards on and the flash rate was very fast, but with a quick twiddle of the knob on the relay I had the flash rate back to where it should be. Then the moment of truth - ignition on and flicked the indicator stalk. Three flashes and stop 👍. £10 and 10 minutes work. Bargain! This is the one I bought on eBay, but there appears to be loads of sellers as the original Toyota relay was used on many different models, as you could imagine. https://www.ebay.co.uk/itm/386806258020?mkcid=16&mkevt=1&mkrid=711-127632-2357-0&ssspo=xfg_a3ycs9s&sssrc=4429486&ssuid=ql8_keC9RJe&var=&widget_ver=artemis&media=COPY
 5 points
 -
4 pointsFitting a tow bar to a Toyota Alphard MNH10 (3.0L V6, 2002–2008) in the UK involves a specific legal procedure that you must address before picking up a wrench. Because these are "grey imports," standard UK towing laws apply differently than for UK-market cars. 1. The Legal Hurdle: VIN Plate & Towing WeightsMost imported Alphards do not have a Gross Train Weight (GTW) stamped on their VIN plate. The Risk: If your VIN plate does not show a GTW (the second biggest number on the plate), your legal towing limit is 0 kg. Towing a trailer in this state can void your insurance and is illegal. The Fix: You must get the vehicle "replated." A specialist engineering firm will calculate the safe capacity and issue a new, legal VIN sticker to stick over the old one. Recommended Specialist: SVTech (UK-based) is the standard go-to for this. Estimated Cost: Approx £150 – £170. Action: Check your VIN plate (passenger door pillar or under the bonnet). If the GTW field is blank, contact SVTech before towing. 2. Weight Limits & SpecificationsOnce legally replated, the 3.0L V6 MNH10 typically has these limits (using an online calculator): Towing Capacity (Braked): 1,600 kg – 1,800 kg (Dependent on the replating certificate). Towing Capacity (Unbraked): 750 kg. Nose Weight (Vertical Load): 75 kg. Note: The rear suspension is soft. If you tow near the limit, the rear will sag. Many owners fit "assister springs" (e.g., from Grayston) inside the rear coil springs to stiffen the ride. Kerb Weight: ~1,900 – 2,000 kg. 3. Mechanical Fitting ProcedureTime: 2–3 hours | Difficulty: Moderate DIY Key Note: The tow bar usually replaces the rear crash beam. You will remove the crash beam and not refit it. Tools: Socket set (10, 12, 14, 17, 19mm) + Extension bars. Torque Wrench (essential). Jigsaw or Padsaw (for bumper cut). Drill with 12.5mm metal bit. Step-by-Step: Preparation: Lower and remove the spare wheel to clear the work area. Exhaust: Detach the rear exhaust rubber hangers. You don't need to remove the exhaust, just lower it enough to work above it. Remove Towing Eye: Remove the factory towing eye (usually held by 4 bolts) from the chassis rail. This will not be refitted. Chassis Access: The mounting points are pre-drilled in the chassis rails but may be covered by tape or underseal. Drilling: Some kits (like Tow-Trust) require you to drill through the outer face of the chassis rail, using the existing inner holes as a guide. Insert Spacers: Crucial Step. You must insert the metal spacer tubes into the chassis rails before bolting. If you forget these, tightening the bolts will crush the box-section of the chassis, causing structural damage. Mounting: Lift the tow bar crossbeam into place (ideally a 2-person lift). Insert bolts loosely. Bumper Cut: Most MNH10 tow bars require a cut on the underside of the bumper (non-visible from standing). Typical Dimensions: 90mm wide x 50mm deep. (Check your specific kit's manual to be sure). Tightening: Torque the bolts to the manufacturer's spec. If not specified, standard ISO ratings for M12 bolts are: Coarse Pitch (Standard): ~102 Nm Fine Pitch: ~111 Nm Reassembly: Raise the exhaust back onto its hangers. Winch the spare wheel back up (check it doesn't foul the new tow bar structure). 4. Electrical Wiring (The "Bypass" Requirement)The MNH10 uses an analogue lighting system, but it is sensitive. You cannot simply scotch-lock wires directly to the bulb holders without a relay, or you risk blowing the lighting control module. Required Kit: A "7-Way Universal Bypass Relay" wiring kit. Connection Point: The best access is behind the Nearside (Left) Rear interior trim panel. You will often find a Blue and White connector block here which carries the rear lighting feeds. Wiring Colors (Guide Only - Always Test with Multimeter): Earth: White/Black Stop: Green/White Tail: Green Indicator (Left): Green/Black Indicator (Right): Green/Yellow Tip: Use a multimeter or 12V test light to confirm these before cutting. Power Feed: You will need to run a dedicated 12V power feed from the battery (front) to the bypass relay (rear), fused near the battery. 5. Critical Consideration: Transmission CoolerThe 3.0L V6 (1MZ-FE engine) is paired with a specific automatic gearbox. The Risk: The radiator cools both the engine and the gearbox fluid. When towing, the gearbox fluid gets incredibly hot. The stock cooler is often insufficient for towing >750kg, leading to gearbox failure. The Fix: Fit an external Transmission Oil Cooler. This is a small radiator (approx £50-£80) that sits in front of your A/C condenser. It is cheap insurance against a £2,000 gearbox rebuild. Summary Checklist for UK OwnersCheck VIN: Is GTW stamped? If No -> Contact SVTech. Buy: Tow bar (e.g., Tow-Trust or PCT) + Universal Bypass Wiring Kit + Transmission Cooler. Install: Remember the chassis spacers and the torque settings (100Nm+). Test: Verify lights and ensure the spare wheel is secure. Oil Cooler For the Toyota Alphard 3.0L V6 (MNH10), you specifically need an Auxiliary Air-to-Oil Transmission Cooler. Do not buy a "standard replacement" transmission cooler from a general parts site (like AutoDoc or Euro Car Parts). Those are usually the stock water-cooled units that fit inside the radiator—they are what you already have, and they are not sufficient for towing. You need an external radiator kit that sits in front of your air conditioning condenser to provide extra cooling. 1. Recommended Kit & SpecificationFor the Alphard V6 towing up to 1,600kg, the "Gold Standard" specification is: Brand: Mocal (highly reliable, UK standard) or Setrab. Size: 13-Row or 16-Row (13-row is standard, 16-row is better for heavy caravans). Width: 235mm (Standard width, fits easily behind the Alphard grille). Hose Size: Typically 10mm (3/8") for Toyota transmission lines (check this on your van before ordering). 2. Where to Buy in the UKOption A: The Specialist (Best Quality)These suppliers sell complete "Universal" kits that include the cooler, hoses, mounting brackets, and clamps. Demon Tweeks (Wrexham / Online): Look for "Mocal Universal Oil Cooler Kit". They are very helpful on the phone if you are unsure about fittings. Merlin Motorsport (Castle Combe): A dedicated race/performance shop. They stock Mocal and Setrab and sell the hose by the meter if you need extra length. Think Automotive (Isleworth): They are the actual manufacturers/distributors of Mocal products in the UK. If you call them and say "I need a transmission cooler kit for a 3.0L Toyota," they can build a kit with the exact right hose barbs. Option B: Budget / General (eBay & Amazon)You can find "Universal Transmission Cooler Kits" for £40–£60. Search for: "Universal Transmission Oil Cooler Kit 10mm". Brands: Hayden or Mishimoto are decent mid-range options. Warning: Avoid the very cheapest unbranded kits (<£30); the hoses are often low quality and can burst under pressure, which would destroy your gearbox in seconds. 3. What to Order (The Shopping List)If you are buying the parts individually, you need: The Cooler: 13-row or 16-row Mocal oil cooler. Fitting Kit: 4x Mounting brackets (often plastic ties that go through the radiator fins, or metal brackets). Hose: 2 meters of high-pressure transmission oil hose (10mm / 3/8" internal diameter). Joiners: You do not need complex screw fittings. You need barbed joiners to splice into the existing rubber hoses coming from the gearbox. 4. Installation TipThe Alphard V6 gearbox lines exit the gearbox and go into the bottom of the main water radiator. Correct Flow: You should plumb the new cooler in series after the main radiator. Route: Gearbox -> Main Radiator -> New Cooler -> Back to Gearbox. Why: This uses the water radiator to get the fluid up to temp quickly, and then the new air cooler sheds the excess heat before the fluid returns to the delicate gearbox mechanics. Correct Flow Positions & Tests For the Toyota Alphard MNH10 (V6), the transmission cooler lines are not consistently colour-coded or stamped "In/Out". Because guessing incorrectly can overheat your gearbox, you must confirm the flow direction physically. The only 100% safe way to identify the return line is the "Bucket Test". 1. The "Bucket Test" (Fail-Safe Method)You need to intercept the fluid after it leaves the main radiator but before it goes back to the gearbox. Locate the Hoses: Find the two rubber hoses connecting the gearbox to the bottom of the main radiator. Disconnect One: Disconnect one of these hoses at the radiator end. Prepare: Place the open end of the rubber hose into an empty bucket. Place a clear plastic tube (or just a finger/rag) over the open metal nozzle on the radiator to catch any fluid. The Test: Have a helper start the engine and immediately turn it off (run for 2–3 seconds max). Identify the Flow: Option A: If fluid spurts out of the Radiator Nozzle, that nozzle is the Feed (coming from the gearbox). The hose you are holding is the Return line. (This is the hose you want). Option B: If fluid spurts out of the Rubber Hose, that hose is the Feed from the gearbox. The radiator nozzle is the Return. Reconnect this hose and test the other one to be sure. 2. How to Plumb the New CoolerTo get the maximum cooling for towing, you should install the new cooler in Series (after the radiator). Correct Flow: Gearbox -> Main Radiator -> New Auxiliary Cooler -> Gearbox Why: The main radiator helps warm the fluid up quickly in winter, and the new cooler sheds the excess heat generated by towing before the fluid returns to the sensitive gearbox mechanics. Connection Steps: Identify the Return Hose using the test above (the one that carries fluid back to the gearbox). Disconnect this hose from the radiator. Connect the Radiator Output (where you just pulled the hose off) to the New Cooler Inlet. Connect the New Cooler Outlet to the original Return Hose (which goes back to the gearbox). 3. Parts ConfirmationHose Diameter: The MNH10 uses 10mm (3/8") internal diameter transmission hose. Clamps: Use proper fuel injection clamps (solid band), not the cheap worm-drive jubilee clips which can bite into the rubber and leak. Top Up: Installing a cooler adds volume to the system. You will likely need to add 0.5L – 1.0L of Toyota Type T-IV fluid (or equivalent JWS 3309 spec). Check the dipstick with the engine running and warm after installation.4 points
-
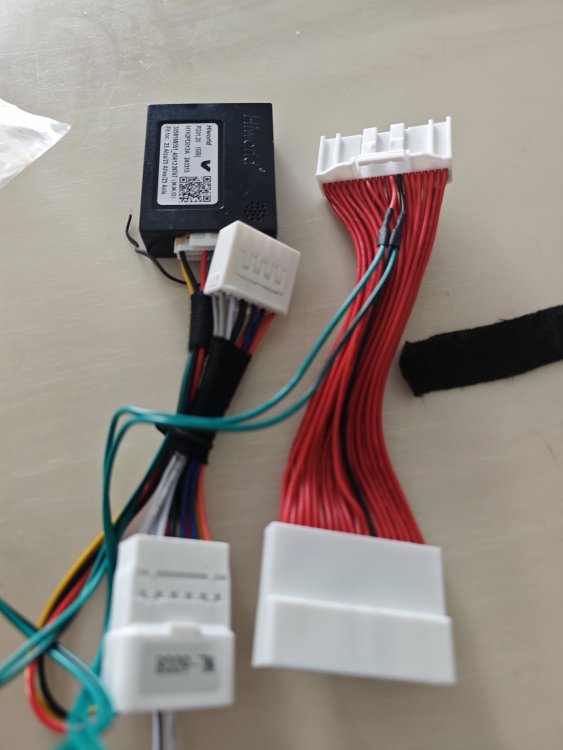
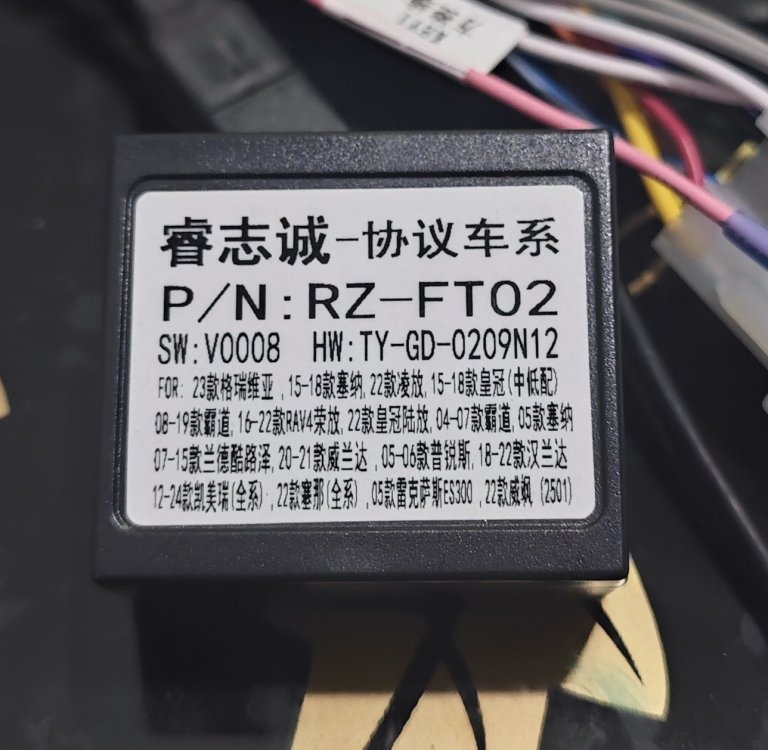
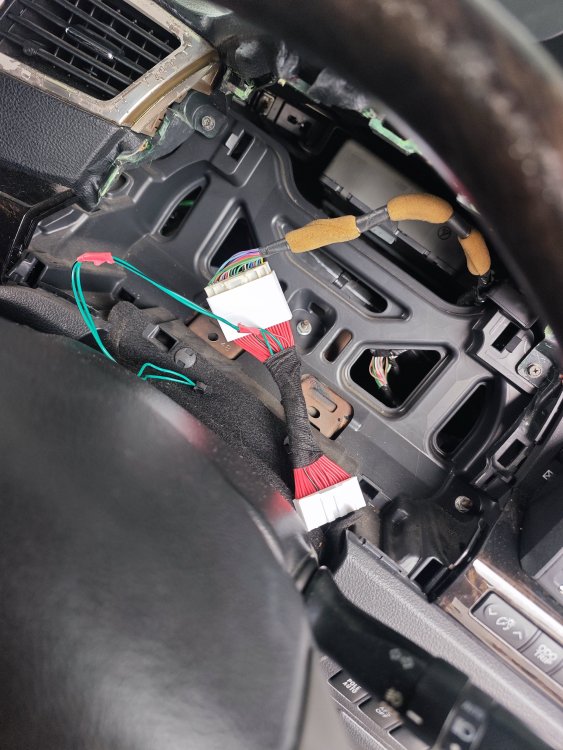
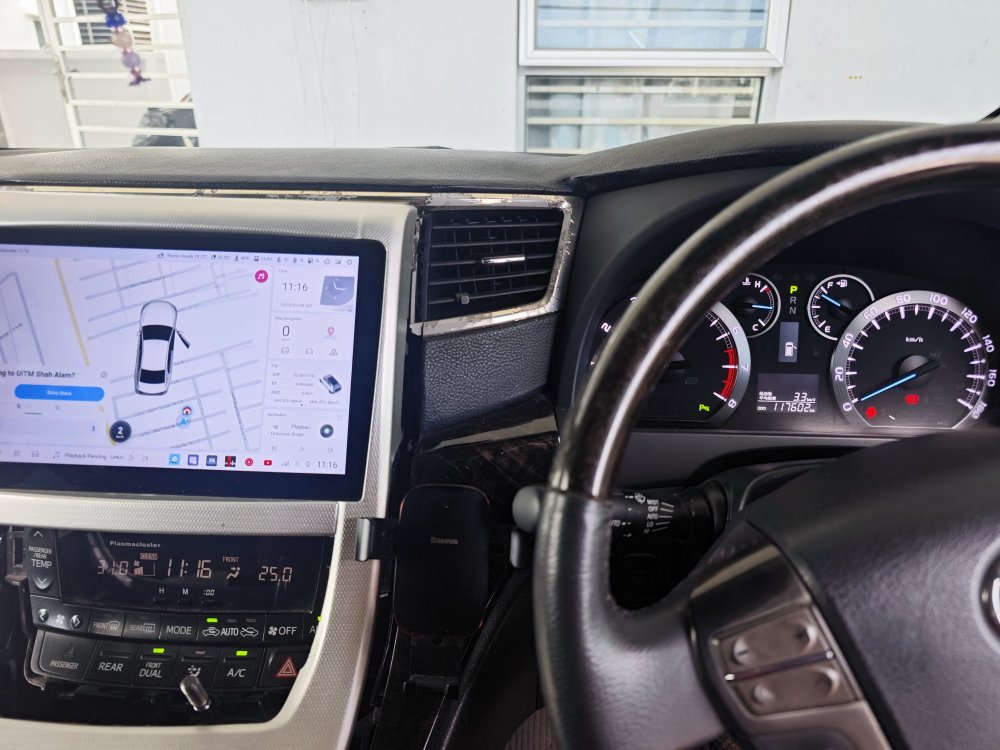
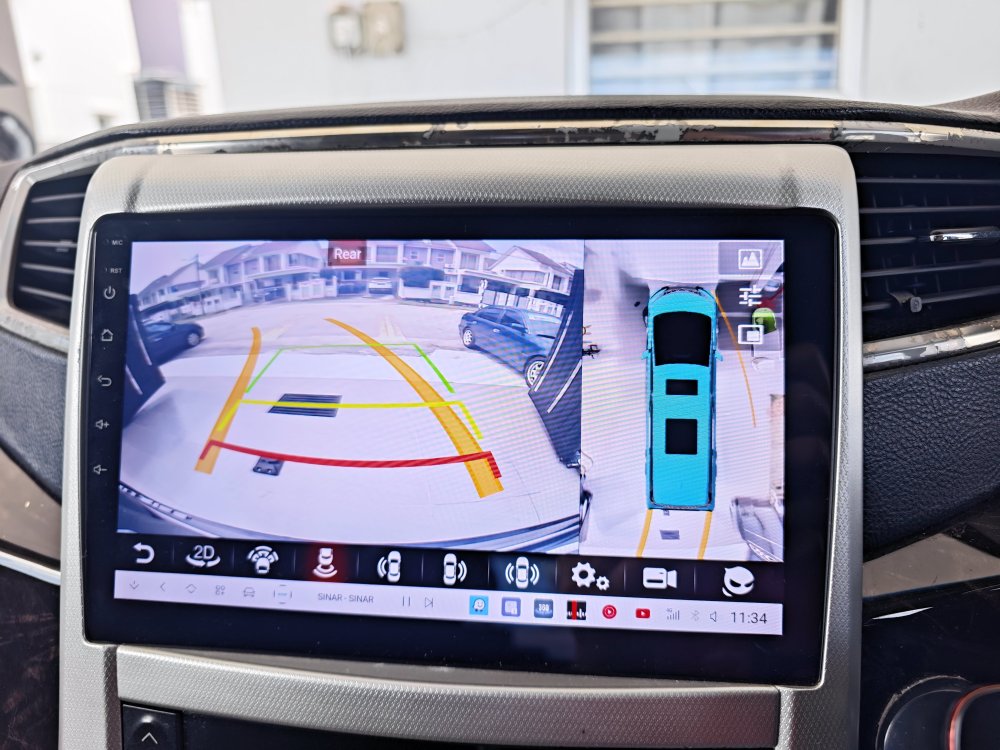
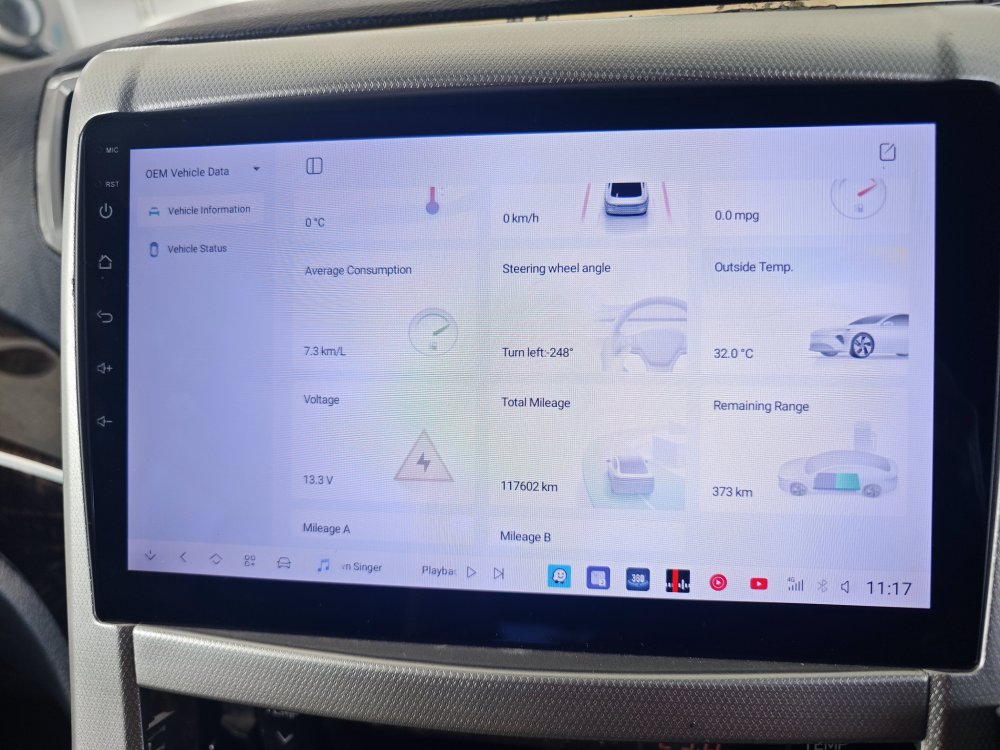
4 pointsHi everyone. I installed android player to my car since 2022. Before this I never bother about the extra function using canbus box because my car didn't come with 18 unit speaker. Last year I make a study about the function of canbus and make some modification. 1) I bought the socket for meter 40pin. This socket connect to canbus box and HU. Original for other car. 2) I change the connection point to 13&14 follow the diagram 3) then I bought canbus Toyota from raise. 4) after that setting the HU You can get information like - parking trajectory - door information - parking radar - outdoor temperature - millage odometer - average consumption
 4 points
 -
4 pointsI couldn't find a definitive video or explanation on YouTube on how to change the interior light bulbs in the car. Apologies if this has been done to death but I couldn't find an explanation on getting to the bulbs. All the bulbs I found below were 12v8w w5w type bulbs. Sunshade mirror vanity lights. Left edge with a nail file or fine screwdriver to push the clip before pulling out the grey assembly with the bulb. Bulb is facing sideways. Pull out bulb and replace. This seemed to be the only one needing the grey assembly to be pulled out. Central lights between sunshades. Prise off the clear plastic starting from the top. You'll see the silhouette on the edge where the plastic holds onto the plastic. Bulb facing you. Pull out and replace. Light next to 2nd row and third row seats. Prise off the clear light reflector from the top using a fine screwdriver or flat spectacles screwdriver. Bulb faces you. Pull out and replace.
 4 points
 -
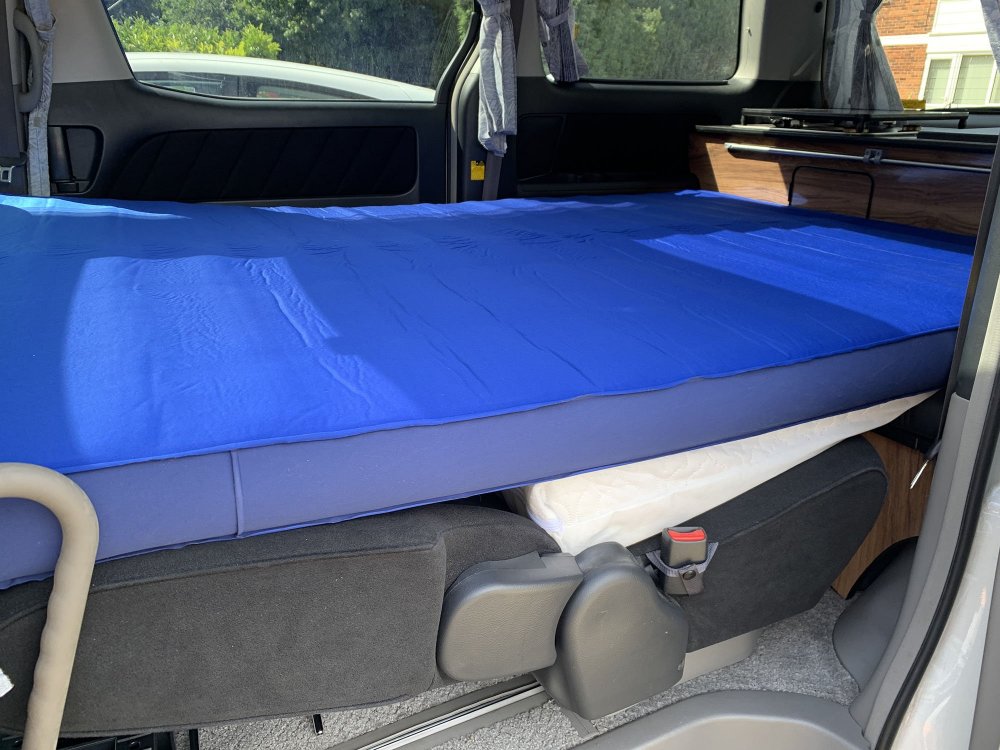
Got away this weekend for the first time in myself converted budget 2004 4wd v6 alphie. Spent less than 1500 aud fitting ot out. Flipped the passenger seat, installed a bed at the height of the rear seat side rails (32cm of clearance underneath) which hinges up into a forward or a rearward facing sofa (hooked up to what used to be the grab rails) 200ah lithium, 2k inverter, semi flexible roof solar, microwave, fridge, toilet, induction cooker. Pretty happy so far. Van has 85,000km. Only complaint is the fuel economy. Mine is a 4 speed and I gather the 5-speed Auto would have been more economical. But the whole van including the build has cost me 11k Australian, which is 6500 pounds. The 107 kph cruise control maximum is potentially annoying on the freeway but no freeway between my house and the beach 😊 I have posted previously about rotating the passenger seat without a swivel. I think this is the best way to do it. Because every time I sit in it I think if it was four centimeters higher I wouldn't be able to in either direction. It's so easy to just undo the four 14 millimeter bolts holding in the passenger seat and flip it around. You just need to drill two rivnuts into the seat base to secure the front tabs into what is now the rear of the seat base. Maybe it takes 2 minutes but I think two minutes every time you need to flip the seat might be better than an extra inch and a half of seat height in both directions just for the convenience of a swivel. Hoping this is the first of many weekend getaways in the Alfie 😊
 3 points
 -
3 pointsOpen a Nationwide Flex plus current account. No need to transfer your existing account, just open it and pay the monthly fee of £12. Included with the account is full personal AA European breakdown cover with no age restriction on the vehicle, and Alphards are well within the size and weight limits. If you open it as a joint account you both get personal AA cover but still just £12 a month. It also has travel insurance and mobile phone insurance as well. If you are planning long stints abroad it might not be suitable. If you get quotes for European breakdown cover you may find it is vastly more expensive than the current account fee. I found I struggled to find a quote at a price I was willing to pay because mine is over 20 years old. If I recall correctly I would have had to pay more to get just 10 days breakdown cover to drive in the Republic of Ireland than the cost of the current account for a year.3 points
-
We have the complete list of wiring diagrams for up to the 2008 series Alphard both models. Same wiring on both the hybrid and non hybrid. SRS.pdf Smart Entry and Start System Wireless Door Control lock.pdf Smart Entry and Start System Steering Lock.pdf Smart Entry and Start System push start button.pdf Smart Entry and Start System - Immobiliser.pdf Smart Entry and Start System.pdf Seat Belt Warning.pdf Rear number 1 seat.pdf Front Passengers seat.pdf Drivers Power Seat.pdf Power outlet.pdf Internal Lighting.pdf Illumination.pdf Combination Meter.pdf Backup Light.pdf AC.pdf Door Control Wiring.pdf Parking Assist.pdf sound system.pdf3 points
-
3 pointsI just wanted to give a shout out to DYERNOSTICS, near Bodmin. Our head gasket (2.4L, 2007) went a couple of months ago and Dyernostics was one of the only local places happy to look at it. They were extremely knowledgeable about the Alphard and gave us some great advice about general maintenance. The repair came in on budget and on time, they kept us up to date throughout and they even fixed some other little niggles on the way. A nice chap and highly recommended. I will be using them for services from now on. Jobs a good’un.3 points
-
3 pointsCould be worth getting a new radiator cap. The coolant is released into the expansion tank as the engine warms up, and is drawn back in when it cools. However, if the cap is not sealing properly when the engine is not fully up to temperature it will spit hot water out until the cap seals.3 points
-
3 pointsGenuinely impressed with the main dealer service at Toyota Cambridge today. As someone who owned a Lexus for years, I’ve come to expect a high standard—and honestly, Toyota matched it. Not too surprising given they share the same site and team, but still, credit where it’s due. I booked it in for an interim service, but they went ahead and did the full service at no extra cost (including spark plugs). They also changed the rear diff and transaxle oils, and were upfront about not doing the gearbox oil because it’s a bigger job that needs the sump removed and filters replaced (just like someone mentioned in my earlier post); but told me to pop in during the week when they have more staff and they’d do it for £135! For some reason, my two local garages wanted approx £680 for the job, excluding the diff/axle oils. Toyota charged £430 for everything excluding gearbox oils. Their full service is normally £425, but with the rear oils and other small bits I’ve asked it should’ve been around £600 or so. All in all, very impressed with the dealer—and I’ll definitely be using them again for all my Alphard jobs. I’m more impressed at how cheap the service is in comparison to my previous Volvos and BMWs that would’ve charged me north of £700+ for a full service.3 points
-
Renewed with Adrian Flux a couple of weeks ago. £40 less than my first year (last year) That was a surprise! Graham3 points
-
3 pointsHi. I have put a couple of posts on here a while ago. I had a towbar fitted which cost about £400 (an Alphard needs something a bit bespoke which my fitter ordered from somewhere in Sheffield). I then bought a secondhand Thule 2 bikerack off ebay. It cost £80. It isn't the tilt type, but works very well, and I just accept I can't open the tailgate without taking the bikes off - I don't need to remove the carrier itself, since it has a foldable frame. The bike rack also doubles as a luggage carrier. Without the bikes on, I can attach a large Fiamma luggage bag which fits a huge amount of stuff. £40 off ebay.3 points
-
Great news! My Alphard just passed its MOT. To celebrate, I've created a tutorial video on how to properly install the rear fog lamp using the OEM stalk and relay. This guide is specifically for second-gen Alphards, but based on feedback from first-gen owners, the process should be similar. This project took me months of research and gathering information from various sources. Since I couldn't find a single comprehensive video covering all the steps, I decided to make one myself. I hope this video is helpful to the entire Alphard community. Please like, share, and subscribe to help spread the word!3 points
-
Just uploaded a drive-and-talk in the 20 Series (with timestamps as the video is 54 mins long). I cover some FAQs and things like V6 fuel economy, why I went for 4WD and not FWD, why I avoided the 'low mileage' traps and so on. I also cover a couple of specific gremlins I’m struggling with, like the auto high-beam sensitivity. Would be awesome if any knowledgeable folks that can answer some of these questions. Thanks for the support2 points
-
2 pointsAll is well, new blades arrived via eBay very speedily & rear fitted no problem. Supplier Heyner UK Ltd. All look very good quality, price £25.972 points
-
2 pointsA "3 month warranty" is almost meaningless. You need to understand exactly what is covered, and what is NOT. Should an issue be identified; who pays the bill ? The vendor, some warranty company, or you (then you make a claim for reimbursement). It would also be helpful to understand who would actually undertake the work.2 points
-
2 pointsPrime selection 2 is just marketing gibberish for some coloured trim, upholstery or tinted headlights. The 240s part is what counts, so it's a standard model. Models for the 240 are 240x basic model 240s standard 240g high spec I would say at this point (2025) this couldn't really be more than £10k, unless it's been really well looked after and had something to make it stand out from the others, at this point adding a few k and buying a 30 series is realistic. Consider i bought a 350G for £12k in 20212 points
-
2 pointsnever heard of an alphard flywheel going. usually happens on manual cars and especially manual diesel cars from poor driving habits and quick shifting to save fuel.2 points
-
To the top three modules is not so difficult to get access but is one more module underneath and you need to take inverter out of the car completely. My advice take some pictures step by step and it will be much easier to put everything back together, put all screws separately do not mixed up. For me it took one day no rushing. Also check other parts where needed cooling paste.2 points
-
2 pointsI’ll add my twopenn’orth… sitting in the sun in Merville-plage in Normandy at “aperitif” time a glass of local, olives, almonds, radishes from the market, smug grin left out of the pic!
 2 points
 -
2 points
-
2 pointsOk, so I cheated and detached the cup support on the replacement and it was a simple click into place job. I didn't fancy having to take the lower dashboard / console apart, at least not today.2 points
-
Hi, new to the forum. I've had multi insurance with LV for years but they would not insure my Alphard. Went with Admiral. £211 fully comp for me and my wife. We live in the North of Scotland, 2004, 2.4.2 points
-
2 pointsHi there! That job appears to not be one for the faint hearted regarding wiring and electrical work! There are a few threads covering people's adventures with it. Especially on the theatre sound with the 18 speakers, the original system has LOTS of features that the aftermarket look to not have included. In my case, I'm not brave enough to delve in, but Google translate is our friend! And we're now getting used to where most buttons are, and do, on the sub menus. The phone will Bluetooth stream music to it, and hands free telephone. We have a separate sat nav, and being not so young we don't really have a great need of other apps on the car rather than our phones. However I do appreciate many people like the modern appearance, and enjoy the challenge2 points
-
Looks like the third from the bottom. I hope this helps.2 points
-
2 pointsPower output sockets are 110v ac 1500w max, american style 2 pin plug. To use engine must be on, READY light on, 110v select push button, to the right of the steering wheel, push in and the advisory light in the switch will light. Use a continental adaptor to charge phone, laptop, air fryer, induction hob etc with regard to max power and voltage applicable.2 points
-
2 pointsHello Kathryn you will have no problems sourcing parts for your alphard most toyota dealers dont like imports or dont have the look up system i have the jdm look up system i help lots of members on here with part no.s and point in right direction with links where to buy from your more than welcome to message me anytime you want i will always reply with part no.s and will give you links on where to get your parts from and will be able to save you a lot of money.2 points
-
2 pointsHi all. After trying unsuccessfully to find someone to supply and code a replacement fob for my Vellfire I thought I would just do it myself. I bought a used key on eBay and to my surprise the diagnostic tool at my work successfully coded it. I also managed to access all the customised options, so I now have silent electric doors and full window opening / closing on the fobs. It’s amazing how many options etc you can change / customise on these cars. If anyone needs help doing this around Bristol, feel free to drop me a message.2 points
-
2 pointsHybrid Battery Repair in Glasgow: https://hybridbatteryrepair.co.uk/contact/ His name is Fraser, and he is excellent. He knows the Alphard hybrid battery system very well. I used him a couple of years ago to replace my cells with upgraded ones. He has a very detailed diagnostic program, and he is very experienced with Alphards specifically. Best of all, I found him to be a very genuine, honest and trustworthy man. I think the quote above of £1750 is probably accurate, as I paid £1600 a couple of years ago. However, he will first run his diagnostics and then let you know his assessment and what your options are. I hope this helps to have an opinion from someone here in Scotland who has used him.2 points
-
2 pointsThey are great cars indeed. Perfectly practical, powerful, gracious and expensive on fuel lol. But a 1st class ride was never the cheapest.2 points
-
2 pointsHi all, Our 2005 AH10 G Facelift, アビー has just had her first set of replacement blades since she came to us. After doing several searches online, we found a company that specialises in identifying blades for non-UK models. In our case we wanted to keep the original front blade design so that アビー maintained her original looks. I can now confirm that the following blades will fit: Front, Bosch Super Plus, SP16 = 16" or 400mm Passenger side. Front, Bosch Super Plus, SP26 = 26" 0r 650mm Drivers side. Rear, Bosch Rear, H409 = 16" or 400mm2 points
-
Mine is a 2013 Vellfire Gazoo Sport Edition with 18 speakers. I have also removed the original screen to replace it with android screen. I also linked the purple and brown wires together to get the audio working through the toyota amplifier. Thank you fir the great tip.
 2 points
 -
2 pointsDo you know what model trim level you have ? AT, AS, etc. Otherwise send your VIN or registration to Picasso (by Private Message if you prefer) and ask him to search for your model number. I don't think, imho, insurance companies are over interested in tyre wheel combinations provided they are close to the OEM, and not the cause of an accident. However wheel offset is important. The offset is normally stamped on the inside of the wheel; convenient, I know. I'll check the handbook for 17 inch wheels, and get back to you.2 points
-
2 pointsGreat song, but I digress already! Had the new to me experience yesterday of bringing up the low fuel light. I blame the incident on me not having had a decent drive in the old bus due to other issues. Off I went with my £20 voucher for butcher meat from a known good butcher in the wilds of West Stirlingshire. After a few miles I realised tank was rather low but I knew where the only station for miles was so pressed on. Imagine my delight to find it closed for major refurb. I'm 13 miles from my nearest station so a very light footed journey commenced. 10 miles later low fuel light comes on, totally new experience for me in van. So, I make it to station & she takes 61 ltrs, another 1st, but having now found out tank capacity is 70 ltrs I am brimming with knowledge. Not that I’m going to make it a habit but I reckon a 2.4 petrol should give you 40-50 miles after low fuel lamp comes on.2 points
-
looking at your photo this Alphard has not been lowered so its standard suspension lot of owners in uk regret buying lowered Alphard's as we got lots of speed bumps and pot holes on our roads and to put a Alphard back to standard Hight your looking at £1200 British pounds2 points
-
2 pointsIt looks like the HU Ombak has is a Mekede Tech model - probably a DUDU 6 or 7. Mekede also own a software development company so are usually ahead of the game for updates etc. This is the brand I've been looking at as they advertise it covers the original HU functions, so ordered the 10.36 inch model from their UK Amazon store (for less that it cost to buy from AliExpress....) they contacted me and offered a better 11" unit C/W with fascia and real buttons/knobs, but it turned out to be nearly twice the price (@£1079), so will re-order the one for £569 (which is the same size as Ombak's), and order the correct fascia from AliExpress (circa £24). Note: (only) if you have the 18 speaker sound system you will also need a combined MOST and CANBUS adapter which range from £90 to £120 from AliExpress. The DUDU7 models have a USB C port on the back which can feed an external display/touch panel - plan is to feed the roof monitor via this: will see how that goes.2 points
-
2 pointsJust a thought, but have you tried cleaning up the inside of the battery terminal clamps, and wherever the battery negative lead connects to the body? They could be oxidized and causing a volt drop when trying to provide cranking current. Putting the starter pack on could bypass where the problem connection is, and hence why you get an instant start.2 points
-
2 pointsAbsolutely superb job you're doing there, especially with the outdoor aspect!!2 points
-
2 pointskseal can block other parts of the heating system, always best to find where the leak is. If there is plenty of coolant in the rad, and you can see it moving when cold with the cap off, then it could be blocked in the heater matrix. You need to warm it up then check the small hoses, feed/return, that are connected to the matrix near the bulkhead, if they are both warm then the valve is working, and you have flow through the matrix, if not then the valve is not working or blocked. If you have flow through then the other cause could be the air flap control disc is faulty, a known fault, it is situated behind the dash low down, above and to the left of the parking brake, a disc from an Avensis control will fit, but both units need stripping down and the discs swopping2 points
-
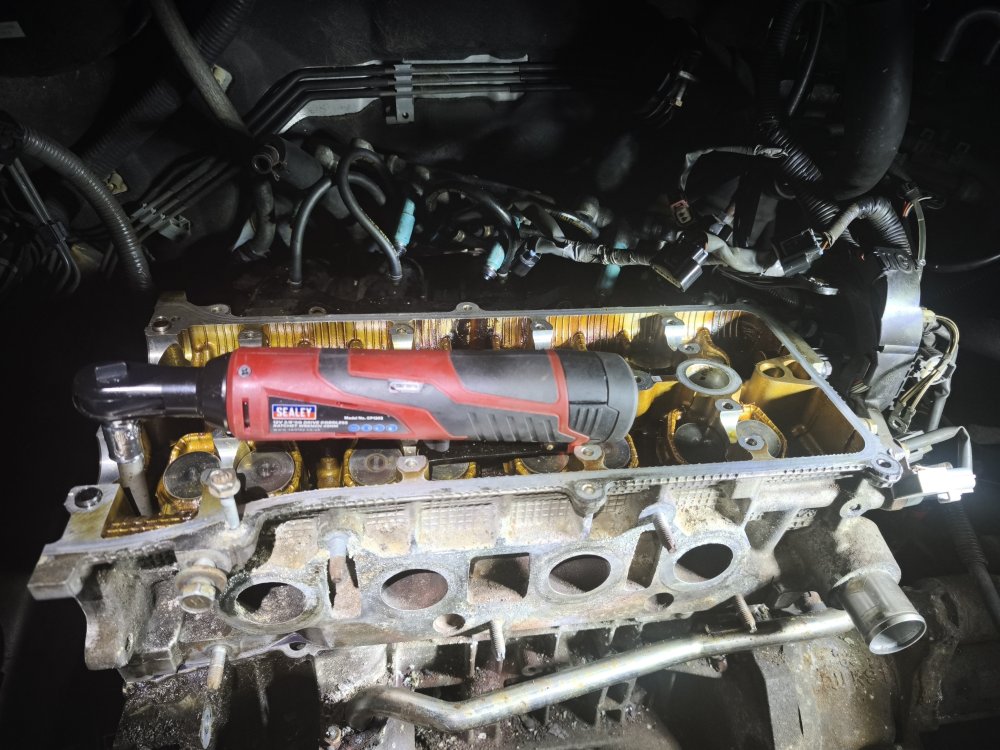
2 pointsDay 13 - 2 hours So I spent a lot of time waiting for parts. When I was ready to install the head bolts. I realised that the new ones didn't come with washers and I'd thrown away the old😂. Didn't want to risk buying something similar and decided to ask Toyota. It was about £2.50 per washer but £28.99 delivery! I emailed asking them if they could get me a better deal on the delivery but after 3 days I had no reply. So I ordered from Amayama. It took about 3 weeks but only cost £16.90 inc delivery! Great service. I spent the first hour checking that my holes were clear or debris and oil. Then confirming that my holes were deep enough. Gave the head and block a final clean. Fitted the gasket and head. Greased the washer and thread of each bolt with engine oil. Torqued to 30 - 42- 55 - 70. In the order in the images. Final 90 degree turn in the same order. Feel like I'm on the home straight. Time for bed now.


 2 points
 -
2 pointsMaybe somebody that works there is called Tanya and thats why. (its ok, i have your back lol)2 points
-
2 points
-
2 points@Simbad For future reference, those side panels of the steering wheel are actually really easy to remove when you know how. I struggled to get the first one off and then realised how it should be done. The ideal tool is a thin metal spudger (I use the blunt end to avoid any risk of scratches). There is actually only one clip holding it in place, and it's in the centre of the front edge of each panel (nearest the driver's seat). All you need to do is shove the spudger straight in at that point, then bend it towards the driver's seat slightly so that the clip bends a little bit, just enough for its lip to clear the opening. Here, I made a video.2 points
-
2 pointshi check this link Car Radio For Toyota Vellfire Alphard H20 2008-2014 CarPlay AndroidAuto Automotive multimedia Tesla Style Bluetooth 4G GPS WIFI - AliExpress 342 points
-
Late update. The bridging works perfectly. The challenge now is where to find the OEM rear monitor or someone in NZ can repair it. Thanks @Tama from fiji
 2 points
 -
Just like to give a big thumbs up to Drive Japan Ltd in Cumbernauld/ Glasgow area. Went to look at a Black 2011 Vellfire and after arriving got to see other stunning condition low mileage and certificated vehicles. No pressure at all from the dealer,left me alone to go in out and through the vehicles he had in stock ,all were in stunning condition and lower than normal mileage Though sorely tempted by the original I fell for another Vellfire that after test driving was coming home with us. So a big thankyou to Carlos and his Mrs for making the viewing a pleasure and the coffee was good too. So if your in the area and looking for a super clean beautifully presented vehicle give Drive Japan a visit,you wont be wasting your time.2 points
-
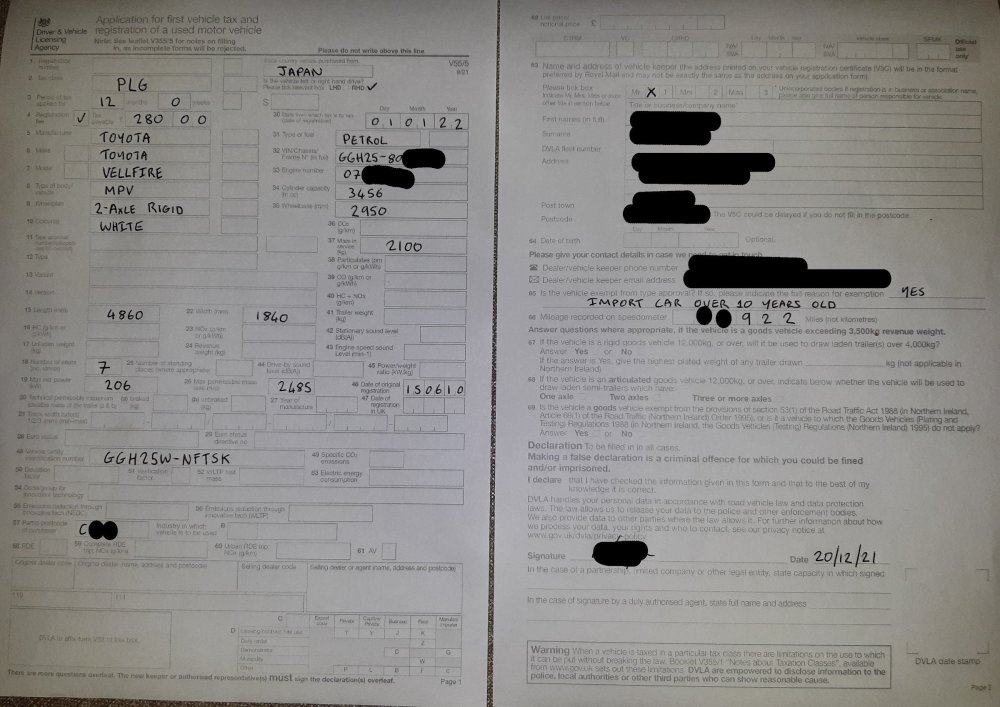
You don't have to answer those. There is no EU compliant emissions testing, these are not Type approved vehicles. I just gave them supporting documentation for proof of age, being the export Japanese export certificate, and an MOT certificate which was done under the chassis number. Included a cheque for the registration fee and 12 months tax. And 2 weeks later a V5C came though the post! It was amazingly easy to be fair! This is how I filled out my form.... And I sent it with all these docs.... And I got a V5C back like this!
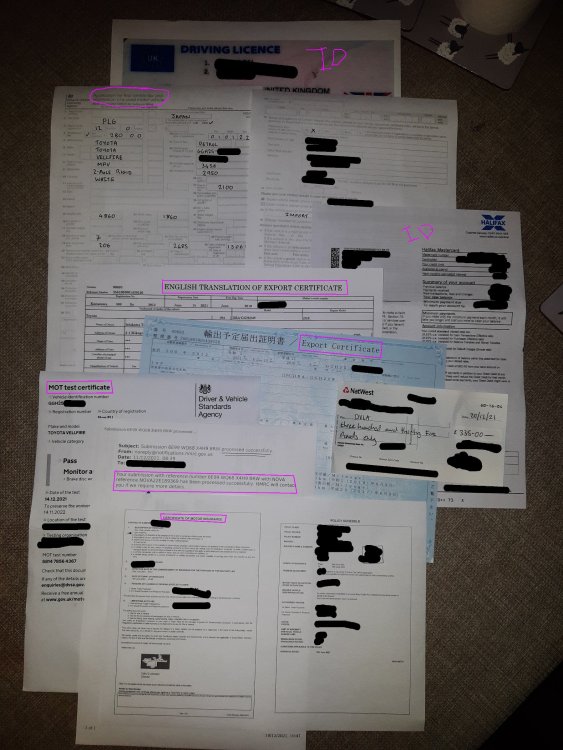
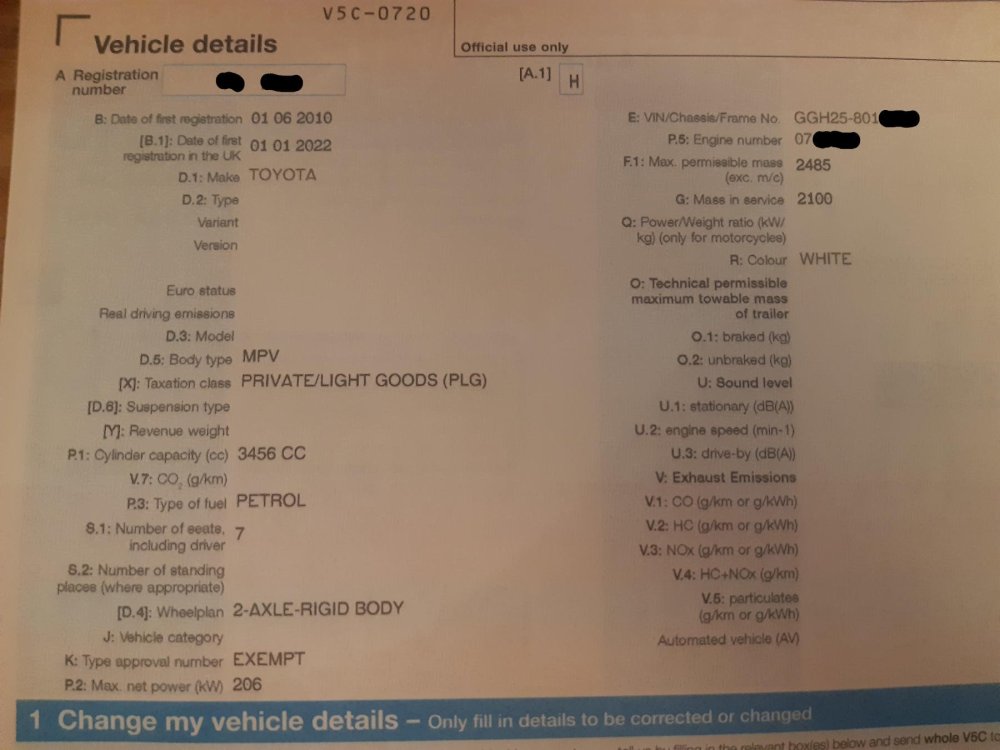 2 points
 -
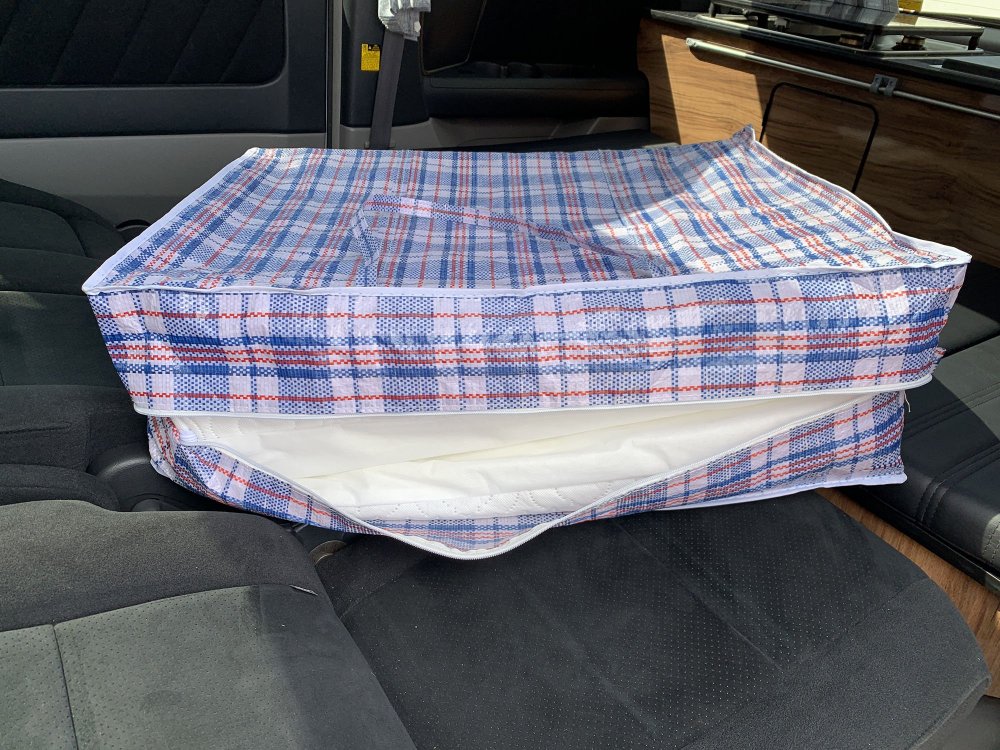
Hi Mark, Here's some photos showing the wedge pillows in place, self inflating camping mat on top, plus the laundry bag which fit the wedge pillows perfectly. Note, you'll see a gap between the thick end of the wedge and the seat back, we sleep with our heads at the back end, it's only our legs lying on that bit, so very little weight pressing down and with a good self inflating camping mat on top it feels pretty flat to me, and believe me, I'm a fussy sleeper! Just for your reference, I'm 6'1".
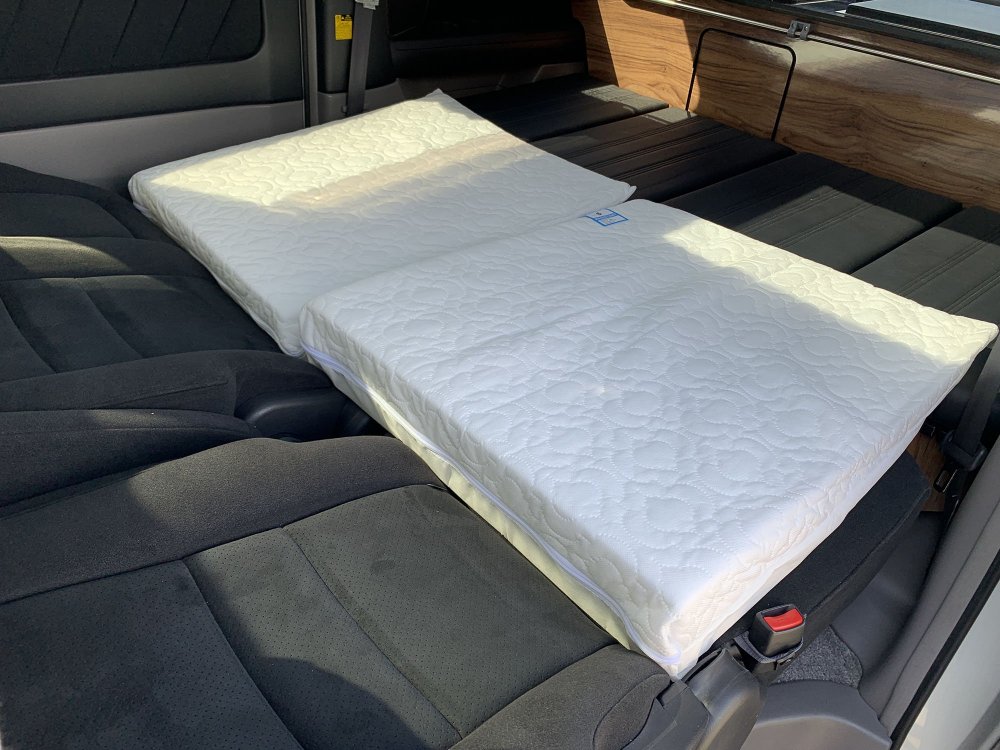
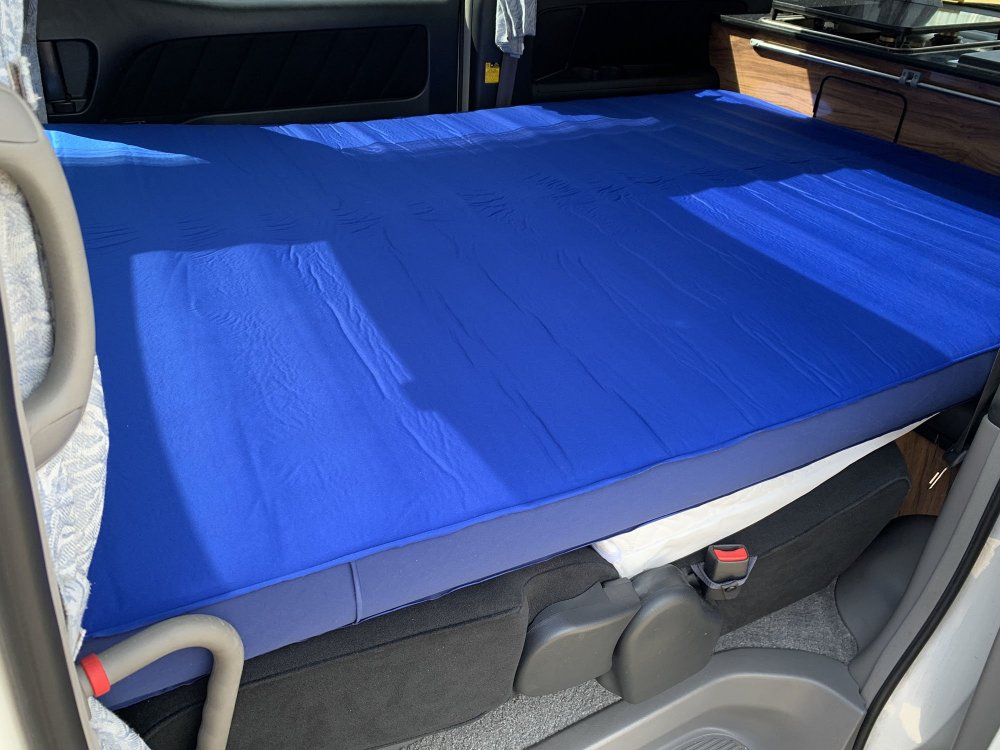
 2 points
 -
The answer unfortunately is no. However, there is an option to have Apple car play or Android Audio installed without affecting any of your original audio system and can be installed by Ben Hau (no affiliation to The Alphard Club) Below is a video showing how this can be done. Another option is to have a new audio system replaced which can be down from around £300 which will mean a new head unit with the latest Apple or Android Software with Maps etc.2 points