Leaderboard
-
Matt.4877
Authorised Trader7Points51Posts -
grumpy grandad
Members3Points14Posts -
Alphard Club
Administrators3Points593Posts -
Hillclimber
Members2Points46Posts


Popular Content
Showing content with the highest reputation since 01/03/2026 in all areas
-
3 pointsgot round to fitting winter mats. They heavy duty and fit perfect


 3 points
 -
2 pointsThe Alphy will be going to my local specialist about April time, for a service, MOT and sort a couple of issues. I'll get them to check the campervan specific wiring and confirm if this switch is indeed an isolator for the heater. Thanks Gamith for your feedback and for giving me the trigger to look at other things, not just the heater itself.2 points
-
1 pointYes, they can be adjusted slightly (5 levels of activation). I usually do this via 'carscanner' app and a obd2 Bluetooth adaptor.1 point
-
1 pointthis was answered in https://uk.alphardclub.com/forums/topic/8785-20-series-documents/1 point
-
1 pointThanks... Didn't end up being to go that far, I used a very small screw and replaced the tiny bit of plastic with that and working well again1 point
-
1 pointIf it's a factory fitted unit have you tried amayama.com? Postage takes a while but if you put in your vehicle details it will tell you which part numbers you need.1 point
-
1 pointYes ours has the footwell lights, but just one colour, kind of amber, and the door mounted puddle lights. But not the door cubby ones! As you say, get the company who you bought it from to sort those fog lights!1 point
-
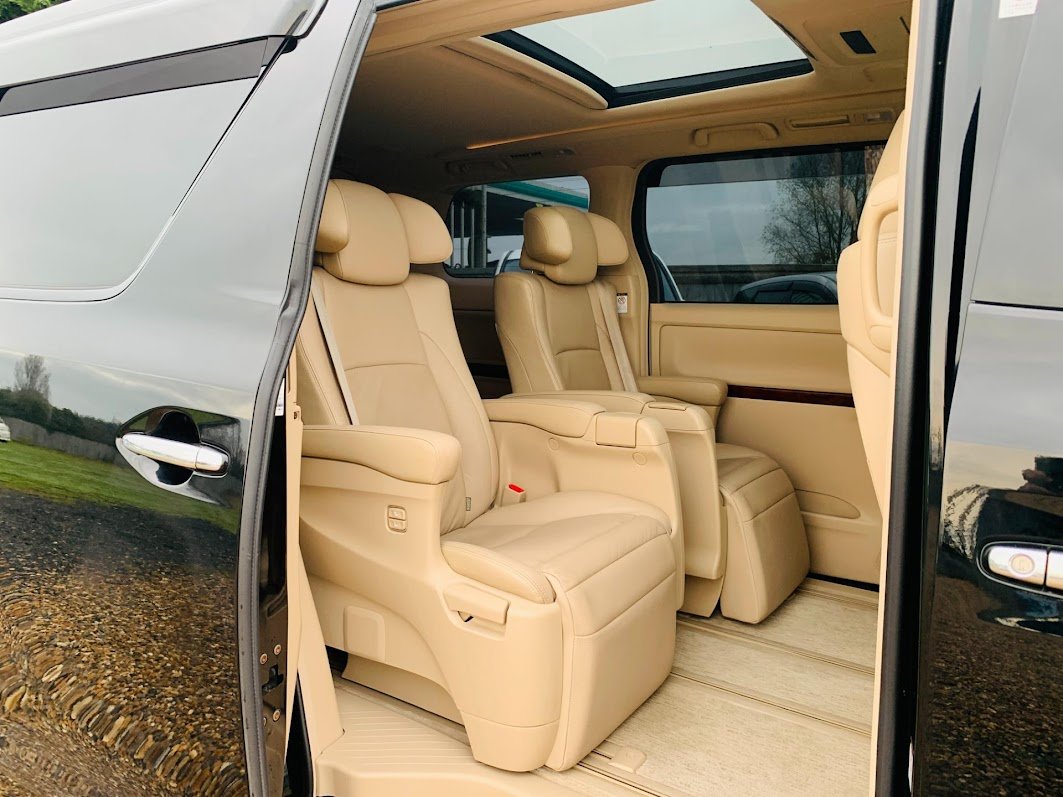
1 pointThese are so nice. I have at the moment the silkblaze artina fabric mats and these would be great addition for winter.1 point
-
1 pointThought it would be fun to add a japanese theme get yours by selecting it top right of this screen and press the Pill shaped button and choose the theme.. all just for fun!
 1 point
 -
Will check in a bit for you your profile says you got 2.4 vin no. Given is 3.0 you will wrong help and advice from members do you know how to change your profile to correct vehicle or do you want me to do it for you1 point
-
1 point
-
1 pointI think that would be my preference, see how it goes and replace if it gives me trouble again relatively soon.1 point
-
1 point£40 That's nearly half a tank of petrol or 50miles in my 3 litre beast.🤣 But.......... At least the EML is still off. I wonder if sorting the MAF out will improve my MPG / GPM.🤔1 point
-
1 pointMy life has always been a long sequence of operator error 🤣. I did have to download the manual and I'm too tight to print it so electronic copy only. Printing a whole manual is pretty impressive, did you need 150 double sided A4 or did you accidentally press multiple copies😁, I've done that. Thanks for your support Bignev, it's much appreciated. I will update whenever I get a solution. Take care Bud.😉1 point
-
I read you say not tyre balance, but have YOU had the rears double checked?1 point
-
it has been mentioned by myself, Torque converter on the Alphard retains: ~40–50% of the total ATF If you have the time to do it yourself you can do a 2nd flush, they dont use that much fluid just from the pan 2-3 litres1 point
-
1 pointHello everyone, I recently bought a 2012 Toyota vellfire and I am really loving this vehicle. One thing I am concerned about is the corrosion of the undercarriage as I have read that in Japan the manufacturers do not treat the cars with any anti corrosive treatment. Has anyone had any issues with corrosion or can shed more light on this matter? Also, any recommendations around London for quality underseal?
 1 point
 -
1 pointJust checked. It’s from Tommy Kiara. It’s on the website. Silk Blaze do some nice stuff. Never bought wheels from them as i use Rays (volk) but glad you enjoying the car. :)1 point
-
Correct & did mention my engine size. The supplier could cover all Alphard auto boxes.1 point
-
1 pointThe car lived in and around East Tokyo. The car didnt sell at auction in August of last year. It was then put into fixed stock It’s because as i outlined, minimal preparation is provided usually. Undersealing is a cost, and Labour intensive to do it correctly. Reduces profit. Definitely do it, and clear seal it, on a ramp. Depends on the car you buy as an investment. I have personally done fine with cars (GT-Rs tho) as investments. Alphard/Vellfire. Best purchases are to use the car, and keep it in good condition (with associated maintenance)1 point
-
1 pointYes, I do too. Japan do not grit their roads so no need for protection. However we do we use salt unlike other european contries which actually use stone,rocks etc to grit. I would say as soon as you can Lanogaurd it. Also take some extra time to squirt it in the holes which is on the chasis.1 point
-
1 pointToyota uses high end galvanisation on the body work. It really is unecessary to underseal them. My mechanic has been servicing Alphards for 10 years or more and even the oldest ones show no signs of corrosion underneath. Unlke the bongos which rust like an LDV ;) I should add my Bongo needed rewelding underneath within 5 years of undersealing ...1 point
-
1 pointI remember talking to someone many years ago who had bought a Hillman Imp (I think) new, took it home and drilled a hole in each side pillar (and quite likely various other spots) and filled it with waxoyl - decades later the car was still in great condition.1 point
-
1 pointThe Nationwide cover is the same for breakdown. It covers the person, not the vehicle, and there are no restrictions on the vehicle that an Alphard driver need be concerned about.1 point
-
I do not doubt anything you've said, these superchargers are rare. It looks like a superb example, but I've gotten spoilt by the electric heated seats and comforts on the G spec. This vehicle will spoil whoever buys it, they won't be able to return to a bog standard 3.5l.1 point
-
Thought i would share the Gs advert from Japan for the Alphard.
 1 point
 -
1 pointWe used Tayna Batteries, excellent delivery and stock age, product support was very good. Optima red top battery RTR 3.7 product code 8035-255. Price in August 2025 £155:771 point
-
1 pointA Nationwide Flex plus account for £18 a month gives full personal European AA breakdown with no age (or import) restriction on the vehice being used. It also gives Aviva travel insurance and there is gadget insurance as well.1 point
-
I have been before, its low on the front of the entrance. Should be Ok to clear it. my grumbles with it - attendance was ok (i was actually in my R34GTR) and took the trip up from Essex. you have to pre-book your space Inside the location / pub, the service is really slow (just my experience) regarding the drinks / food if you just around in the carpark (and not table service). From memory its £5 from your ticket towards your food, but people were having issues with barcodes scanning pleased i went, but TBH i wont be going again.1 point
-
2012 ANH20 2.4 non Hybrid Just as another reference, I just replaced by original factory fit Yuasa Battery GS 90D23L with Bosch S4 026 Type 068 (70Ah 630cch) It fits like a glove ! Original Battery Dimension(appx): L230 x W170 x H200 Bosch S4 032 - 068 Stated Dimensions: L261 x W175 x H225 Its fits fine as the H225 relates to the top of the terminal , the actual height to the top surface is as original @ 200mm The tray easily accommodates this slightly Wider and longer battery no issue....... only thing is, the insulation wrap around card thing that you have from original , is for the bin !1 point
-
1 point
-
1 pointFitting a tow bar to a Toyota Alphard MNH10 (3.0L V6, 2002–2008) in the UK involves a specific legal procedure that you must address before picking up a wrench. Because these are "grey imports," standard UK towing laws apply differently than for UK-market cars. 1. The Legal Hurdle: VIN Plate & Towing WeightsMost imported Alphards do not have a Gross Train Weight (GTW) stamped on their VIN plate. The Risk: If your VIN plate does not show a GTW (the second biggest number on the plate), your legal towing limit is 0 kg. Towing a trailer in this state can void your insurance and is illegal. The Fix: You must get the vehicle "replated." A specialist engineering firm will calculate the safe capacity and issue a new, legal VIN sticker to stick over the old one. Recommended Specialist: SVTech (UK-based) is the standard go-to for this. Estimated Cost: Approx £150 – £170. Action: Check your VIN plate (passenger door pillar or under the bonnet). If the GTW field is blank, contact SVTech before towing. 2. Weight Limits & SpecificationsOnce legally replated, the 3.0L V6 MNH10 typically has these limits (using an online calculator): Towing Capacity (Braked): 1,600 kg – 1,800 kg (Dependent on the replating certificate). Towing Capacity (Unbraked): 750 kg. Nose Weight (Vertical Load): 75 kg. Note: The rear suspension is soft. If you tow near the limit, the rear will sag. Many owners fit "assister springs" (e.g., from Grayston) inside the rear coil springs to stiffen the ride. Kerb Weight: ~1,900 – 2,000 kg. 3. Mechanical Fitting ProcedureTime: 2–3 hours | Difficulty: Moderate DIY Key Note: The tow bar usually replaces the rear crash beam. You will remove the crash beam and not refit it. Tools: Socket set (10, 12, 14, 17, 19mm) + Extension bars. Torque Wrench (essential). Jigsaw or Padsaw (for bumper cut). Drill with 12.5mm metal bit. Step-by-Step: Preparation: Lower and remove the spare wheel to clear the work area. Exhaust: Detach the rear exhaust rubber hangers. You don't need to remove the exhaust, just lower it enough to work above it. Remove Towing Eye: Remove the factory towing eye (usually held by 4 bolts) from the chassis rail. This will not be refitted. Chassis Access: The mounting points are pre-drilled in the chassis rails but may be covered by tape or underseal. Drilling: Some kits (like Tow-Trust) require you to drill through the outer face of the chassis rail, using the existing inner holes as a guide. Insert Spacers: Crucial Step. You must insert the metal spacer tubes into the chassis rails before bolting. If you forget these, tightening the bolts will crush the box-section of the chassis, causing structural damage. Mounting: Lift the tow bar crossbeam into place (ideally a 2-person lift). Insert bolts loosely. Bumper Cut: Most MNH10 tow bars require a cut on the underside of the bumper (non-visible from standing). Typical Dimensions: 90mm wide x 50mm deep. (Check your specific kit's manual to be sure). Tightening: Torque the bolts to the manufacturer's spec. If not specified, standard ISO ratings for M12 bolts are: Coarse Pitch (Standard): ~102 Nm Fine Pitch: ~111 Nm Reassembly: Raise the exhaust back onto its hangers. Winch the spare wheel back up (check it doesn't foul the new tow bar structure). 4. Electrical Wiring (The "Bypass" Requirement)The MNH10 uses an analogue lighting system, but it is sensitive. You cannot simply scotch-lock wires directly to the bulb holders without a relay, or you risk blowing the lighting control module. Required Kit: A "7-Way Universal Bypass Relay" wiring kit. Connection Point: The best access is behind the Nearside (Left) Rear interior trim panel. You will often find a Blue and White connector block here which carries the rear lighting feeds. Wiring Colors (Guide Only - Always Test with Multimeter): Earth: White/Black Stop: Green/White Tail: Green Indicator (Left): Green/Black Indicator (Right): Green/Yellow Tip: Use a multimeter or 12V test light to confirm these before cutting. Power Feed: You will need to run a dedicated 12V power feed from the battery (front) to the bypass relay (rear), fused near the battery. 5. Critical Consideration: Transmission CoolerThe 3.0L V6 (1MZ-FE engine) is paired with a specific automatic gearbox. The Risk: The radiator cools both the engine and the gearbox fluid. When towing, the gearbox fluid gets incredibly hot. The stock cooler is often insufficient for towing >750kg, leading to gearbox failure. The Fix: Fit an external Transmission Oil Cooler. This is a small radiator (approx £50-£80) that sits in front of your A/C condenser. It is cheap insurance against a £2,000 gearbox rebuild. Summary Checklist for UK OwnersCheck VIN: Is GTW stamped? If No -> Contact SVTech. Buy: Tow bar (e.g., Tow-Trust or PCT) + Universal Bypass Wiring Kit + Transmission Cooler. Install: Remember the chassis spacers and the torque settings (100Nm+). Test: Verify lights and ensure the spare wheel is secure. Oil Cooler For the Toyota Alphard 3.0L V6 (MNH10), you specifically need an Auxiliary Air-to-Oil Transmission Cooler. Do not buy a "standard replacement" transmission cooler from a general parts site (like AutoDoc or Euro Car Parts). Those are usually the stock water-cooled units that fit inside the radiator—they are what you already have, and they are not sufficient for towing. You need an external radiator kit that sits in front of your air conditioning condenser to provide extra cooling. 1. Recommended Kit & SpecificationFor the Alphard V6 towing up to 1,600kg, the "Gold Standard" specification is: Brand: Mocal (highly reliable, UK standard) or Setrab. Size: 13-Row or 16-Row (13-row is standard, 16-row is better for heavy caravans). Width: 235mm (Standard width, fits easily behind the Alphard grille). Hose Size: Typically 10mm (3/8") for Toyota transmission lines (check this on your van before ordering). 2. Where to Buy in the UKOption A: The Specialist (Best Quality)These suppliers sell complete "Universal" kits that include the cooler, hoses, mounting brackets, and clamps. Demon Tweeks (Wrexham / Online): Look for "Mocal Universal Oil Cooler Kit". They are very helpful on the phone if you are unsure about fittings. Merlin Motorsport (Castle Combe): A dedicated race/performance shop. They stock Mocal and Setrab and sell the hose by the meter if you need extra length. Think Automotive (Isleworth): They are the actual manufacturers/distributors of Mocal products in the UK. If you call them and say "I need a transmission cooler kit for a 3.0L Toyota," they can build a kit with the exact right hose barbs. Option B: Budget / General (eBay & Amazon)You can find "Universal Transmission Cooler Kits" for £40–£60. Search for: "Universal Transmission Oil Cooler Kit 10mm". Brands: Hayden or Mishimoto are decent mid-range options. Warning: Avoid the very cheapest unbranded kits (<£30); the hoses are often low quality and can burst under pressure, which would destroy your gearbox in seconds. 3. What to Order (The Shopping List)If you are buying the parts individually, you need: The Cooler: 13-row or 16-row Mocal oil cooler. Fitting Kit: 4x Mounting brackets (often plastic ties that go through the radiator fins, or metal brackets). Hose: 2 meters of high-pressure transmission oil hose (10mm / 3/8" internal diameter). Joiners: You do not need complex screw fittings. You need barbed joiners to splice into the existing rubber hoses coming from the gearbox. 4. Installation TipThe Alphard V6 gearbox lines exit the gearbox and go into the bottom of the main water radiator. Correct Flow: You should plumb the new cooler in series after the main radiator. Route: Gearbox -> Main Radiator -> New Cooler -> Back to Gearbox. Why: This uses the water radiator to get the fluid up to temp quickly, and then the new air cooler sheds the excess heat before the fluid returns to the delicate gearbox mechanics. Correct Flow Positions & Tests For the Toyota Alphard MNH10 (V6), the transmission cooler lines are not consistently colour-coded or stamped "In/Out". Because guessing incorrectly can overheat your gearbox, you must confirm the flow direction physically. The only 100% safe way to identify the return line is the "Bucket Test". 1. The "Bucket Test" (Fail-Safe Method)You need to intercept the fluid after it leaves the main radiator but before it goes back to the gearbox. Locate the Hoses: Find the two rubber hoses connecting the gearbox to the bottom of the main radiator. Disconnect One: Disconnect one of these hoses at the radiator end. Prepare: Place the open end of the rubber hose into an empty bucket. Place a clear plastic tube (or just a finger/rag) over the open metal nozzle on the radiator to catch any fluid. The Test: Have a helper start the engine and immediately turn it off (run for 2–3 seconds max). Identify the Flow: Option A: If fluid spurts out of the Radiator Nozzle, that nozzle is the Feed (coming from the gearbox). The hose you are holding is the Return line. (This is the hose you want). Option B: If fluid spurts out of the Rubber Hose, that hose is the Feed from the gearbox. The radiator nozzle is the Return. Reconnect this hose and test the other one to be sure. 2. How to Plumb the New CoolerTo get the maximum cooling for towing, you should install the new cooler in Series (after the radiator). Correct Flow: Gearbox -> Main Radiator -> New Auxiliary Cooler -> Gearbox Why: The main radiator helps warm the fluid up quickly in winter, and the new cooler sheds the excess heat generated by towing before the fluid returns to the sensitive gearbox mechanics. Connection Steps: Identify the Return Hose using the test above (the one that carries fluid back to the gearbox). Disconnect this hose from the radiator. Connect the Radiator Output (where you just pulled the hose off) to the New Cooler Inlet. Connect the New Cooler Outlet to the original Return Hose (which goes back to the gearbox). 3. Parts ConfirmationHose Diameter: The MNH10 uses 10mm (3/8") internal diameter transmission hose. Clamps: Use proper fuel injection clamps (solid band), not the cheap worm-drive jubilee clips which can bite into the rubber and leak. Top Up: Installing a cooler adds volume to the system. You will likely need to add 0.5L – 1.0L of Toyota Type T-IV fluid (or equivalent JWS 3309 spec). Check the dipstick with the engine running and warm after installation.1 point
-
1 pointI couldn't find a definitive video or explanation on YouTube on how to change the interior light bulbs in the car. Apologies if this has been done to death but I couldn't find an explanation on getting to the bulbs. All the bulbs I found below were 12v8w w5w type bulbs. Sunshade mirror vanity lights. Left edge with a nail file or fine screwdriver to push the clip before pulling out the grey assembly with the bulb. Bulb is facing sideways. Pull out bulb and replace. This seemed to be the only one needing the grey assembly to be pulled out. Central lights between sunshades. Prise off the clear plastic starting from the top. You'll see the silhouette on the edge where the plastic holds onto the plastic. Bulb facing you. Pull out and replace. Light next to 2nd row and third row seats. Prise off the clear light reflector from the top using a fine screwdriver or flat spectacles screwdriver. Bulb faces you. Pull out and replace.
 1 point
 -
1 pointI'm a new owner of an 2013 Hybrid and i'm just searching relevant inf and documentation ref my model, so far i have the attached, if anyone else have any other, please share you never know when you need it maintenance-schedule.pdf auto-service-repair-manuals-and-wiring-diagrams-pr.pdf toyota-alphard-vellfire-em2441e-overall-electrical-wiring-diagram.pdf Toyota-ALPHARD-VELLFIRE-EM2441E-Relay-Locations-pdf.pdf Alphard-2-Vellfire-20-2008-2015-fuse-and-relay.pdf CAMSHAFT-VALVE-TOYOTA-ALPHARD-VELLFIRE-HV.pdf ALPHARD-VELLFIRE-Service-sheet.pdf hybrid-vehicle-dismantling-manual-for-ath20.pdf Alphard-20-Manual-pdf.pdf1 point
-
1 pointVery happy with mine, was unsure at first about ordering one looking at the online pictures, shipping costs the same as the cost of the protector. Mine was £82.24 delivered.
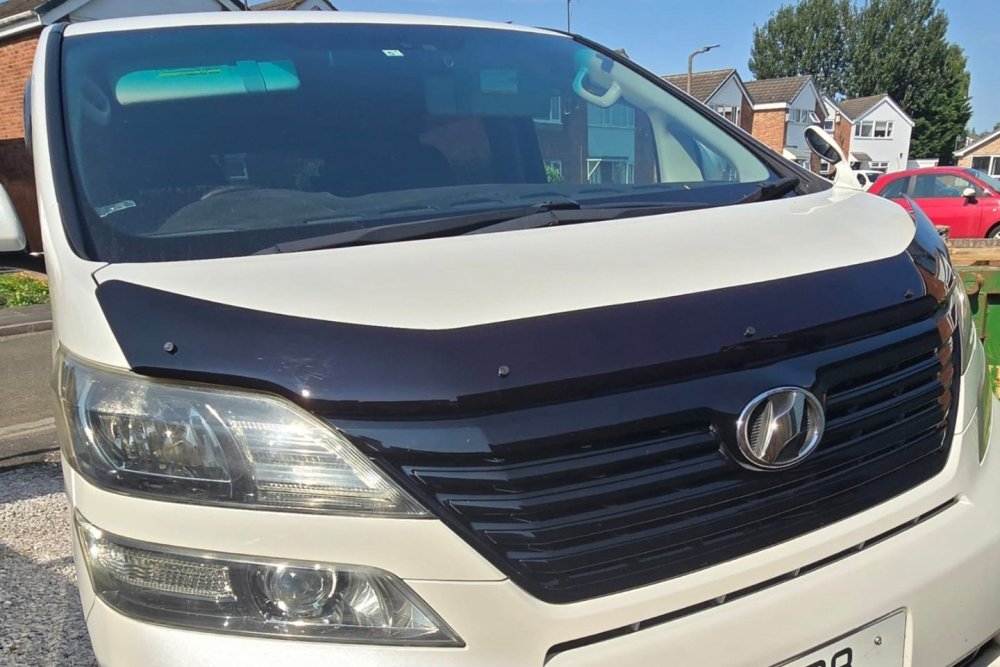 1 point
 -
0 pointsUse this link it will tell you if your air bag has been done you may need google translate to read it. https://www.toyota.co.jp/recall-search/dc/en/search0 points


